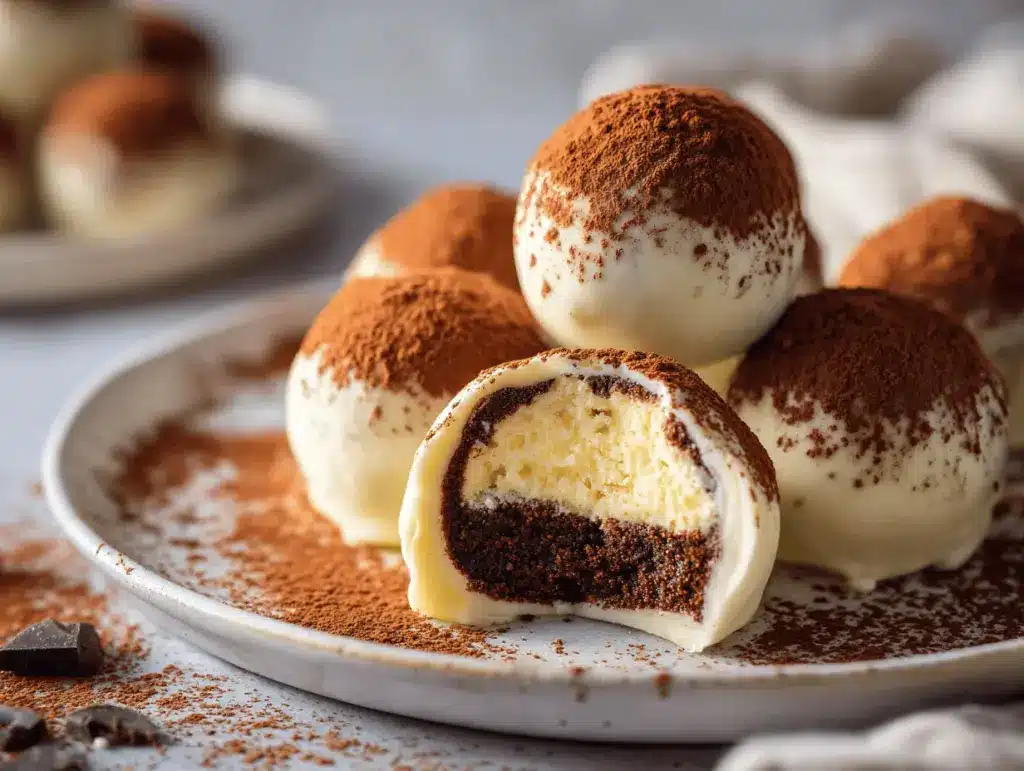
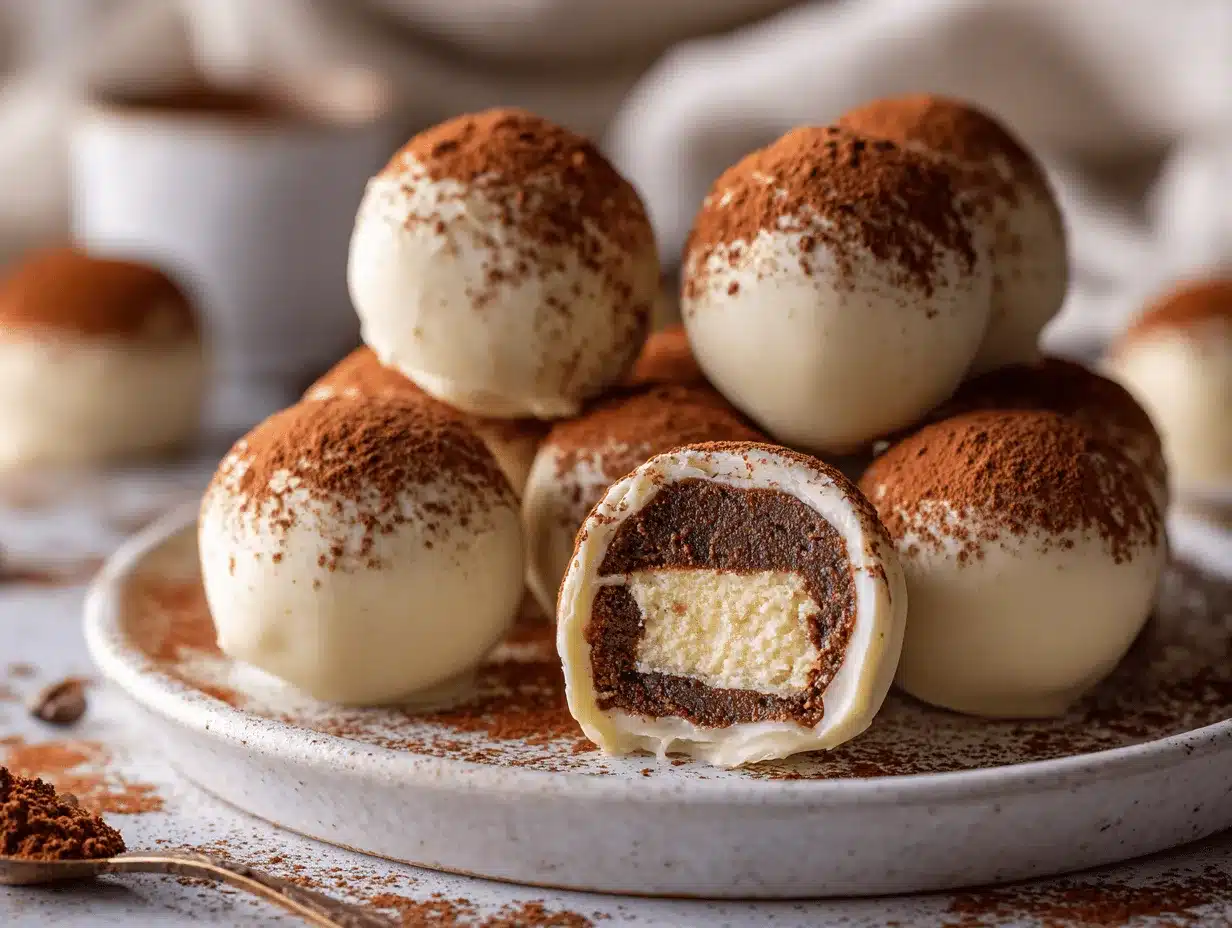
Creamy mascarpone, a whisper of espresso, and a dusting of cocoa—if that doesn’t make your mouth water, I don’t know what will. The first time I made tiramisu truffles, my kitchen smelled like an Italian café, and by the time I’d rolled the last truffle, I’d already eaten three (don’t judge!). This recipe for tiramisu truffles is pure magic—no baking, no fuss, just bite-sized luxury that’s almost too pretty to eat. But let’s be real; you’ll eat them anyway.
I discovered these little gems when I was looking for a show-stopping dessert for a girls’ night in. Traditional tiramisu is a classic, but sometimes you want something you can grab and go—without a fork or a plate. That’s where tiramisu truffles come in: all the flavor of the Italian favorite, wrapped up in a chocolatey shell. Honestly, I’ve tweaked this recipe more times than I can count, and it’s never failed to impress (even my picky aunt went back for seconds!).
These tiramisu truffles are perfect for parties, gifting, or just a little treat for yourself when you need a dose of decadence. They’re quick, require no oven, and can be made ahead—talk about convenience! Whether you’re a busy parent, a dessert lover, or someone trying to wow your next dinner guests, you’ll fall in love with this easy tiramisu truffles recipe. So, tie on your apron (or don’t—there’s barely any mess) and let’s roll up some luxury together!
Why You’ll Love This Tiramisu Truffles Recipe
- No Bake, No Fuss: Say goodbye to complicated dessert prep. These truffles come together in less than 30 minutes, and there’s no need to turn on the oven. Perfect for hot days or when you just can’t be bothered with baking.
- Simple, Readily Available Ingredients: If you’ve got a box of ladyfingers and a tub of mascarpone, you’re halfway there. The rest are pantry staples—nothing fancy required.
- Perfect for Entertaining: Whether it’s a brunch, a birthday, or a weeknight treat, tiramisu truffles always look impressive on a platter. I love making them for holiday parties—they disappear in seconds!
- Kid & Adult Approved: The espresso flavor is subtle enough that kids enjoy them (you can use decaf if you like), and adults appreciate the classic tiramisu taste in a fun, new form.
- Decadent Flavor, Dreamy Texture: Each bite is creamy, rich, and a little bit boozy (if you add the liqueur). The texture is just dreamy—like a cross between a truffle and a cloud.
What sets this tiramisu truffles recipe apart isn’t just the flavor—it’s the balance. I use just enough espresso to give that signature coffee kick, and a touch of liqueur for grown-up sophistication. Blending the mascarpone with crushed ladyfingers gives a melt-in-your-mouth bite. The chocolate shell? It cracks just perfectly when you take a bite—so satisfying!
I’ve tested countless versions, and this one nails the ratio. No soggy centers, no overpowering coffee, and not too sweet. It’s also super adaptable. If you want to skip the alcohol or make them gluten-free, you totally can. Honestly, I think these little truffles are the kind of treat you keep making because they check all the boxes: easy, impressive, and downright irresistible.
Trust me, once you try these tiramisu truffles, you won’t look back. They’re comfort food with a touch of elegance—just the thing when you want to treat yourself or impress your favorite people.
What Ingredients You Will Need
This recipe uses simple, high-quality ingredients to create an indulgent treat with all the classic tiramisu flavors, no oven required. Most of these are pantry staples or easy to find at any grocery store. Here’s what you’ll need to make tiramisu truffles:
- Ladyfingers (Savoiardi), crushed – about 7 oz / 200 g (dry, crisp Italian cookies; I use [Balocco] or [Vicenzovo] brands—they hold up well and have the perfect texture)
- Mascarpone cheese – 8 oz / 225 g (full-fat for creaminess; let it soften at room temp for easy mixing)
- Powdered sugar – 2/3 cup / 80 g (adds sweetness and keeps the filling smooth)
- Espresso or strong brewed coffee – 2 tbsp / 30 ml (cooled; use decaf if preferred)
- Dark rum or coffee liqueur – 1 tbsp / 15 ml (optional, but it gives that authentic tiramisu kick—Kahlúa or Marsala work too)
- Pure vanilla extract – 1 tsp / 5 ml (rounds out the flavor)
- Bittersweet or semisweet chocolate, chopped – 8 oz / 225 g (for coating; I like Ghirardelli or Lindt 60-70% cacao)
- Cocoa powder – for dusting (unsweetened Dutch process is best for a classic look and flavor)
Optional add-ins and swaps:
- Instant espresso powder: For extra coffee punch, add 1 tsp mixed into the mascarpone.
- Gluten-free ladyfingers: Works great for gluten-sensitive folks; look for Schär brand.
- Dairy-free mascarpone: Kite Hill makes a good almond-based version for dairy-free adaptations.
- White chocolate coating: For a sweeter, different twist—just swap for dark chocolate.
Ingredient tips: Make sure your mascarpone is not watery; if it is, drain off any liquid before mixing. If you can’t find ladyfingers, crisp vanilla wafers will do in a pinch, but the flavor will be a little different. For the espresso/coffee, use something you’d actually drink—no bitter instant coffee here, please!
Equipment Needed
- Mixing bowls: One large for the truffle base, one small for melting chocolate; glass or stainless steel both work (I’ve even used a big salad bowl when all my others were dirty—no shame!).
- Hand mixer or sturdy whisk: For blending the mascarpone, sugar, and espresso—if you’re feeling strong, a wooden spoon and some elbow grease will do.
- Food processor or plastic bag + rolling pin: For crushing ladyfingers; I’ve definitely used the bag-and-bash method on a stressful day—very therapeutic!
- Baking sheet or tray: To chill the rolled truffles; line it with parchment or wax paper for easy cleanup.
- Small cookie scoop or tablespoon: For portioning the truffles evenly (I use a melon baller sometimes—works great!).
- Microwave-safe bowl or double boiler: For melting chocolate—if you don’t have a double boiler, a heatproof bowl over a saucepan of simmering water is perfect.
- Forks or dipping tools: For coating truffles in chocolate; two regular dinner forks are my go-to.
Maintenance tip: If you use nonstick pans or silicone mats, hand wash them gently to keep them in good shape. For melting chocolate, always wipe your bowl dry—one drop of water can make your chocolate seize up.
Budget note: No need to splurge on fancy tools. Most of these can be swapped for whatever you have on hand. Even the chocolate can be a store-brand bar—just check the cacao percentage for best results!
How to Make Tiramisu Truffles (Step-by-Step)
-
Crush the Ladyfingers (5 minutes)
- Add 7 oz (200 g) ladyfingers to a food processor. Pulse until you have fine crumbs. No processor? Pop them in a zip-top bag and crush with a rolling pin or heavy pan. You want them as fine as possible—think sand, not gravel.
- Troubleshooting: If they’re a bit stale, that’s perfect—they crumble more easily and soak up the mascarpone better.
-
Mix the Truffle Dough (10 minutes)
- In a large bowl, combine 8 oz (225 g) mascarpone, 2/3 cup (80 g) powdered sugar, 2 tbsp (30 ml) cooled espresso, 1 tbsp (15 ml) rum or liqueur, and 1 tsp (5 ml) vanilla extract.
- Beat with a hand mixer (or use a sturdy whisk) until smooth and creamy—about 1 minute. Add the crushed ladyfingers and mix until a thick, sticky dough forms.
- Note: The dough will be a bit soft but should hold together when pressed. If it’s too wet, add a little more crushed ladyfingers. If it’s dry, add another spoonful of mascarpone.
-
Chill the Mixture (20 minutes)
- Cover the bowl and refrigerate for 20 minutes (or freeze for 10 if you’re impatient like me). This makes the dough easier to roll and helps the flavors meld.
- Sensory cue: The dough should feel cool and firmer to the touch before rolling.
-
Roll the Truffles (10 minutes)
- Line a baking sheet with parchment. Scoop out 1-tbsp (about 20 g) portions of dough and roll into balls between your palms. You’ll get about 20-24 truffles.
- Tip: Lightly dampen your hands to keep the mixture from sticking.
-
Chill Again (10 minutes)
- Place rolled truffles in the fridge or freezer for 10 minutes. This keeps them firm for dipping.
- Warning: Don’t skip this step—the chocolate coating won’t set properly if the truffles are too soft.
-
Melt the Chocolate (5 minutes)
- Add 8 oz (225 g) chopped bittersweet chocolate to a microwave-safe bowl. Microwave in 20-second bursts, stirring each time, until smooth. Or melt gently over a double boiler.
- Troubleshooting: If the chocolate seizes (turns grainy), add a tiny bit of coconut oil and stir.
-
Coat the Truffles (10 minutes)
- Using two forks, dip each chilled truffle in melted chocolate, rolling to coat. Lift out, let excess drip off, and place back on the lined tray. Repeat for all truffles.
- Personal tip: Work in small batches—if the truffles get too warm, pop them back in the fridge for a few minutes.
-
Dust with Cocoa (2 minutes)
- While the chocolate is still soft, sprinkle each truffle with unsweetened cocoa powder using a small sieve or mesh strainer.
- Sensory cue: The cocoa should stick to the chocolate, making a velvety finish.
-
Final Chill and Serve (30 minutes)
- Refrigerate truffles for at least 30 minutes to set completely. Serve chilled or at cool room temperature.
- Note: The flavor gets even better after a few hours in the fridge.
Enjoy your no bake tiramisu truffles! Honestly, the hardest part is not eating them all before serving. If you do, I won’t tell.
Cooking Tips & Techniques
After making tiramisu truffles more times than I can count, I’ve learned a few tricks that make the process easier and the results more consistent.
- Use dry, crisp ladyfingers: Soft or cake-like ones will make the mixture too wet. If yours are fresh and soft, let them sit out overnight to crisp up.
- Room temperature mascarpone mixes best: Cold mascarpone can get lumpy and hard to blend. Let it sit out for 20-30 minutes before starting.
- Espresso should be cooled: Hot coffee will melt the mascarpone and make the dough runny (ask me how I know!).
- Chill, chill, chill: Don’t rush the chilling steps. If you try to roll or coat warm truffles, they’ll fall apart or get messy. Patience pays off here.
- Work in batches: If your kitchen is warm, only take a few truffles out of the fridge at a time for dipping. The rest should stay cold.
- Don’t overheat the chocolate: Melting it slowly prevents burning. Stir often and use short bursts in the microwave.
- Keep your hands clean: Wash and dry your hands between every few truffles. Sticky hands make messy truffles (learned that one the hard way).
Common mistakes? Using too much liquid (makes the dough too soft), skipping the chilling (hello, chocolate puddles), or using low-fat mascarpone (not worth it—the texture just isn’t the same).
Multitasking tip: While the truffle mixture is chilling, melt your chocolate and prep your workstation. This way, you’re never waiting around. If you want to be extra efficient, set up a “dipping line” with one bowl for chocolate, one for cocoa dusting, and a tray for finished truffles.
For perfect truffles every time, just remember: keep things cool, use quality ingredients, and don’t rush the process. It’s worth it!
Variations & Adaptations
One of my favorite things about tiramisu truffles is how easy they are to customize. Whether you’re working around allergies or just want to try something new, here are some creative twists:
- Gluten-Free Tiramisu Truffles: Swap in gluten-free ladyfingers—brands like Schär work well. You might need a tiny bit less espresso since GF cookies sometimes absorb more liquid.
- Dairy-Free or Vegan Version: Use plant-based mascarpone (like Kite Hill almond milk) and dairy-free dark chocolate. Double-check your ladyfingers—they need to be egg and dairy-free too. I’ve made these for vegan friends and they were a hit!
- White Chocolate Tiramisu Truffles: Coat the truffles in melted white chocolate instead of dark. Add a sprinkle of espresso powder on top for a pretty finish and extra coffee flavor.
- Nutty Crunch: Roll finished truffles in finely chopped toasted hazelnuts or almonds instead of cocoa powder for texture and a flavor boost.
- Kid-Friendly: Skip the alcohol and use decaf coffee. Add a splash of chocolate milk for a little extra richness.
- Extra Boozy (Adults Only): Add a bit more rum or Kahlúa—just be careful not to make the mixture too soft. A little goes a long way!
Personal favorite? I once swapped the cocoa powder for freeze-dried raspberry powder—tart, pretty, and absolutely delicious. Don’t be afraid to experiment; these truffles are super forgiving and practically beg for a personal touch.
Serving & Storage Suggestions
For the best experience, serve tiramisu truffles slightly chilled. I love piling them onto a pretty platter and sprinkling with extra cocoa powder for a dramatic effect (think Pinterest-worthy!). A few fresh berries or a sprig of mint make them pop at a party.
Pair with espresso, cappuccino, or even a little glass of dessert wine for a true Italian café vibe. They also make gorgeous gifts—just pop them in a box lined with parchment and tie with a ribbon.
Storage Tips:
- Refrigerator: Store truffles in an airtight container for up to 5 days. Separate layers with parchment to prevent sticking.
- Freezer: Freeze on a tray, then transfer to a zip-top bag or container. They last up to 2 months—just thaw in the fridge before serving.
- Reheating: No need! Just let frozen truffles thaw in the fridge overnight. If you like them extra fudgy, eat straight from the fridge.
The flavors develop and intensify over time—honestly, they’re even better a day or two after making. If you’re making ahead for a party, this is your secret weapon!
Nutritional Information & Benefits
Each tiramisu truffle has approximately:
- Calories: 120
- Fat: 7g
- Carbohydrates: 12g
- Protein: 2g
Key ingredients like mascarpone and dark chocolate provide calcium and antioxidants, while the ladyfingers add a bit of energy-boosting carbs. You can lighten things up by using less sugar or a lighter mascarpone. To make it gluten-free, simply swap the ladyfingers. Allergens to watch for: dairy, gluten (unless you use GF cookies), and possibly eggs (in some ladyfingers).
Personally, I see these truffles as a joyful treat—a little luxury that fits even into a balanced lifestyle. A couple of truffles after dinner totally satisfies my sweet tooth without overdoing it!
Conclusion
There’s a reason tiramisu truffles are my go-to for easy luxury dessert treats. They’re fast, no-bake, and deliver all the creamy, coffee-kissed goodness you expect from tiramisu—without the hassle. You can customize them to your heart’s content, and they always impress (even if your “dipping” is a little messy, trust me—no one cares once they taste them).
Try swapping in your favorite flavors or get the kids involved in rolling and dipping—it’s fun for the whole family. I always keep a stash in the freezer for unexpected guests or those days when you just need a little something special.
Give these tiramisu truffles a try and let me know what you think! If you make any fun variations, drop them in the comments—I love seeing what you come up with. Don’t forget to pin this recipe and share with friends who need a little luxury in their life. Remember, good desserts are meant to be shared (or secretly hoarded, no judgment!).
Frequently Asked Questions
Can I make tiramisu truffles without alcohol?
Absolutely! Just skip the rum or liqueur and add a little extra espresso or vanilla. The flavor is still amazing and kid-friendly.
What’s the best chocolate for coating tiramisu truffles?
I recommend a good-quality bittersweet or semisweet chocolate (60-70% cacao). If you prefer, white chocolate works too—just note it’s a bit sweeter.
How long do tiramisu truffles last?
Stored in the fridge, they’ll keep for up to 5 days. In the freezer, they last up to 2 months. Just thaw before serving for best texture.
Can I make these truffles gluten-free?
Yes, just use gluten-free ladyfingers. Everything else in the recipe is naturally gluten-free. The taste and texture are just as good!
Can I use instant coffee instead of espresso?
Definitely. Dissolve 1-2 teaspoons of instant espresso powder in 2 tablespoons of hot water, let it cool, and use as directed. It’s an easy swap!
Pin This Recipe!

Tiramisu Truffles Recipe Easy No Bake Luxury Dessert Treats

These tiramisu truffles are a no-bake, bite-sized twist on the classic Italian dessert, featuring creamy mascarpone, espresso, and a chocolate shell. Perfect for parties, gifting, or a decadent treat, they come together quickly and can be made ahead for ultimate convenience.
- Prep Time: 20 minutes
- Cook Time: 0 minutes
- Total Time: 50 minutes
- Yield: 20-24 truffles 1x
- Category: Dessert
- Cuisine: Italian
Ingredients
- 7 oz (200 g) ladyfingers (Savoiardi), crushed
- 8 oz (225 g) mascarpone cheese, full-fat, softened
- 2/3 cup (80 g) powdered sugar
- 2 tbsp (30 ml) espresso or strong brewed coffee, cooled
- 1 tbsp (15 ml) dark rum or coffee liqueur (optional)
- 1 tsp (5 ml) pure vanilla extract
- 8 oz (225 g) bittersweet or semisweet chocolate, chopped (for coating)
- Unsweetened cocoa powder, for dusting
Instructions
- Add ladyfingers to a food processor and pulse until you have fine crumbs. Alternatively, place them in a zip-top bag and crush with a rolling pin until sandy.
- In a large bowl, combine mascarpone, powdered sugar, cooled espresso, rum or liqueur (if using), and vanilla extract. Beat with a hand mixer or whisk until smooth and creamy.
- Add the crushed ladyfingers and mix until a thick, sticky dough forms. If too wet, add more ladyfinger crumbs; if too dry, add a bit more mascarpone.
- Cover the bowl and refrigerate for 20 minutes (or freeze for 10 minutes) until the dough is firmer.
- Line a baking sheet with parchment. Scoop out 1-tbsp portions of dough and roll into balls between your palms. You should get about 20-24 truffles.
- Chill the rolled truffles in the fridge or freezer for 10 minutes to firm up.
- Melt the chopped chocolate in a microwave-safe bowl in 20-second bursts, stirring each time, or over a double boiler until smooth.
- Using two forks, dip each chilled truffle in melted chocolate to coat. Let excess drip off and place back on the lined tray.
- While the chocolate is still soft, dust each truffle with unsweetened cocoa powder using a small sieve.
- Refrigerate truffles for at least 30 minutes to set completely. Serve chilled or at cool room temperature.
Notes
Use dry, crisp ladyfingers for best texture. Let mascarpone come to room temperature before mixing. Chill the dough and truffles thoroughly for easy rolling and dipping. For gluten-free or dairy-free versions, substitute as needed. Truffles can be made ahead and stored in the fridge for up to 5 days or frozen for up to 2 months.
Nutrition
- Serving Size: 1 truffle
- Calories: 120
- Sugar: 7
- Sodium: 25
- Fat: 7
- Saturated Fat: 4
- Carbohydrates: 12
- Fiber: 1
- Protein: 2
Keywords: tiramisu truffles, no bake dessert, Italian dessert, mascarpone truffles, chocolate truffles, party treats, easy tiramisu, coffee dessert, holiday dessert, bite-sized dessert


