“You won’t believe this, but it all started on a random Thursday night when my neighbor, Joe—yes, the guy who’s usually all about kale smoothies—knocked on my door with a mysterious package. Inside? A handwritten note and a burger patty packed with cheese so gooey it was practically oozing out the sides. Joe swore it was his grandma’s secret Juicy Lucy recipe. Honestly, I was skeptical (I mean, Joe and juicy burgers? Who knew?), but the first bite changed everything. The melty cheese center paired with that perfectly seasoned beef made me close my eyes and savor every moment. Maybe you’ve had a burger before, but you haven’t really had a Juicy Lucy until you’ve tasted this version. There was a tiny mishap too—I forgot to flip one patty on time, and the cheese almost escaped entirely, but that crispy edge? Totally worth it.
That evening stuck with me because it wasn’t just about the burger; it was about how something so simple could turn an ordinary night into a small celebration. You know that feeling when a meal feels like a warm hug? That’s what this Savory Juicy Lucy Stuffed Burger Ultimate Melt delivers every time. It’s the kind of recipe I keep coming back to when I want comfort with a little flair, especially when friends drop by unexpectedly or when I just want to treat myself without fuss. So, let me tell you, whether you’re a burger newbie or a seasoned melt lover, this recipe is definitely worth your kitchen real estate.
Why You’ll Love This Recipe
After countless attempts perfecting this Savory Juicy Lucy Stuffed Burger Ultimate Melt, I’ve nailed a recipe that hits all the right notes. It’s been tested in my kitchen with friends who range from picky eaters to serious foodies, and everyone’s gone nuts for it. Here’s why you’ll want to make this your go-to burger recipe:
- Quick & Easy: Comes together in under 30 minutes, ideal for those hectic weeknights or last-minute cravings.
- Simple Ingredients: No need for fancy or hard-to-find items; most are pantry staples or easy to grab at your local store.
- Perfect for Ultimate Melt Lovers: The melty cheese core combined with a crispy sear offers a next-level melt experience that’s hard to forget.
- Crowd-Pleaser: Kids, adults, and even the most stubborn cheese skeptics give it two thumbs up.
- Unbelievably Delicious: The juicy beef, seasoned just right, with that molten cheese center creates a flavor and texture combo that’s pure comfort food bliss.
What sets this apart is the balance—juicy but not greasy, cheesy but not overwhelming, and a little crispy around the edges for that perfect bite. I like to blend a bit of smoked cheddar with mozzarella inside to get that killer stretch and savory depth. Plus, the secret seasoning mix I sprinkle on the patties is my little twist that you won’t find in just any burger recipe. Honestly, it’s the kind of burger that makes you pause, savor, and maybe even close your eyes for a moment—that’s how I know it’s done right.
What Ingredients You Will Need
This recipe calls for straightforward, wholesome ingredients that come together to make a bold, juicy burger without any fuss. You’ll find most of these right in your fridge or pantry, and if you want to swap things up, I’ve got you covered with substitution tips below.
- For the Patties:
- 1 lb (450 g) ground beef (80/20 blend for juiciness; I prefer local butcher’s fresh grind)
- 1 tsp garlic powder
- 1 tsp onion powder
- ½ tsp smoked paprika (adds a subtle smoky flavor)
- Salt and freshly ground black pepper, to taste
- For the Cheese Filling:
- 4 oz (115 g) sharp cheddar cheese, shredded (I love Cabot brand for that sharp tang)
- 2 oz (60 g) mozzarella cheese, shredded (for that gooey stretch)
- For the Ultimate Melt Toppings:
- 4 slices of crispy bacon (optional but highly recommended for added savoriness)
- 4 slices of ripe tomato
- 4 leaves of crisp lettuce (romaine or iceberg works great)
- 4 brioche burger buns, toasted
- Butter, for toasting buns (unsalted, softened)
- Your favorite burger sauce or mayo (I sometimes mix mayo with a touch of Dijon mustard for a subtle kick)
Substitution Tips: For a lighter option, swap ground beef with ground turkey or chicken, but keep in mind the juiciness will differ. Use dairy-free cheese alternatives if you’re avoiding dairy. For gluten-free buns, try lettuce wraps or gluten-free buns from brands like Udi’s. If you can’t find smoked paprika, a pinch of regular paprika plus a dash of liquid smoke can work.
Equipment Needed
- Large mixing bowl – perfect for combining and seasoning your beef
- Cast iron skillet or heavy-bottomed frying pan – I swear by cast iron for that beautiful crust
- Spatula or burger press (optional) – helps keep the patties uniform but your hands work just fine
- Cheese grater – for shredding your cheddar and mozzarella
- Cooking thermometer (instant-read) – handy to check the burger’s internal temperature for perfect doneness
- Basting brush – for buttering the buns
If you don’t have a cast iron skillet, a non-stick pan works too, but you might miss out on that crispy sear. I once tried using a grill pan in a hurry, and though the grill marks were nice, the cheese oozed out faster, so keep an eye on those patties! For budget-friendly options, many of these tools can be found at local thrift stores or online marketplaces without breaking the bank.
Preparation Method
- Prepare the Cheese Filling (5 minutes): In a small bowl, mix the shredded cheddar and mozzarella cheese together. Set aside. This combo ensures a perfect balance of sharpness and gooey melt.
- Season the Beef (5 minutes): Place the ground beef in a large bowl. Sprinkle garlic powder, onion powder, smoked paprika, salt, and pepper over the meat. Gently mix with your hands until just combined—don’t overwork it or the burgers will get tough.
- Form the Patties (10 minutes): Divide the beef into 8 equal portions (about 2 oz/60 g each). Flatten each portion into a thin patty roughly ¼ inch (6 mm) thick. Take one patty and place about 1 tablespoon of the cheese mixture in the center. Top with another patty and press the edges together tightly to seal the cheese inside. Repeat for all patties. If the edges aren’t sealed well, cheese will leak out while cooking.
- Preheat the Skillet (3 minutes): Heat your cast iron skillet over medium-high heat until very hot. Add a little oil with a high smoke point like avocado or canola oil.
- Cook the Burgers (8-10 minutes): Place the stuffed patties in the skillet. Cook for about 4-5 minutes on the first side without moving them to develop a good crust. Flip carefully using a spatula, then cook another 4-5 minutes. Use an instant-read thermometer to check for an internal temperature of 160°F (71°C) to make sure the beef is safe to eat and the cheese is melty.
- Toast the Buns (2 minutes): While the burgers cook, spread softened butter on the brioche buns and toast them in a separate pan or under the broiler until golden and slightly crisp.
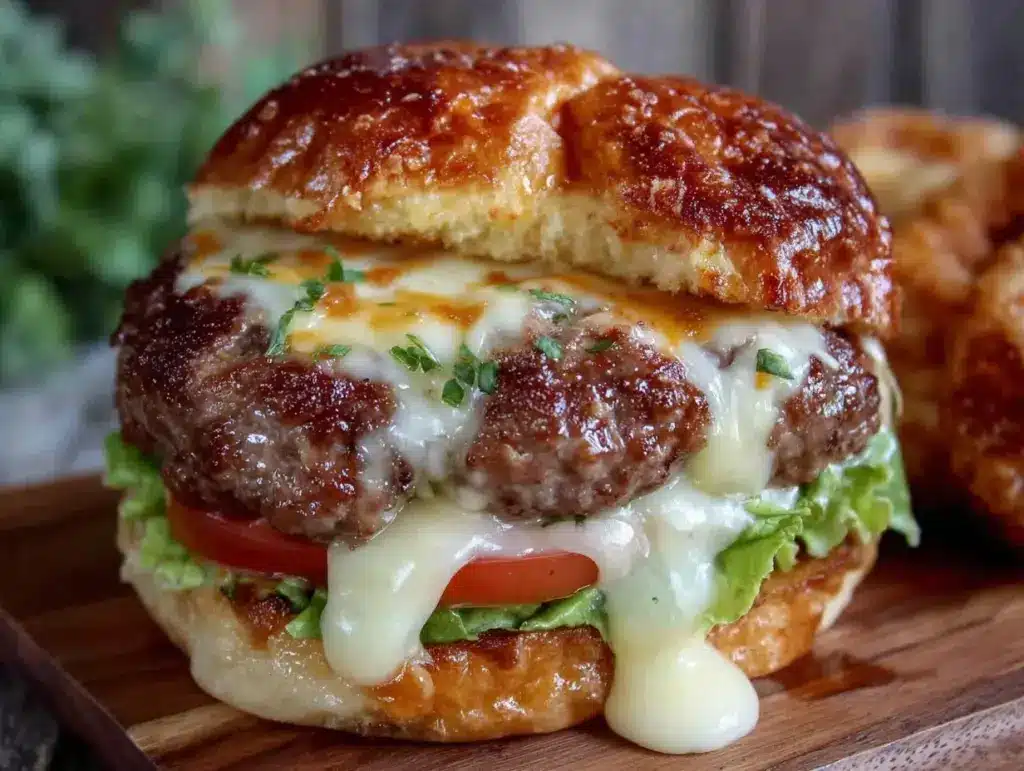
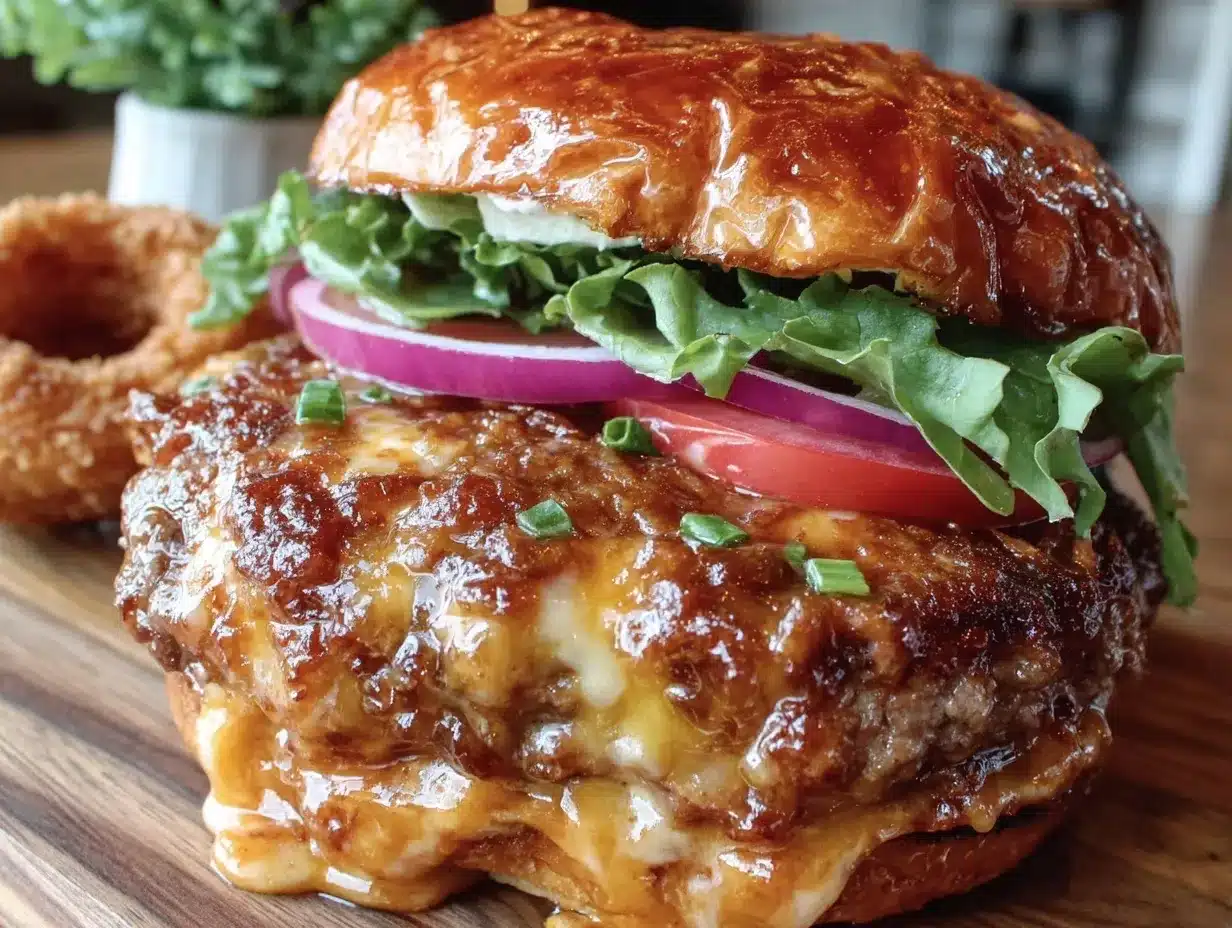
- Assemble the Ultimate Melt (5 minutes): Spread your favorite sauce on the buns. Layer the lettuce, tomato, and crispy bacon (if using). Place the hot, juicy Juicy Lucy patty on top. Add the top bun and press lightly.
- Serve Immediately: Serve your Savory Juicy Lucy Stuffed Burgers straight away for that molten cheese magic. Have plenty of napkins ready!
Pro tip: If the patties start to brown too fast, lower the heat slightly to avoid burning before the cheese melts inside. Also, don’t poke holes in the patties while cooking—that’s a sure way to lose all that cheesy goodness.
Cooking Tips & Techniques
Getting the perfect Juicy Lucy melt can be tricky, but a few tricks make it foolproof. First, using a higher fat content beef (around 20%) keeps the burger juicy and helps the cheese stay gooey inside. I’ve made the mistake of using lean ground beef before, and the patties came out dry and crumbly.
Seal the edges well—this is crucial. Pinch and press the patties firmly so the cheese doesn’t escape during cooking. If you’re worried, chill the formed patties for 15 minutes before cooking; it helps them hold their shape. Trust me, I learned this after a cheesy mess in my skillet once.
Use medium-high heat to get a nice crust without overcooking the inside. Too hot, and the outside burns before the cheese melts; too low, and you miss that sear. An instant-read thermometer is a great investment—it takes the guesswork out.
Multitasking tip: While the patties cook, toast your buns and prep toppings to save time. This keeps everything warm and ready to assemble once the burgers are done.
And here’s a little secret—adding a tiny bit of butter to the pan while cooking adds richness and helps caramelize the edges beautifully. I sometimes add a splash of Worcestershire sauce to the beef mix for an umami boost, but that’s optional.
Variations & Adaptations
- Vegetarian Version: Use seasoned portobello mushroom caps stuffed with a mix of mozzarella and cream cheese. Grill or pan-fry until tender and juicy.
- Spicy Kick: Mix diced jalapeños or chipotle powder into the cheese filling for a smoky heat surprise inside your burger.
- Seasonal Twist: Swap out cheddar for blue cheese and add caramelized onions in fall for a deeper, more complex flavor.
- Low-Carb Option: Skip the buns and serve your Juicy Lucy on a bed of leafy greens with avocado slices for a satisfying keto-friendly meal.
- Personal Favorite: I once tried adding a thin slice of ham inside along with the cheese—like a mini cordon bleu surprise. It was a hit at the barbecue!
Serving & Storage Suggestions
These burgers are best served hot off the skillet, with the cheese molten and the patties juicy. I like to present mine with a side of crispy sweet potato fries or a tangy coleslaw to cut through the richness. A cold craft beer or a sparkling iced tea pairs beautifully, but honestly, it’s a versatile meal that works with many drinks.
If you have leftovers (which is rare!), wrap them tightly in foil or plastic wrap and store in the fridge for up to 2 days. To reheat, gently warm in a skillet over low heat to keep the juices and melt the cheese again—microwaving tends to make the beef rubbery and the cheese tough.
Flavors actually deepen after resting overnight, so if you’re making these ahead for a party, I recommend cooking patties fully and reheating just before serving for that fresh melt effect.
Nutritional Information & Benefits
Each Savory Juicy Lucy Stuffed Burger packs approximately 450-500 calories depending on toppings and bun choices. The recipe delivers a good dose of protein from the beef and cheese, essential for muscle repair and energy. Using seasoned beef with natural spices means no artificial additives or preservatives here.
Cheddar and mozzarella provide calcium and vitamin D, while the optional lettuce and tomato add fiber and antioxidants. For those watching carbs, swapping buns for greens lowers carb intake significantly.
Keep in mind this recipe contains dairy and gluten (from buns), so adjust accordingly if you have allergies. Personally, I appreciate how this burger strikes a balance between indulgence and real ingredients, making it a satisfying treat without feeling overly processed.
Conclusion
This Savory Juicy Lucy Stuffed Burger Ultimate Melt is more than just a burger. It’s a little adventure in your kitchen that brings gooey, savory comfort with each bite. Whether you’re feeding a hungry crowd or just craving something special, this recipe delivers on flavor and satisfaction.
Feel free to tweak the cheeses, seasonings, or toppings to make it truly your own. I love how this burger encourages creativity while keeping things simple and approachable. So, give it a go, share your own twists, and don’t forget to tell me how it went—I’m always excited to hear about your juicy burger moments!
Now, grab that skillet and let’s get melting.
FAQs
What is a Juicy Lucy burger?
A Juicy Lucy is a burger that’s stuffed with cheese inside the patty instead of melted on top, so you get a molten cheese center with every bite.
How do I prevent the cheese from leaking out?
Make sure to pinch and seal the edges of the two patties tightly around the cheese. Chilling the formed patties for 15 minutes before cooking also helps them hold together better.
Can I use different types of cheese?
Absolutely! Sharp cheddar and mozzarella are classic for melt and flavor, but you can try pepper jack, gouda, or blue cheese for unique twists.
Is it safe to eat stuffed burgers with melted cheese inside?
Yes, as long as you cook the patties to an internal temperature of 160°F (71°C) to ensure the beef is fully cooked and safe.
Can I make these burgers ahead of time?
You can prepare the patties and refrigerate them for up to a day before cooking. Cook and assemble just before serving for the best melt and juiciness.
Pin This Recipe!

Savory Juicy Lucy Stuffed Burgers Recipe Perfect for Ultimate Melt Lovers

A juicy, cheese-stuffed burger with a melty core and crispy sear, perfect for comfort food lovers and quick weeknight meals.
- Prep Time: 20 minutes
- Cook Time: 10 minutes
- Total Time: 30 minutes
- Yield: 4 servings 1x
- Category: Main Course
- Cuisine: American
Ingredients
- 1 lb ground beef (80/20 blend)
- 1 tsp garlic powder
- 1 tsp onion powder
- ½ tsp smoked paprika
- Salt and freshly ground black pepper, to taste
- 4 oz sharp cheddar cheese, shredded
- 2 oz mozzarella cheese, shredded
- 4 slices crispy bacon (optional)
- 4 slices ripe tomato
- 4 leaves crisp lettuce (romaine or iceberg)
- 4 brioche burger buns, toasted
- Butter, for toasting buns (unsalted, softened)
- Your favorite burger sauce or mayo
Instructions
- Prepare the cheese filling by mixing shredded cheddar and mozzarella cheese together in a small bowl. Set aside.
- Place ground beef in a large bowl. Sprinkle garlic powder, onion powder, smoked paprika, salt, and pepper over the meat. Gently mix until just combined.
- Divide the beef into 8 equal portions (about 2 oz each). Flatten each portion into a thin patty about ¼ inch thick.
- Place about 1 tablespoon of cheese mixture in the center of one patty. Top with another patty and press edges tightly to seal the cheese inside. Repeat for all patties.
- Preheat a cast iron skillet over medium-high heat until very hot. Add a little high smoke point oil like avocado or canola oil.
- Cook the stuffed patties for 4-5 minutes on the first side without moving to develop a crust. Flip carefully and cook another 4-5 minutes until internal temperature reaches 160°F (71°C).
- While burgers cook, spread softened butter on brioche buns and toast until golden and slightly crisp.
- Assemble the burgers by spreading sauce on buns, layering lettuce, tomato, and bacon (if using), then placing the hot Juicy Lucy patty on top. Add the top bun and press lightly.
- Serve immediately with plenty of napkins.
Notes
Seal the edges of patties tightly to prevent cheese leakage. Chill patties for 15 minutes before cooking to help hold shape. Use medium-high heat for a good crust without burning. Avoid poking holes in patties while cooking. Adding a bit of butter to the pan enhances caramelization. Optional Worcestershire sauce can be added to beef for umami.
Nutrition
- Serving Size: 1 stuffed burger wit
- Calories: 475
- Sugar: 4
- Sodium: 650
- Fat: 30
- Saturated Fat: 12
- Carbohydrates: 25
- Fiber: 2
- Protein: 30
Keywords: Juicy Lucy, stuffed burger, cheese-stuffed burger, melt burger, comfort food, quick burger recipe


