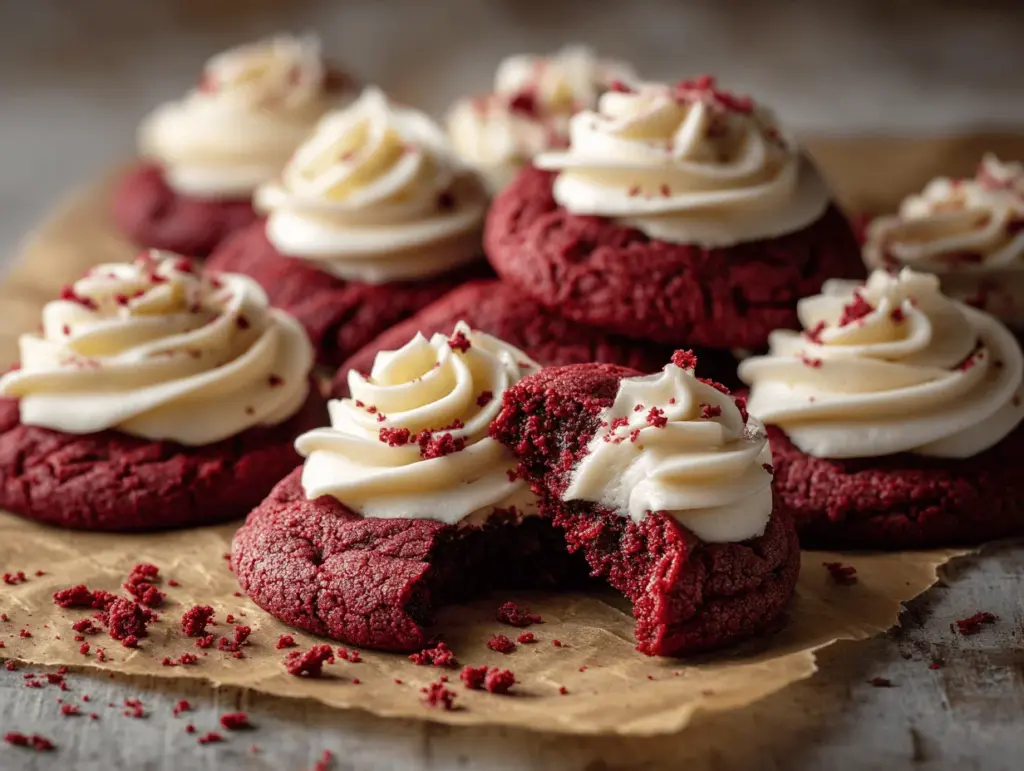
The first time I pulled a tray of these frosted red velvet cookies out of the oven, the kitchen smelled like a sweet dream—think hints of cocoa, real butter, and a little vanilla magic. That pop of deep red color against creamy white frosting? Honestly, it’s impossible not to sneak a taste before they cool. There’s something about red velvet anything that feels a little fancy, but these cookies make bakery-style perfection feel totally doable at home (even if you’ve never baked from scratch before).
I’ll admit, my obsession with red velvet started with cupcakes at a little bakery downtown—so moist, so rich, and always with just the right amount of tang. But let’s face it, as much as I adore a good cupcake, cookies are just way more fun to share and way easier for little hands (and big ones, too!). So, after a lot of tinkering and taste tests (my family’s not complaining), this is my go-to red velvet cookies recipe that delivers all that classic flavor with a soft, chewy center and a thick, swoopy layer of vanilla cream cheese frosting.
These cookies are perfect for holidays, birthdays, potlucks, or just when you need a little pick-me-up in the middle of the week. Red velvet cookies have that wow factor—with their bright color and bakery-style frosting, they practically beg to be shown off on your prettiest plate (or, let’s be real, eaten straight from the cooling rack). If you’ve ever wished you could make bakery treats at home without a culinary degree, stick around. You’ll be surprised at how easy these are to whip up, and, trust me, they taste even better than they look.
Why You’ll Love This Red Velvet Cookies Recipe
After years of baking and more than a dozen batches of these beauties, I can promise you—these frosted red velvet cookies are in a league of their own. They’re the kind of cookie that makes people pause mid-bite and ask, “Wait, did you make these?”
- Quick & Easy: You’ll have fresh, bakery-style cookies in under 35 minutes, start to finish. No chilling dough overnight or complicated steps.
- Simple Ingredients: You probably have everything on hand already—no buttermilk or special chocolate needed. Pantry staples do the trick.
- Perfect for Every Occasion: These cookies are showstoppers at Valentine’s Day, Christmas, birthdays, and bake sales. (Honestly, though, I make them “just because” all the time.)
- Kid & Crowd-Pleaser: Soft, chewy texture and that thick, tangy frosting mean they disappear fast—kids and adults love them equally.
- Bakery-Style Results at Home: The deep red color and plush cream cheese frosting look (and taste) straight out of a bakery display case.
What sets this red velvet cookies recipe apart? For one, I use a touch of cornstarch in the dough for a tender, melt-in-your-mouth bite. And the frosting? It’s whipped until light and fluffy (not too sweet, just perfectly creamy). The balance of cocoa and vanilla is spot-on, so you get that hint of chocolate without overpowering the classic red velvet flavor.
Honestly, these cookies are a little bit nostalgic, a little bit indulgent, and totally soul-soothing. They’re the kind you bake for a friend who needs cheering up… or just because you want something special with your coffee. Every batch reminds me that homemade can be just as good (or better) than what you’d buy at a fancy bakery. Go ahead—make them once, and you’ll see why they’re a family favorite in my house.
What Ingredients You Will Need
This red velvet cookies recipe uses familiar, easy-to-find ingredients that come together for that bakery-style flavor and texture you crave. Here’s what you’ll need:
- For the Red Velvet Cookie Dough:
- All-purpose flour (2 cups / 250g) – Provides structure and chewiness
- Cornstarch (1 tablespoon / 8g) – Makes the cookies extra soft
- Unsweetened cocoa powder (2 tablespoons / 12g) – Gives a subtle chocolate flavor without overpowering
- Baking soda (1/2 teaspoon / 2g) – Helps the cookies rise
- Salt (1/2 teaspoon / 3g) – Balances sweetness and boosts flavor
- Unsalted butter, softened (1/2 cup / 113g) – For rich, buttery flavor (I like Kerrygold for extra creaminess, but any good butter works)
- Granulated sugar (3/4 cup / 150g) – Sweetness and crisp edges
- Light brown sugar, packed (1/4 cup / 50g) – Adds moisture and depth
- Large egg, room temperature (1) – Binds the dough and adds richness
- Vanilla extract (2 teaspoons / 10ml) – For that classic bakery aroma
- Red gel food coloring (1 tablespoon / 15ml) – Gel gives a vibrant color without thinning the dough (I use AmeriColor Super Red)
- White vinegar (1 teaspoon / 5ml) – Enhances the red color and classic red velvet tang
- For the Cream Cheese Frosting:
- Cream cheese, softened (4 oz / 113g) – Full-fat for the creamiest frosting
- Unsalted butter, softened (2 tablespoons / 28g)
- Powdered sugar (1 1/4 cups / 150g) – Sifted, for a smooth finish
- Vanilla extract (1/2 teaspoon / 2.5ml)
- Pinch of salt – To balance the sweetness
- Milk or cream (1-2 teaspoons / 5-10ml, as needed) – For spreading consistency
Ingredient Tips: For the brightest color, always use gel food coloring—liquid will dull the dough and make it too wet. If you want these gluten-free, Bob’s Red Mill 1:1 Gluten-Free Baking Flour swaps in perfectly. Vegan butter and plant-based cream cheese (like Miyoko’s) work well for dairy-free cookies, too.
Don’t have red food coloring? The cookies will still be delicious without the color, though they’ll look more like chocolate cookies. And if you love a little extra crunch, add white chocolate chips or chopped pecans to the dough.
Equipment Needed
- Mixing bowls: One large for dough, one medium for frosting. Glass or stainless steel works great.
- Hand mixer or stand mixer: Makes creaming butter and sugar a breeze. If you’re mixing by hand, use a sturdy wooden spoon and some elbow grease (I’ve done it—just takes longer!).
- Baking sheets: Line with parchment paper for easy cleanup and even baking.
- Cookie scoop (optional): For perfectly sized cookies. A tablespoon works if you don’t have one.
- Wire rack: For cooling cookies without soggy bottoms.
- Offset spatula or butter knife: For swirling on that dreamy frosting (a regular butter knife does the trick in a pinch).
Don’t stress if you don’t own a stand mixer—these cookies come together beautifully with a trusty hand mixer or a bit of manual mixing. I sometimes grab a silicone spatula for scraping every last bit of dough out of the bowl. Parchment paper saves your pans from stuck-on cookies and makes cleanup a snap. If you bake a lot, investing in sturdy baking sheets pays off (mine have lasted years with just a bit of TLC—no metal utensils, and always hand-wash to keep them in top shape!).
How to Make Frosted Red Velvet Cookies

-
Preheat & Prepare: Set your oven to 350°F (180°C). Line two baking sheets with parchment paper for best results.
Personal Tip: Let your oven fully preheat; cookies bake more evenly! -
Mix Dry Ingredients: In a medium bowl, whisk together 2 cups (250g) all-purpose flour, 1 tablespoon (8g) cornstarch, 2 tablespoons (12g) cocoa powder, 1/2 teaspoon (2g) baking soda, and 1/2 teaspoon (3g) salt. Set aside.
Warning: Don’t skip the cornstarch—it’s the secret to soft centers! -
Cream Butter & Sugars: In a large bowl, beat 1/2 cup (113g) softened butter, 3/4 cup (150g) granulated sugar, and 1/4 cup (50g) packed brown sugar until light and fluffy (about 2-3 minutes). Use medium speed if using a hand or stand mixer.
Troubleshooting: If the mixture looks grainy, keep beating until smooth. -
Add Wet Ingredients: Beat in 1 large egg, 2 teaspoons (10ml) vanilla extract, 1 tablespoon (15ml) red gel food coloring, and 1 teaspoon (5ml) white vinegar until fully incorporated. The mixture should be bright red.
Note: Scrape down the bowl to mix in any stuck bits. -
Combine Wet & Dry: Add the dry ingredients to the wet mixture in two batches, mixing gently after each addition until just combined. The dough will be thick.
Personal Tip: Don’t overmix—stop as soon as no streaks remain. -
Portion & Shape: Scoop dough into 2-tablespoon portions (about 30g each) onto prepared baking sheets, spacing 2 inches (5cm) apart. Roll into balls for even baking.
Sensory Cue: Dough should be slightly tacky but not sticky. -
Bake: Bake in preheated oven for 9-11 minutes, until the edges are set and centers look slightly underbaked. They’ll finish setting as they cool.
Warning: Overbaked cookies will be dry—err on the side of slightly soft. -
Cool: Let cookies cool on the pan for 5 minutes, then transfer to a wire rack to cool completely before frosting.
Tip: Frosting melts on warm cookies—patience pays off! -
Make the Frosting: Beat 4 oz (113g) softened cream cheese and 2 tablespoons (28g) butter until smooth. Gradually add 1 1/4 cups (150g) powdered sugar, 1/2 teaspoon (2.5ml) vanilla, and a pinch of salt. Beat until light and fluffy. Add 1-2 teaspoons (5-10ml) milk or cream, if needed, for spreadable consistency.
Personal Note: Frosting should hold soft peaks and be easy to swoop. -
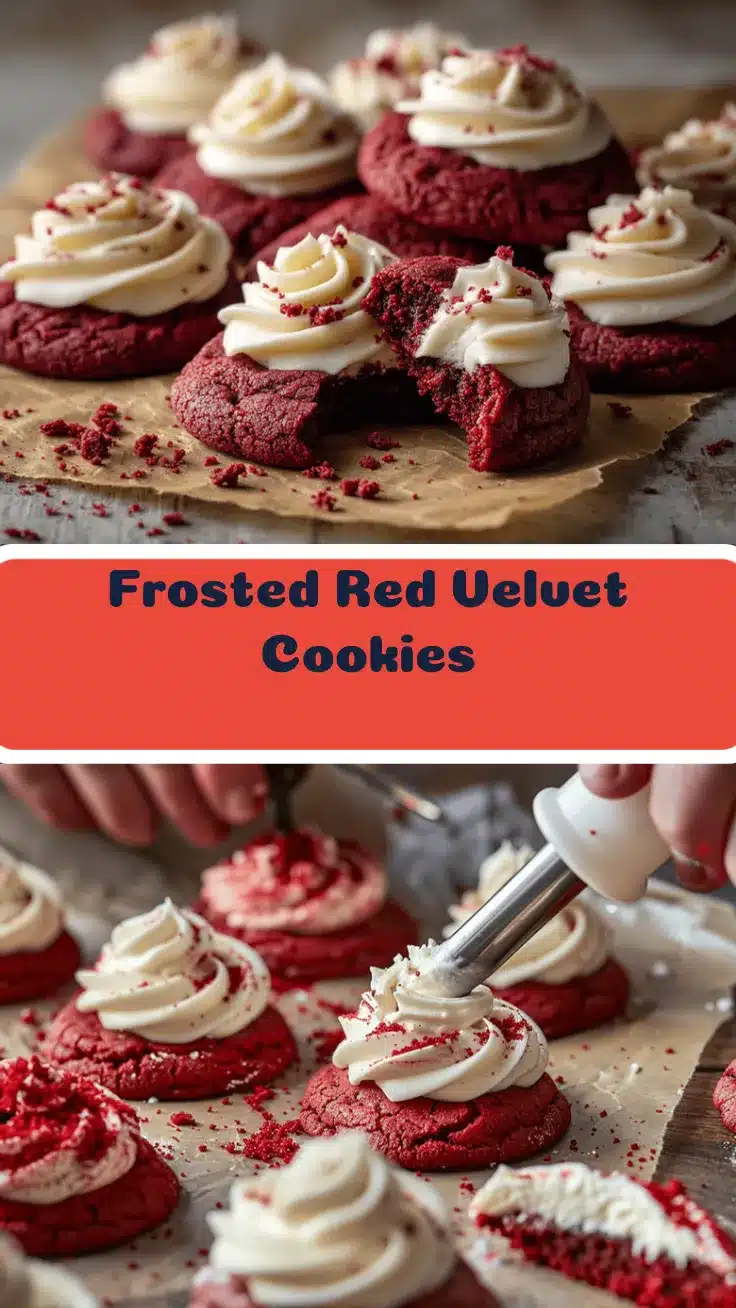
Frost & Decorate: Once cookies are cool, spread or pipe a generous dollop of frosting onto each. Garnish with red velvet cake crumbs, sprinkles, or white chocolate shavings if you like!
Efficiency Tip: Line up cooled cookies and frost assembly-line style.
If your frosting feels runny, pop it in the fridge for 10 minutes before spreading. And if you want picture-perfect cookies, use an offset spatula to swirl the tops. I always taste one (for quality control, of course!) before serving the rest.
Cooking Tips & Techniques
Here’s what I’ve learned after lots of trial and error (and a few cookie fails):
- Soften, Don’t Melt: Make sure butter and cream cheese are softened—not melted—before mixing. Melted butter makes the dough spread too much and results in flat cookies. If you forget to take them out, microwave in 5-second bursts.
- Measuring Flour: Spoon flour into your measuring cup and level it off for the most accurate results. Scooping straight from the bag packs it down and leads to dry, cakey cookies—ask me how I know!
- Bake in Batches: If you don’t have double ovens (who does?), bake one sheet at a time in the center of the oven. Rotating trays halfway through helps, too.
- Don’t Overbake: Take the cookies out when the centers look just a little underdone—they’ll set up as they cool. Overbaking is the #1 reason for dry cookies.
- Chill if Needed: If your kitchen is warm or your dough feels too sticky, chill it for 10-15 minutes before baking. It makes scooping (and cleanup) easier.
I’ve definitely had moments where my cookies spread into one giant blob, or the frosting was so runny it slid right off. Don’t stress—a little chilling or extra powdered sugar fixes most frosting issues. Multitask while baking: mix the frosting while the cookies bake, and you’ll be ready to frost as soon as they’re cool. For bakery-style consistency every time, stick to the recipe’s ratios and use a cookie scoop for even sizes. Your cookies will bake evenly and look super professional—pinkie promise!
Variations & Adaptations
Love to mix things up? Me too. Here are easy ways to make this red velvet cookies recipe your own:
- Gluten-Free: Swap the all-purpose flour for a 1:1 gluten-free blend (like Bob’s Red Mill). Works like a charm—no one will know the difference.
- Vegan: Use plant-based butter and cream cheese, and swap the egg for a flax egg (1 tablespoon ground flaxseed + 3 tablespoons water, mixed and rested 5 minutes). The cookies stay just as chewy.
- Extra Chocolate: Stir in 1/2 cup (85g) white or dark chocolate chips before baking. The creamy white chocolate adds a sweet contrast to the tangy dough.
- Seasonal Flavors: Add a pinch of cinnamon and nutmeg for a holiday twist, or swap the frosting for a swirl of marshmallow fluff in summer.
- Nut-Friendly: If you need nut-free cookies, rest easy—this recipe is naturally nut-free as written. But for a fun crunch, add chopped pecans or walnuts.
One of my favorite tweaks? Swapping half the cream cheese frosting for a chocolate ganache drizzle—totally over-the-top, but so worth it for special occasions. Don’t be afraid to try new add-ins; just keep the dough base the same for best results.
Serving & Storage Suggestions
These frosted red velvet cookies are best enjoyed at room temperature when the frosting is creamy and the cookie is just soft enough to sink your teeth into. Pile them high on a pretty platter for parties, or tuck a couple into lunchboxes for a midday treat.
Pair with an ice-cold glass of milk, a hot cup of coffee, or even a festive mug of cocoa in winter. For dessert boards, nestle them between strawberries and chocolate-dipped pretzels for a Pinterest-worthy spread.
Store leftover cookies in an airtight container in the refrigerator for up to 5 days—the frosting stays fresh, and the cookies keep their soft texture. For longer storage, freeze unfrosted cookies in a zip-top bag for up to 3 months. Thaw and frost as needed. To revive cookies, let them sit at room temperature for 30 minutes, or microwave for 10 seconds for that just-baked taste. (Flavors deepen as they sit; honestly, day-two cookies are even better!)
Nutritional Information & Benefits
Each frosted red velvet cookie is estimated to have around 180 calories, 8g fat, 25g carbs, and 2g protein. They’re a sweet treat, but made with real butter, cream cheese, and no artificial preservatives.
The cocoa powder adds a touch of antioxidants, while the cream cheese brings a bit of calcium and protein. If you use whole grain or gluten-free flour, you’ll get a little extra fiber. These cookies are nut-free as written but do contain dairy, eggs, and gluten (unless you make the swaps above).
I’m a big believer in balance—these cookies are a treat that fits into a happy, wholesome life. Enjoy them mindfully, savor every bite, and don’t forget to share the joy with someone you love!
Conclusion
If you’ve been searching for the ultimate red velvet cookies recipe—one that’s easy, bakery-worthy, and absolutely irresistible—this is it. Each bite delivers that craveable mix of cocoa, vanilla, and tangy cream cheese frosting, all in a soft, chewy cookie you’ll want to make again and again.
Don’t be afraid to make these cookies your own. Try out different frostings, add chocolate chips, or go gluten-free—whatever fits your cravings and needs. I love these cookies because they’re nostalgic and special, but simple enough for any day of the week.
If you try this recipe, leave a comment below and let me know how it turned out—or share your own twist! I’d love to hear what you think. Now, go bake a batch and treat yourself to a little bakery-style bliss at home. Happy baking!
FAQs About Red Velvet Cookies
Can I make red velvet cookies without food coloring?
Absolutely! The cookies will still taste amazing—they’ll just look more like chocolate cookies. The red color is mostly for fun and tradition.
Can I freeze red velvet cookies?
Yes! Freeze unfrosted cookies in an airtight container for up to 3 months. Thaw, then frost before serving for best results.
What’s the best way to store frosted cookies?
Keep them in an airtight container in the fridge for up to 5 days. Let cookies come to room temperature before serving for the best texture.
Can I use natural cocoa powder instead of Dutch-process?
Yes, either one works in this recipe. Natural cocoa will give a slightly lighter color and a bit more tang, but both are delicious!
Can I double this recipe for a party?
Definitely! Just double all ingredients and bake in batches. Make sure to rotate trays in the oven for even baking.
Pin This Recipe!
Red Velvet Cookies Recipe – Easy Frosted Bakery-Style Treats

These bakery-style red velvet cookies are soft, chewy, and topped with a thick layer of creamy vanilla cream cheese frosting. They’re easy to make at home and perfect for holidays, parties, or a sweet treat any day.
- Prep Time: 15 minutes
- Cook Time: 10 minutes
- Total Time: 35 minutes
- Yield: 16 cookies 1x
- Category: Dessert
- Cuisine: American
Ingredients
- 2 cups all-purpose flour
- 1 tablespoon cornstarch
- 2 tablespoons unsweetened cocoa powder
- 1/2 teaspoon baking soda
- 1/2 teaspoon salt
- 1/2 cup unsalted butter, softened
- 3/4 cup granulated sugar
- 1/4 cup light brown sugar, packed
- 1 large egg, room temperature
- 2 teaspoons vanilla extract
- 1 tablespoon red gel food coloring
- 1 teaspoon white vinegar
- 4 oz cream cheese, softened
- 2 tablespoons unsalted butter, softened
- 1 1/4 cups powdered sugar, sifted
- 1/2 teaspoon vanilla extract
- Pinch of salt
- 1–2 teaspoons milk or cream, as needed
Instructions
- Preheat oven to 350°F (180°C). Line two baking sheets with parchment paper.
- In a medium bowl, whisk together flour, cornstarch, cocoa powder, baking soda, and salt. Set aside.
- In a large bowl, beat softened butter, granulated sugar, and brown sugar until light and fluffy (2-3 minutes).
- Beat in egg, vanilla extract, red gel food coloring, and white vinegar until fully incorporated.
- Add dry ingredients to wet mixture in two batches, mixing gently after each addition until just combined. Do not overmix.
- Scoop dough into 2-tablespoon portions and roll into balls. Place on prepared baking sheets, spacing 2 inches apart.
- Bake for 9-11 minutes, until edges are set and centers look slightly underbaked.
- Cool cookies on the pan for 5 minutes, then transfer to a wire rack to cool completely.
- For the frosting: Beat softened cream cheese and butter until smooth. Gradually add powdered sugar, vanilla, and a pinch of salt. Beat until light and fluffy. Add milk or cream as needed for spreadable consistency.
- Once cookies are cool, spread or pipe frosting onto each. Garnish as desired.
Notes
For gluten-free cookies, substitute a 1:1 gluten-free flour blend. Vegan butter and plant-based cream cheese work for dairy-free adaptations. Do not overbake; cookies should look slightly underdone when removed from the oven. Chill dough if too sticky. Store frosted cookies in the fridge for up to 5 days, or freeze unfrosted cookies for up to 3 months.
Nutrition
- Serving Size: 1 cookie
- Calories: 180
- Sugar: 16
- Sodium: 110
- Fat: 8
- Saturated Fat: 5
- Carbohydrates: 25
- Fiber: 1
- Protein: 2
Keywords: red velvet cookies, bakery-style cookies, cream cheese frosting, easy cookies, holiday cookies, chewy cookies, homemade cookies


