Let me just start by saying—there’s nothing quite like the thrill of pulling a tray of Rainbow Pot of Gold Cupcakes out of the oven. The sweet, buttery aroma fills the kitchen, and those vibrant rainbow swirls? They’re almost too pretty to eat (almost!). The first time I made these, I was knee-high to a grasshopper, helping my grandma prep treats for the annual neighborhood block party. I’ll never forget the moment we added that final sprinkle of edible gold dust—everyone gathered around, eyes wide with wonder, and you could feel the excitement buzzing in the air. It was one of those pause-and-smile moments that stick with you for years.
Honestly, these cupcakes are dangerously easy to whip up, but they deliver pure, nostalgic comfort with a playful twist. I stumbled upon the idea when I was trying to recreate those magical St. Patrick’s Day treats you see popping up on Pinterest—except I wanted something that worked for any celebration, from birthdays to baby showers. Let’s face it, anything with rainbows and gold is bound to brighten someone’s day. My family couldn’t stop sneaking them off the cooling rack (and I can’t really blame them—they’re irresistible!).
Whether you’re looking for the perfect sweet treat for your kids, a showstopper for your office potluck, or a way to jazz up your Pinterest dessert board, these Rainbow Pot of Gold Cupcakes deliver every time. I’ve tested this recipe more times than I care to admit—in the name of research, of course—and it’s now a staple for family gatherings and gifting. There’s something about the colorful layers and creamy frosting that feels like a warm hug in cupcake form. Trust me, you’re going to want to bookmark this one.
Why You’ll Love These Rainbow Pot of Gold Cupcakes
I’ve baked countless batches, tweaked the recipe to perfection, and even recruited my crew of taste-testers (my kids, neighbors, and anyone who happened to walk through the door). Here’s why these Rainbow Pot of Gold Cupcakes have earned their special place in my celebration lineup:
- Quick & Easy: You can whip these up in under an hour—perfect for those “Oh no, I forgot the dessert!” moments or spontaneous party invites.
- Simple Ingredients: No need for fancy stuff; most of what you need is probably chilling in your pantry right now. Trust me, you won’t be running all over town.
- Perfect for Any Occasion: From birthday parties to St. Patrick’s Day, baby showers, and graduations, these cupcakes bring a pop of color and fun wherever they go.
- Crowd-Pleaser: The combo of moist vanilla cake, creamy frosting, and playful decorations means they disappear fast—kids and adults alike always want seconds.
- Unbelievably Delicious: The texture is soft and tender, the flavor is buttery with a hint of vanilla, and the frosting is dreamy—plus, those gold coins add a little crunch!
What sets this recipe apart is the technique for swirling the rainbow batter—no more muddy colors or streaky cupcakes. I use gel food coloring for bold hues, and my secret for extra-fluffy cake is a touch of sour cream in the batter (learned that one the hard way after a few dense attempts). The gold “pot of gold” on top isn’t just for looks—it adds a sweet finish that ties the whole thing together.
Honestly, this recipe isn’t just good—it’s the kind of treat that makes you close your eyes for that first bite and smile. It’s comfort food reimagined: just as fun and magical as those childhood bake sale cupcakes, but with a more grown-up flavor and a Pinterest-worthy appearance. If you want to impress guests without stressing out, or you just want to turn a simple get-together into something special, these Rainbow Pot of Gold Cupcakes are your go-to.
What Ingredients You Will Need
This recipe uses simple, wholesome ingredients to deliver bold flavor and a dreamy, tender crumb—plus all the riotous color you need to make your party table pop. Most items are pantry staples, and you can swap a few things for dietary needs or seasonal touches.
- For the Cupcake Batter:
- 1 1/2 cups (180g) all-purpose flour
- 1 1/2 teaspoons baking powder
- 1/2 teaspoon baking soda
- 1/4 teaspoon salt
- 1/2 cup (115g) unsalted butter, softened (adds richness)
- 1 cup (200g) granulated sugar
- 2 large eggs, room temperature
- 1 teaspoon pure vanilla extract (I always reach for Nielsen-Massey)
- 1/2 cup (120ml) sour cream (for extra moisture and tenderness)
- 1/2 cup (120ml) whole milk (or substitute with dairy-free milk)
- For the Rainbow Effect:
- Gel food coloring—red, orange, yellow, green, blue, and purple (I recommend AmeriColor for the brightest colors)
- For the Frosting:
- 1 cup (230g) unsalted butter, softened
- 3 cups (360g) powdered sugar
- 2-3 tablespoons whole milk (adjust for consistency)
- 1 teaspoon vanilla extract
- Pinch of salt
- For Decoration:
- Mini rainbow candies or rainbow sour belts (for the rainbow arch)
- Edible gold coins, gold sugar pearls, or gold sprinkles (for the pot of gold effect)
- Edible glitter or shimmer dust (optional, but so fun for extra sparkle)
Ingredient Tips: For a gluten-free version, swap in your favorite 1:1 gluten-free flour blend (I’ve had good luck with King Arthur’s). You can use dairy-free butter and milk for a vegan-friendly adaptation—Earth Balance and Oatly are my go-tos. In summer, fresh berries make a lovely addition to the batter, but honestly, the classic rainbow look never goes out of style. If you’re in a pinch, regular liquid food coloring works, but gel is best for that picture-perfect Instagram finish.
Equipment Needed
You don’t need fancy gadgets to make Rainbow Pot of Gold Cupcakes, but a few key tools make the process smoother (and more fun!). Here’s what I always reach for:
- 12-cup muffin tin or cupcake pan
- Paper cupcake liners (rainbow-patterned ones make for extra flair!)
- Mixing bowls—at least three, for dividing the batter
- Electric hand mixer or stand mixer (makes for fluffier batter, but a whisk and elbow grease work in a pinch)
- Kitchen scale (optional, but great for accuracy—seriously, it changed my baking game)
- Spatulas and spoons for mixing and portioning
- Toothpicks or cake tester
- Small piping bags and tips for frosting (a zip-top bag with the corner snipped works fine too)
- Offset spatula or butter knife (for smooth frosting)
- Food-safe paintbrush for dusting on edible gold shimmer (if using)
If you’re just starting out, don’t stress about the mixer—a sturdy whisk will do. I’ve used everything from old wooden spoons to silicone spatulas, and honestly, the results are still delicious. Keep cupcake pans clean by lining with paper liners, and if you use reusable silicone liners, give them a quick rinse before each batch. Budget-friendly options for most tools can be found at any big box store or online (I started with a $10 hand mixer and it lasted years!).
Preparation Method
- Preheat and Prep:
Preheat your oven to 350°F (175°C). Line a 12-cup muffin tin with paper liners.
If you’re using silicone liners, lightly spray them with nonstick spray.
This step keeps cupcakes from sticking, trust me—it’s a lesson learned after losing half a batch to stubborn pans. - Mix Dry Ingredients:
In a medium bowl, whisk together 1 1/2 cups (180g) flour, 1 1/2 teaspoons baking powder, 1/2 teaspoon baking soda, and 1/4 teaspoon salt.
Set aside. The mixture should look even, without clumps—run your fingers through it if you spot any stubborn bits. - Cream Butter and Sugar:
In a large bowl, use an electric mixer to cream 1/2 cup (115g) butter and 1 cup (200g) sugar until light and fluffy—about 2-3 minutes.
If mixing by hand, use a sturdy whisk and really go for it; the mixture should turn pale and airy. - Add Eggs and Vanilla:
Beat in 2 eggs, one at a time, mixing well after each.
Add 1 teaspoon vanilla extract, and beat until combined.
Scrape down the sides to catch any butter hiding at the bottom. - Combine Wet and Dry Ingredients:
Mix in half the dry ingredients, followed by 1/2 cup (120ml) sour cream and 1/2 cup (120ml) milk.
Finish with the remaining dry ingredients, mixing just until smooth.
Don’t overmix—batter should be creamy, not runny or stiff.
If you see lumps, gently fold them in; overmixing leads to dense cupcakes (been there, done that). - Divide and Color the Batter:
Divide the batter evenly into six bowls.
Add a drop or two of gel food coloring to each bowl—red, orange, yellow, green, blue, and purple.
Mix gently until each color is vibrant and uniform (use a clean spoon for each to avoid muddiness).
If you want pastel shades, use less coloring. - Layer the Rainbow:
Using a spoon, layer the colored batter into each cupcake liner in rainbow order.
About 1 teaspoon of each color per layer—don’t worry if it’s not perfect; the magic happens when they bake!
Gently smooth the top with a spoon, but avoid swirling (unless you want a tie-dye look). - Bake:
Bake cupcakes for 18-22 minutes, or until a toothpick inserted in the center comes out clean.
Watch for golden edges and domed tops—if they collapse, they were either underbaked or overmixed.
Let cool in the pan for 5 minutes, then transfer to a wire rack. - Make the Frosting:
Beat 1 cup (230g) butter until creamy.
Gradually add 3 cups (360g) powdered sugar, mixing on low.
Add 2-3 tablespoons milk, 1 teaspoon vanilla, and a pinch of salt.
Beat until light and fluffy, 2-3 minutes.
Adjust consistency with milk as needed—frosting should hold soft peaks, not runny. - Frost and Decorate:
Pipe or spread frosting on cooled cupcakes.
Add a mini rainbow candy as an arch, nestle gold coins or sprinkles at the base for the “pot of gold” effect.
Dust with edible glitter for extra sparkle.
If the frosting is too soft, chill for 10 minutes before decorating. - Serve and Enjoy:
Arrange cupcakes on a platter, snap a photo (they’re Pinterest gold!), and watch them disappear.
Store any extras in an airtight container at room temperature for up to 2 days, or refrigerate for up to 5 days.
Cooking Tips & Techniques
After baking more rainbow cupcakes than I can count, I’ve learned a few tricks (mostly from trial and error!). Here’s how you can nail these every time:
- Use gel food coloring —It gives you bold, vibrant colors without thinning out the batter. Liquid coloring can make things streaky or pale.
- Don’t overmix —Mix just until the dry ingredients disappear. Overmixing = tough cupcakes. If in doubt, stop early!
- Layer, don’t swirl —If you’re after true rainbow stripes, spoon each color on top of the last. I tried swirling once—turned out more tie-dye than rainbow. Fun, but not what I was going for.
- Room temperature ingredients —Butter, eggs, and dairy blend better and bake fluffier. Cold ingredients can lead to dense pockets or uneven baking.
- Test for doneness early —Start checking at 18 minutes. Every oven is a little quirky (mine runs hot!), so keep an eye out for golden edges and a clean toothpick.
- Pipe frosting with a wide tip —If you want those bakery-style swirls, use a large round or star tip. No piping bag? Snip the corner off a zip-top bag—it works wonders.
- Decorate just before serving —Gold candies and rainbow belts can fade or “sweat” if left overnight. For the best look, add toppings the day of your party.
One time, I forgot to divide the batter evenly—ended up with a few cupcakes missing the purple layer. Still tasty, but lesson learned! If you want perfect rainbows, use a measuring spoon for each color. Multitasking tip: Make the frosting while the cupcakes bake so you’re ready to decorate as soon as they cool. Consistency is all about the batter—if it’s too thick, add a splash of milk; too runny, toss in another tablespoon of flour.
Variations & Adaptations
These Rainbow Pot of Gold Cupcakes are super flexible—here’s how you can make them your own:
- Gluten-Free: Swap all-purpose flour for a 1:1 gluten-free baking blend. I’ve used King Arthur and Cup4Cup with great results. Texture stays light and fluffy.
- Vegan: Use plant-based butter and dairy-free milk (Oatly is my favorite). Replace eggs with a flaxseed mixture (1 tablespoon ground flaxseed + 2.5 tablespoons water per egg). The flavor is just as rich!
- Low-Sugar: Substitute a portion of sugar with coconut sugar or a baking-friendly sweetener. The cupcakes will be a bit darker but still sweet enough for kids and grown-ups.
- Seasonal Flavors: Add a teaspoon of almond or lemon extract to the batter for a springtime twist. In autumn, mix in a pinch of cinnamon or nutmeg.
- Chocolate Rainbow: Use a chocolate cupcake base—just swap 1/3 cup of flour for cocoa powder. The rainbow layers pop against the dark cake!
- Allergen-Friendly: For nut-free and egg-free versions, always check labels on candies and decorations. Some brands have sneaky nut warnings!
My personal favorite twist? Swapping the rainbow candies for fresh fruit slices (strawberries, kiwi, blueberries) for a “natural rainbow” look. The kids love it, and it’s a little lighter for summer parties. For a grown-up party, dust the tops with edible gold shimmer and serve with a splash of limoncello. Have fun experimenting—these cupcakes are all about celebration and creativity!
Serving & Storage Suggestions
For the best party wow-factor, serve Rainbow Pot of Gold Cupcakes at room temperature on a bright platter. Arrange them in a circle so the rainbow arches point outward—they look stunning and make for great photos (seriously, Pinterest loves these!).
Pair with sparkling lemonade, fruity punch, or a simple vanilla milkshake. For grown-up celebrations, a glass of Prosecco or Moscato really brings out the buttery flavors. If you’re going extra fancy, garnish the platter with edible flowers or gold confetti.
To store, place cupcakes in an airtight container. They’ll keep at room temperature for up to 2 days, or in the fridge for 4-5 days. For longer storage, skip the decorations, wrap cupcakes tightly in plastic, and freeze for up to 2 months. Thaw overnight, then frost and decorate fresh for your celebration.
Reheat chilled cupcakes in the microwave for 10-15 seconds—just enough to revive that tender crumb without melting the frosting. Flavors actually deepen after a day in the fridge, so don’t be afraid to make them ahead! Just remember, add rainbow candies and gold coins right before serving for the brightest colors and crunch.
Nutritional Information & Benefits
Each Rainbow Pot of Gold Cupcake clocks in at around 220 calories, with 10g fat, 30g carbohydrates, and 2g protein. The butter and sour cream bring a little calcium, while the eggs add some protein and vitamin D. If you use gluten-free or vegan swaps, the nutrition shifts slightly—but the fun stays the same!
Rainbow cupcakes are naturally nut-free if you stick to safe decorations, and can be made gluten-free or dairy-free with simple ingredient swaps. The bright colors encourage kids (and adults!) to try new flavors, and honestly, they’re a great way to sneak in a celebration without heavy desserts.
I see these as a “sometimes” treat—perfect for parties, not every day. The magic here is the memories you create, not just the nutrients. If you’re watching sugar or allergens, use the substitutions above. My own wellness philosophy? Celebrate the joy, savor the moment, and share with loved ones.
Conclusion
If you’re looking for a showstopping treat that’s easy, vibrant, and guaranteed to make people smile, Rainbow Pot of Gold Cupcakes are a must-try. They’re quick to make, fun to decorate, and always the star of any party table. Plus, they’re flexible enough to fit any dietary need or occasion.
Don’t be afraid to experiment—swap flavors, switch up decorations, and make these cupcakes your own. Honestly, every batch tells a story, and that’s half the fun. My family asks for these on every special occasion, and they’ve become my go-to for both quick celebrations and big gatherings.
Give these a whirl, and let me know how your party turns out! Leave a comment below with your favorite decorating tip, or share your own creative twist. And if you post them on Pinterest, tag me—I love seeing everyone’s rainbow creations. Happy baking, and may your celebrations be as colorful as your cupcakes!
Frequently Asked Questions
How do I get vibrant rainbow colors in my cupcakes?
Use gel food coloring instead of liquid—it gives you bold, bright hues without thinning the batter. Mix each color in a separate bowl and layer them gently for neat stripes.
Can I make Rainbow Pot of Gold Cupcakes ahead of time?
Yes! Bake and frost the cupcakes up to a day in advance. Decorate with candies and gold coins just before serving for the freshest look and crunch.
What’s the best way to avoid dense cupcakes?
Make sure your ingredients are at room temperature, and don’t overmix the batter. If you’re unsure, mix just until the flour disappears—overmixing leads to dense cakes.
Are these cupcakes safe for gluten-free or nut-free diets?
Absolutely! Use a 1:1 gluten-free flour blend for gluten-free cupcakes, and double-check your decorations for nut-free labels. Most rainbow candies and gold sprinkles are nut-free, but always check packaging.
How do I store leftover cupcakes?
Keep cupcakes in an airtight container at room temperature for 2 days, or refrigerate for up to 5 days. For longer storage, freeze unfrosted cupcakes and decorate after thawing.
Pin This Recipe!
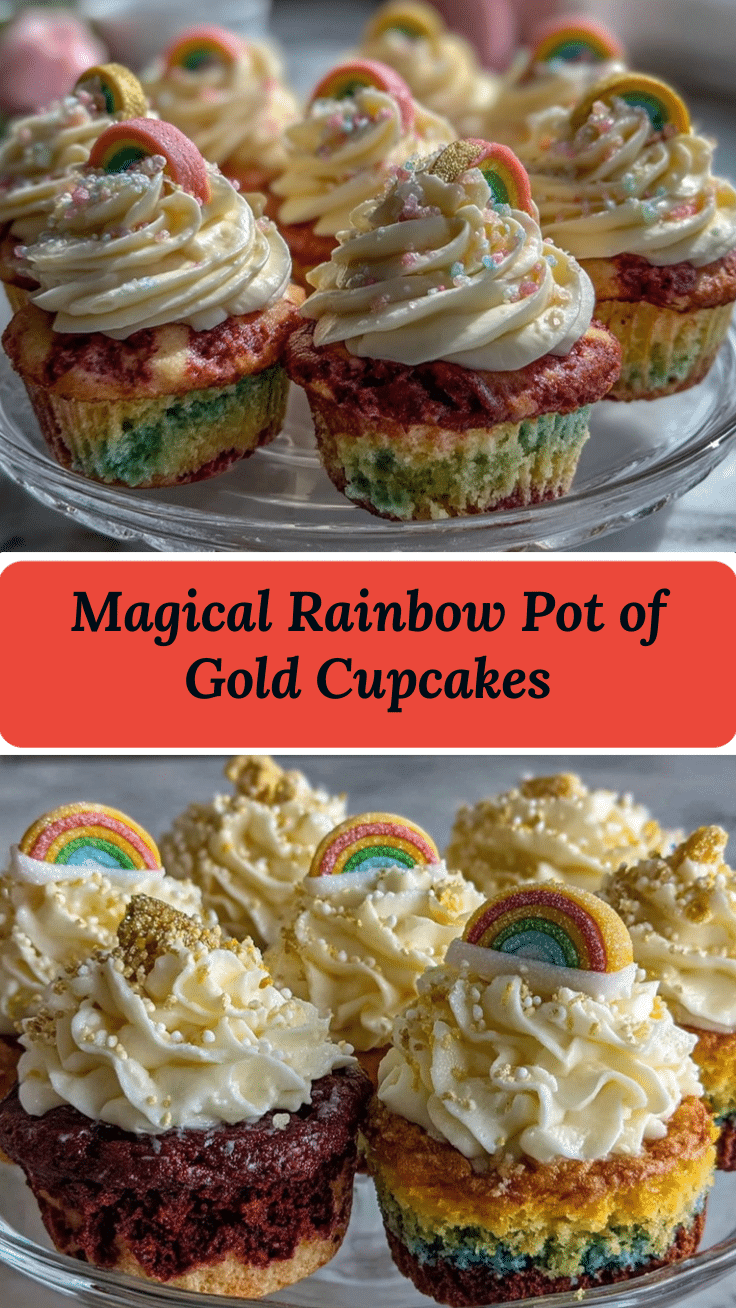
Rainbow Pot of Gold Cupcakes
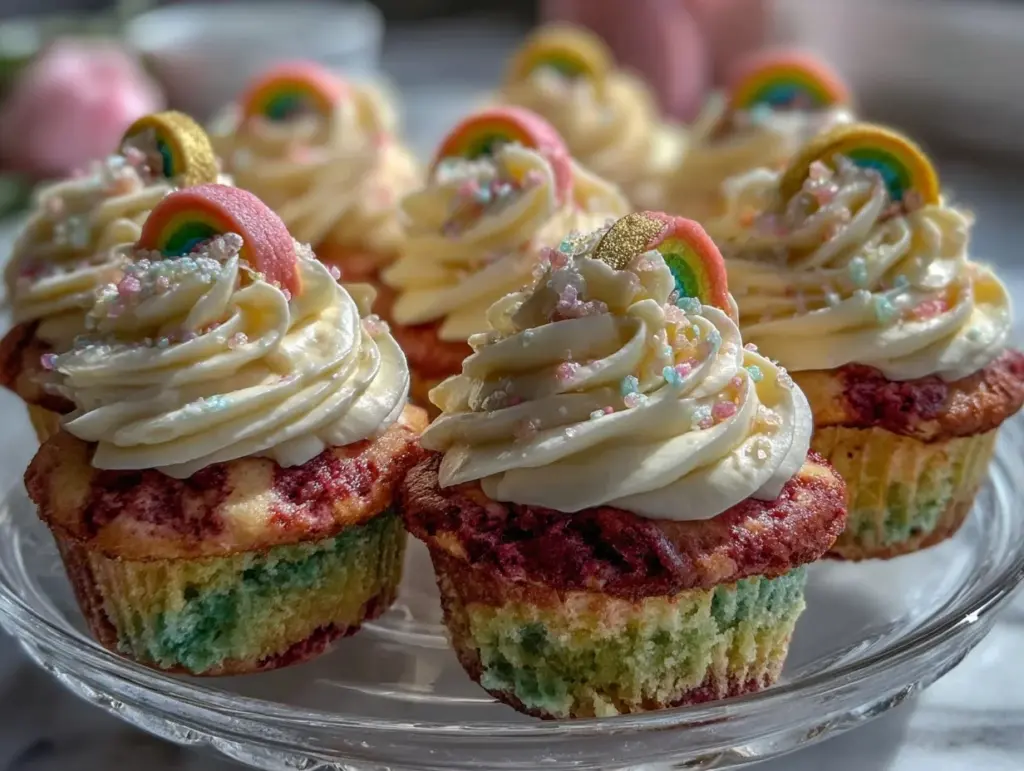
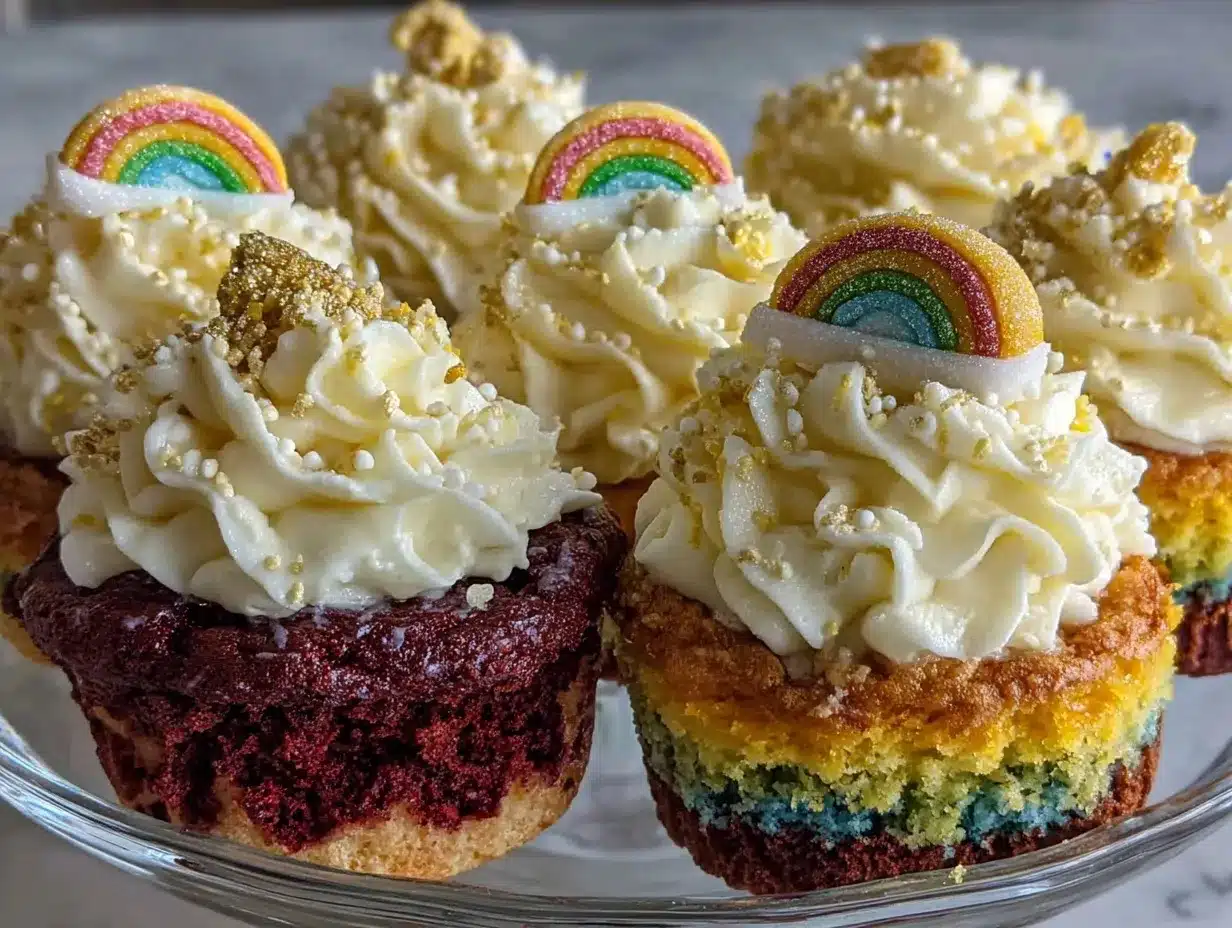
These vibrant Rainbow Pot of Gold Cupcakes feature moist vanilla cake, creamy frosting, and playful rainbow and gold decorations—perfect for celebrations like birthdays, St. Patrick’s Day, or baby showers. Easy to make and guaranteed to wow any crowd with their colorful layers and magical appearance.
- Prep Time: 25 minutes
- Cook Time: 20 minutes
- Total Time: 45 minutes
- Yield: 12 cupcakes 1x
- Category: Dessert
- Cuisine: American
Ingredients
- 1 1/2 cups all-purpose flour
- 1 1/2 teaspoons baking powder
- 1/2 teaspoon baking soda
- 1/4 teaspoon salt
- 1/2 cup unsalted butter, softened
- 1 cup granulated sugar
- 2 large eggs, room temperature
- 1 teaspoon pure vanilla extract
- 1/2 cup sour cream
- 1/2 cup whole milk
- Gel food coloring (red, orange, yellow, green, blue, purple)
- 1 cup unsalted butter, softened (for frosting)
- 3 cups powdered sugar
- 2–3 tablespoons whole milk (for frosting)
- 1 teaspoon vanilla extract (for frosting)
- Pinch of salt (for frosting)
- Mini rainbow candies or rainbow sour belts
- Edible gold coins, gold sugar pearls, or gold sprinkles
- Edible glitter or shimmer dust (optional)
Instructions
- Preheat oven to 350°F (175°C). Line a 12-cup muffin tin with paper liners; lightly spray silicone liners if using.
- In a medium bowl, whisk together flour, baking powder, baking soda, and salt. Set aside.
- In a large bowl, cream butter and sugar with an electric mixer until light and fluffy (2-3 minutes).
- Beat in eggs one at a time, then add vanilla extract. Mix well and scrape down the sides.
- Mix in half the dry ingredients, then add sour cream and milk. Finish with remaining dry ingredients, mixing just until smooth.
- Divide batter evenly into six bowls. Add gel food coloring to each bowl for red, orange, yellow, green, blue, and purple. Mix gently.
- Layer colored batter into cupcake liners in rainbow order, about 1 teaspoon of each color per layer. Smooth tops gently.
- Bake for 18-22 minutes, or until a toothpick inserted in the center comes out clean. Cool in pan for 5 minutes, then transfer to wire rack.
- For frosting: Beat butter until creamy. Gradually add powdered sugar, mixing on low. Add milk, vanilla, and salt. Beat until light and fluffy (2-3 minutes). Adjust consistency with milk as needed.
- Pipe or spread frosting on cooled cupcakes. Decorate with rainbow candies, gold coins or sprinkles, and edible glitter if desired.
- Serve at room temperature. Store extras in an airtight container at room temperature for up to 2 days, or refrigerate for up to 5 days.
Notes
Use gel food coloring for vibrant colors. Don’t overmix the batter to keep cupcakes tender. Decorate just before serving for the freshest look. For gluten-free or vegan adaptations, substitute flour, butter, milk, and eggs as needed. Store decorated cupcakes at room temperature for up to 2 days, or refrigerate for up to 5 days. Freeze unfrosted cupcakes for longer storage.
Nutrition
- Serving Size: 1 cupcake
- Calories: 220
- Sugar: 22
- Sodium: 120
- Fat: 10
- Saturated Fat: 6
- Carbohydrates: 30
- Protein: 2
Keywords: rainbow cupcakes, party dessert, St. Patrick's Day, celebration cupcakes, gold cupcakes, easy cupcakes, colorful cupcakes, kid-friendly dessert


