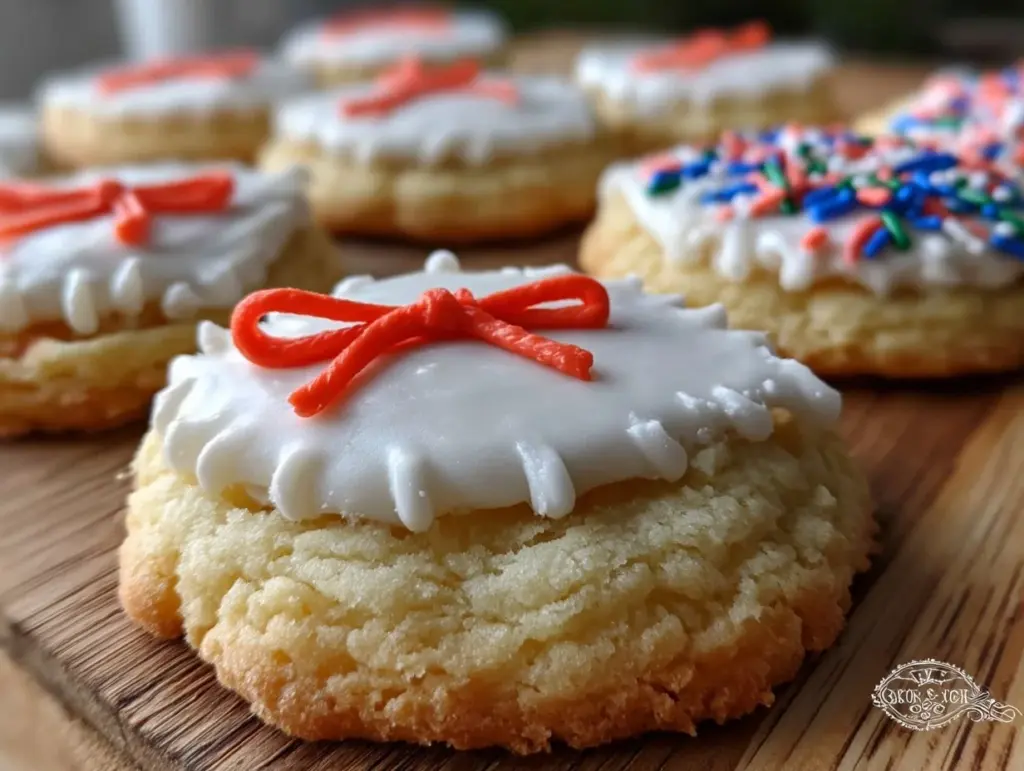
“I never thought I’d be so caught up in decorating sugar cookies, but there I was, a little mess in the kitchen and a cracked piping bag at my side,” my neighbor Linda confessed last Saturday as we shared a cup of coffee. She had just baked these delightful diploma sugar cookies for her niece’s graduation party, and honestly, I was hooked. The way she casually molded each cookie into a tiny rolled-up diploma, complete with a sweet frosting seal, was nothing short of charming. It reminded me of that one time I tried to make fancy cookies for a potluck and ended up with a frosting disaster all over the counter—maybe you’ve been there too.
These diploma sugar cookies aren’t just your average treat. They bring a dash of nostalgia and celebration to the table, perfect for marking milestones. The best part? They look like they belong on a bakery shelf but are surprisingly easy to make at home, even if your first attempt involves a few frosting smudges or a frosting bag that suddenly loses its nozzle. I mean, who doesn’t like a cookie that tastes as good as it looks, especially when it’s for someone special?
Linda’s cookies stayed with me long after the party ended. They weren’t just sweet bites but little moments of joy wrapped in sugar and fondant-like icing. So, if you’ve got a graduation, promotion, or any celebration coming up, these perfect decorated diploma sugar cookies might just be your secret weapon for bringing smiles and sweet memories.
Why You’ll Love This Recipe
Honestly, I’ve tested a handful of sugar cookie recipes over the years, but this one stands out for all the right reasons. It’s not only about the taste but how fun and approachable the decorating process is. Whether you’re a seasoned baker or someone who usually sticks to boxed mixes, these cookies will surprise you.
- Quick & Easy: Comes together in under 90 minutes from start to finish, perfect for last-minute celebrations or busy days.
- Simple Ingredients: Uses pantry staples you probably already have—no need for specialty stores or complicated shopping lists.
- Perfect for Celebrations: Tailored for graduations, parties, or any milestone; these cookies add a personal touch to your event.
- Crowd-Pleaser: Kids and adults alike rave about the buttery texture and the fun diploma design.
- Unbelievably Delicious: The balance of sweet dough and smooth royal icing is just spot-on, not too sugary but satisfying.
This recipe isn’t just another cookie; it’s the one where the frosting sets just right, the dough holds its shape beautifully, and you end up with cookies that look like tiny certificates of achievement. The secret? A chill time that helps the dough firm up for cutting perfect shapes and a simple royal icing recipe that dries hard but is easy to pipe. You’ll find yourself closing your eyes after the first bite, savoring that buttery, sweet goodness.
Whether you want to impress guests without the stress or need a sweet way to celebrate milestones, these decorated diploma sugar cookies fit the bill. Trust me, they’ll bring a smile and maybe a few “oohs” and “aahs” around the dessert table.
What Ingredients You Will Need
This recipe uses simple, wholesome ingredients to deliver bold flavor and satisfying texture without the fuss. Most are pantry staples, and the decorating ingredients are straightforward, making it a breeze to whip up these perfect decorated diploma sugar cookies anytime.
- For the Sugar Cookie Dough:
- 2 ¾ cups (345g) all-purpose flour, sifted (I like King Arthur for consistency)
- 1 teaspoon baking powder
- ½ teaspoon salt
- 1 cup (226g) unsalted butter, softened (room temperature is key here)
- 1 ½ cups (300g) granulated sugar
- 1 large egg, room temperature
- 2 teaspoons pure vanilla extract
- 2 tablespoons whole milk (adds tenderness)
- For the Royal Icing:
- 3 cups (360g) powdered sugar, sifted
- 2 large egg whites or 4 tablespoons meringue powder mixed with 6 tablespoons water (safer for raw egg concerns)
- 1 teaspoon lemon juice (for a slight tang and better drying)
- Food coloring gel in black, red, and blue (for diploma details and ribbons)
- Optional Decoration:
- Edible gold dust or shimmer (adds a fancy touch for those special celebrations)
- Miniature edible pearls or sprinkles (for the seal)
If you prefer a gluten-free version, almond flour can be substituted for about 1:1 ratio, but expect a slightly different texture. For dairy-free, swap butter with a plant-based alternative and use almond or oat milk instead of cow’s milk. I recommend trying the standard version first to get a feel for the dough’s consistency before experimenting.
Equipment Needed
- Mixing bowls (one large for dough, one medium for icing)
- Electric hand mixer or stand mixer (makes creaming butter and sugar much easier)
- Rolling pin (a non-stick or silicone one works best to prevent dough sticking)
- Diploma-shaped cookie cutter or a sharp knife to cut rectangles and a small circle cutter for the seal (I once improvised with a small glass rim!)
- Parchment paper or silicone baking mats (essential for even baking and easy cleanup)
- Piping bags with small round tips (#1 or #2) for detailed icing work
- Food-safe brushes (optional, for applying edible dust or smoothing icing)
If you don’t have a stand mixer, the hand mixer will do just fine, though it takes a bit more elbow grease. For piping, if you don’t have bags, you can make a small cone from parchment paper—works surprisingly well in a pinch! Keeping your tools clean and dry makes a huge difference in the icing’s consistency, trust me on that one.
Preparation Method
- Mix Dry Ingredients: In a medium bowl, whisk together 2 ¾ cups (345g) all-purpose flour, 1 teaspoon baking powder, and ½ teaspoon salt. Set aside. (5 minutes)
- Cream Butter and Sugar: In a large bowl, use an electric mixer to beat 1 cup (226g) softened unsalted butter and 1 ½ cups (300g) granulated sugar until light and fluffy, about 3-4 minutes. Scrape down sides as needed. (5 minutes)
- Add Egg and Vanilla: Beat in 1 large room temperature egg and 2 teaspoons vanilla extract until combined. (2 minutes)
- Combine Wet and Dry: Gradually add the dry ingredients to the butter mixture, alternating with 2 tablespoons whole milk, mixing just until incorporated. Avoid overmixing to keep cookies tender. The dough should be soft but not sticky. (5 minutes)
- Chill the Dough: Divide dough in half, flatten each into a disk, wrap in plastic wrap, and refrigerate for at least 1 hour or up to overnight. Chilling helps the dough hold its shape during baking. (1 hour minimum)
- Preheat Oven and Prepare Pans: Preheat oven to 350°F (175°C). Line baking sheets with parchment or silicone mats. (10 minutes)
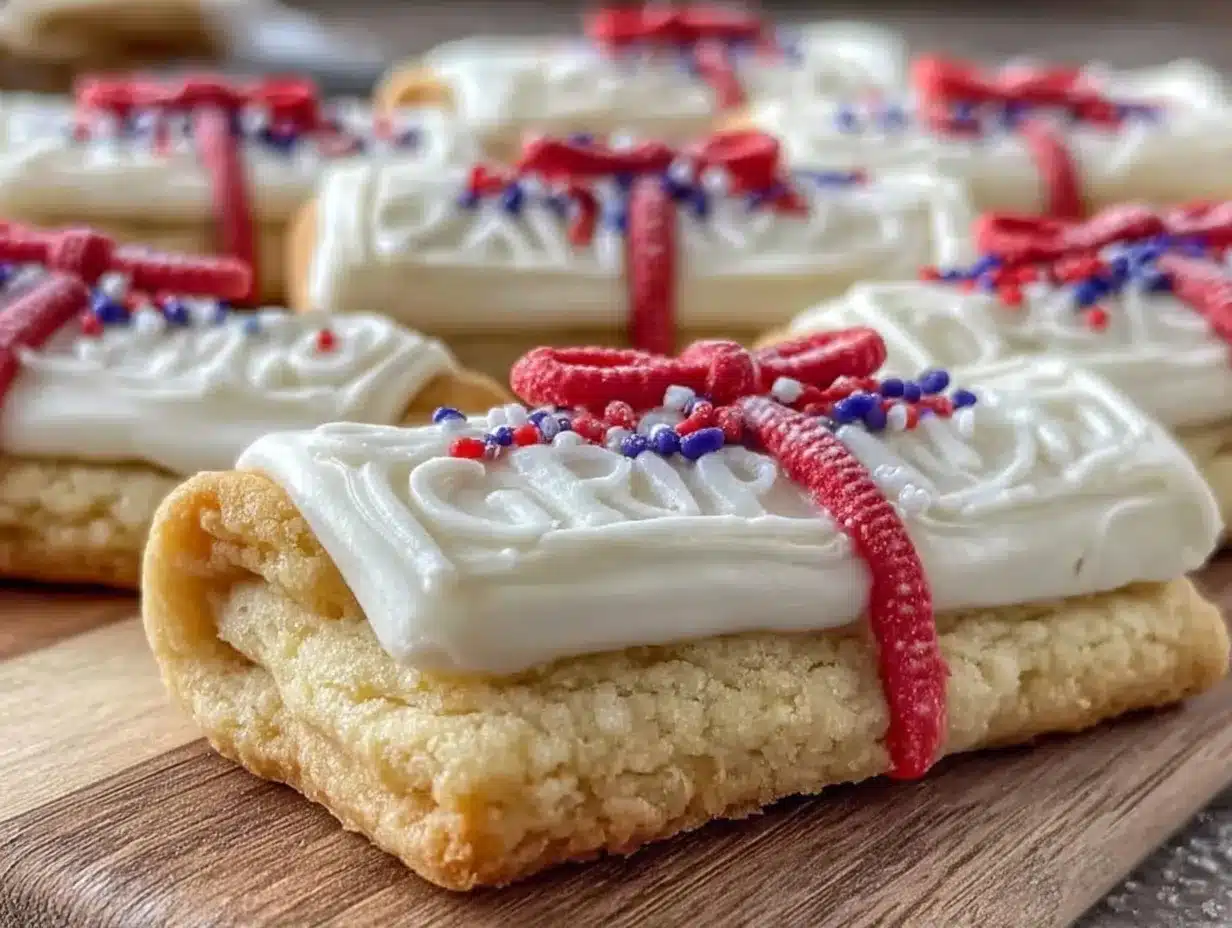
- Roll and Cut: On a lightly floured surface, roll out one dough disk to about ¼ inch (6mm) thickness. Use a diploma-shaped cookie cutter or cut rectangles approx. 3 inches (7.5cm) long and 1.5 inches (4cm) wide. Cut small circles or ovals for seals. Transfer carefully to prepared pans. (15 minutes)
- Bake: Bake cookies for 8-10 minutes, until edges just start to turn golden. Watch closely to prevent overbaking, which makes cookies dry. Cool on pans for 5 minutes, then move to wire racks to cool completely. (10-15 minutes)
- Prepare Royal Icing: While cookies cool, mix 3 cups (360g) powdered sugar with egg whites or meringue powder mixture and 1 teaspoon lemon juice until smooth and glossy. Adjust consistency with a few drops of water for piping (thicker) or flooding (thinner). Divide and tint small batches with food coloring for diploma details. (10 minutes)
- Decorate: Use piping bags with fine tips to outline diplomas in white or ivory icing. Use colored icing for ribbons and seals. Let each layer dry for 15 minutes before adding details to prevent colors bleeding. Add edible pearls or shimmer dust as desired. (30-45 minutes)
- Dry Completely: Allow decorated cookies to dry at room temperature for several hours or overnight to set the icing fully before stacking or packing. (Several hours)
Pro tip: If your dough feels too soft and sticky after chilling, pop it back in the fridge for 15-20 minutes before rolling. And don’t rush the drying time for the icing—patience here means clean, crisp designs.
Cooking Tips & Techniques
Creating perfect decorated diploma sugar cookies requires a bit of finesse, but honestly, it’s not rocket science. Here are some tips I picked up from trial, error, and a few frosting mishaps:
- Keep Dough Cool: If your kitchen is warm, chilling the dough multiple times helps prevent spreading during baking. I once skipped this step and ended up with cookies that looked more like blobs than diplomas.
- Flour Lightly: Use just enough flour for rolling to avoid tough cookies; too much flour can dry them out.
- Royal Icing Consistency: Get your icing just right—thicker for outlines and piping, thinner for flooding the cookie base. If it’s too runny, colors will bleed; too thick, and it won’t spread smoothly.
- Layer Icing: Let each layer dry before adding details. This prevents colors from mixing and helps designs stay sharp.
- Practice Piping on Parchment: Before decorating cookies, try piping on parchment paper to get comfortable with pressure and flow.
- Use Food Coloring Gels: These provide vibrant colors without thinning the icing like liquid dyes do.
- Work in Small Batches: Mix smaller amounts of icing at a time to prevent it from drying out while you decorate.
- Clean Tip Between Colors: Wipe your piping tip when switching colors to keep lines clean and crisp.
And hey, if your first batch isn’t perfect, that’s part of the fun—it means you’re learning. I remember my initial attempt had a seal that looked more like a sad blob, but after a second try, I was piping like a pro. So, don’t sweat small imperfections!
Variations & Adaptations
Sometimes you want to make a recipe your own, right? Here are a few ways to switch up these perfect decorated diploma sugar cookies based on taste, diet, or occasion:
- Gluten-Free Version: Swap all-purpose flour with a gluten-free blend (I’ve used Bob’s Red Mill 1:1 with great results). Expect slightly crumbly but still tasty cookies.
- Vegan Adaptation: Use coconut oil instead of butter, flax egg (1 tbsp ground flaxseed + 3 tbsp water) instead of egg, and a dairy-free milk alternative. Royal icing can be replaced with vegan frosting recipes or use powdered sugar mixed with plant-based milk.
- Flavor Twist: Add a teaspoon of almond or lemon extract to the dough for a subtle flavor boost. You can also sprinkle a bit of edible glitter on the icing for extra sparkle.
- Seasonal Colors: Change up icing colors to match holiday themes or party colors—think gold and black for New Year’s, pastels for spring graduations, or school colors for that extra personal touch.
- Mini Diploma Cookies: Cut the dough into smaller rectangles for bite-sized treats. These are great for party favors or kid-friendly snacks.
I once made a batch with lavender extract and swapped blue icing for purple—it was a hit at a friend’s baby shower. Don’t hesitate to experiment!
Serving & Storage Suggestions
These diploma sugar cookies are best served at room temperature, allowing the buttery flavor and delicate icing to shine. Arrange them on a decorative platter alongside other themed treats or package them individually in clear bags tied with ribbon for party favors.
For storage, place cookies in an airtight container layered with parchment paper to keep them from sticking. They keep well at room temperature for up to 5 days. If you want to store longer, freezing is your friend. Freeze undecorated cookies in a single layer, wrapped tightly, for up to 3 months. Decorated cookies freeze best after the icing has fully set—place them in a single layer on a baking sheet, freeze until firm, then transfer to airtight containers with parchment layers.
When reheating, bring cookies back to room temperature before serving; avoid microwaving as it can melt the icing. Flavors often mellow and blend nicely after a day, so making them a day ahead can actually improve the taste. Just keep them well-sealed to prevent drying out.
Nutritional Information & Benefits
Each decorated diploma sugar cookie (approx. 3×1.5 inches) contains roughly:
| Calories | 150-170 kcal |
|---|---|
| Fat | 7g (mostly from butter) |
| Carbohydrates | 22g |
| Protein | 2g |
| Sugar | 12g (from dough and icing) |
While these cookies are definitely a treat, they use real butter and whole eggs, providing some protein and healthy fats. Using fresh, high-quality ingredients means better flavor without artificial additives. For those with dietary restrictions, the recipe can be adapted to gluten-free or vegan versions as mentioned.
From a wellness perspective, enjoying these cookies in moderation is a joyful way to celebrate special moments without guilt. You can also balance the sweetness by serving with fresh fruit or tea.
Conclusion
These perfect decorated diploma sugar cookies bring a sweet, personal touch to any celebration. They’re simple enough for home bakers yet impressive enough to steal the show at parties. I love how they combine nostalgia with creativity, letting you celebrate milestones deliciously and beautifully.
Feel free to tweak the colors, flavors, or shapes to fit your occasion. Whether you’re a frosting novice or a cookie decorating enthusiast, this recipe welcomes all skill levels. Give it a try, and don’t be surprised if these cookies become your go-to for celebrations.
I’d love to hear how your cookies turn out or any creative twists you try—drop a comment or share your photos! Remember, the best part is the joy and smiles these little diplomas bring to your table. Happy baking!
FAQs
Can I make the dough ahead of time?
Yes! The dough can be refrigerated for up to 3 days or frozen for up to a month. Just thaw in the fridge before rolling out.
What if I don’t have a diploma-shaped cookie cutter?
No worries! Use a knife to cut rectangles about 3 inches long by 1.5 inches wide, then roll a corner or use icing to mimic the rolled diploma effect.
How do I prevent royal icing from cracking?
Make sure your icing isn’t too thick, and allow it to dry slowly at room temperature. Avoid storing cookies in very dry or cold places until icing is set.
Can I use store-bought frosting instead of royal icing?
You can, but royal icing dries hard and is better for detailed decorations. Store-bought frosting may stay soft and smudge easily.
How long do these cookies stay fresh?
Stored in an airtight container at room temperature, they stay fresh for about 5 days. For longer storage, freezing is recommended.
Pin This Recipe!
Perfect Decorated Diploma Sugar Cookies Easy for Celebrations and Parties

These decorated diploma sugar cookies are perfect for graduations and celebrations, combining a buttery texture with smooth royal icing for a charming and delicious treat.
- Prep Time: 30 minutes
- Cook Time: 10 minutes
- Total Time: 1 hour 50 minutes
- Yield: 24 cookies 1x
- Category: Dessert
- Cuisine: American
Ingredients
- 2 ¾ cups (345g) all-purpose flour, sifted
- 1 teaspoon baking powder
- ½ teaspoon salt
- 1 cup (226g) unsalted butter, softened (room temperature)
- 1 ½ cups (300g) granulated sugar
- 1 large egg, room temperature
- 2 teaspoons pure vanilla extract
- 2 tablespoons whole milk
- 3 cups (360g) powdered sugar, sifted
- 2 large egg whites or 4 tablespoons meringue powder mixed with 6 tablespoons water
- 1 teaspoon lemon juice
- Food coloring gel in black, red, and blue
- Optional: edible gold dust or shimmer
- Optional: miniature edible pearls or sprinkles
Instructions
- Mix dry ingredients: whisk together flour, baking powder, and salt in a medium bowl. (5 minutes)
- Cream butter and sugar: beat softened butter and granulated sugar until light and fluffy, about 3-4 minutes. (5 minutes)
- Add egg and vanilla: beat in egg and vanilla extract until combined. (2 minutes)
- Combine wet and dry: gradually add dry ingredients alternating with milk, mixing just until incorporated. Dough should be soft but not sticky. (5 minutes)
- Chill dough: divide dough in half, flatten into disks, wrap in plastic wrap, and refrigerate for at least 1 hour. (1 hour minimum)
- Preheat oven to 350°F (175°C) and line baking sheets with parchment or silicone mats. (10 minutes)
- Roll and cut: roll dough to ¼ inch thickness, cut diploma shapes or rectangles approx. 3 x 1.5 inches, and small circles for seals. Transfer to baking sheets. (15 minutes)
- Bake: bake for 8-10 minutes until edges start to turn golden. Cool on pans 5 minutes, then on wire racks completely. (10-15 minutes)
- Prepare royal icing: mix powdered sugar with egg whites or meringue powder mixture and lemon juice until smooth. Adjust consistency for piping or flooding. Tint with food coloring. (10 minutes)
- Decorate: pipe outlines and details with icing, let each layer dry 15 minutes before adding more. Add edible pearls or shimmer dust as desired. (30-45 minutes)
- Dry completely: allow decorated cookies to dry at room temperature for several hours or overnight before storing or packing.
Notes
Chill dough well to prevent spreading. Use royal icing with correct consistency for best decorating results. Let each icing layer dry before adding details to avoid bleeding. Practice piping on parchment paper if new to decorating. Dough can be refrigerated up to 3 days or frozen for 1 month. Decorated cookies keep fresh 5 days at room temperature or can be frozen after icing sets.
Nutrition
- Serving Size: 1 cookie (approx. 3
- Calories: 160
- Sugar: 12
- Sodium: 90
- Fat: 7
- Saturated Fat: 4.5
- Carbohydrates: 22
- Fiber: 0.5
- Protein: 2
Keywords: sugar cookies, decorated cookies, diploma cookies, graduation cookies, party cookies, royal icing, celebration treats


