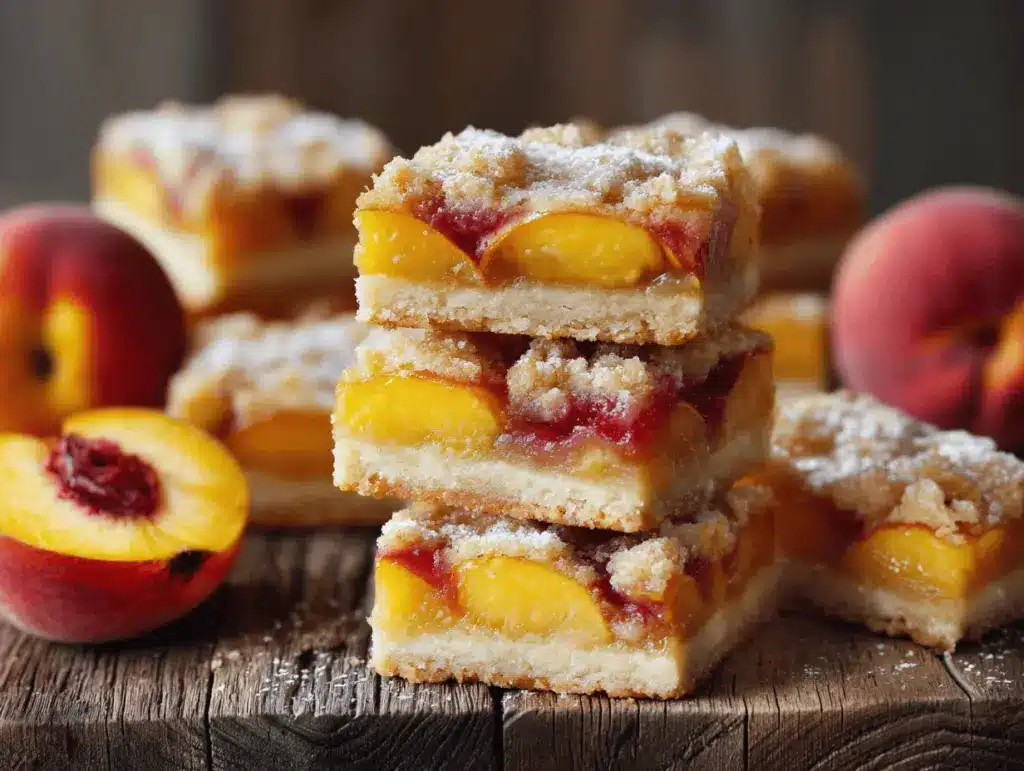
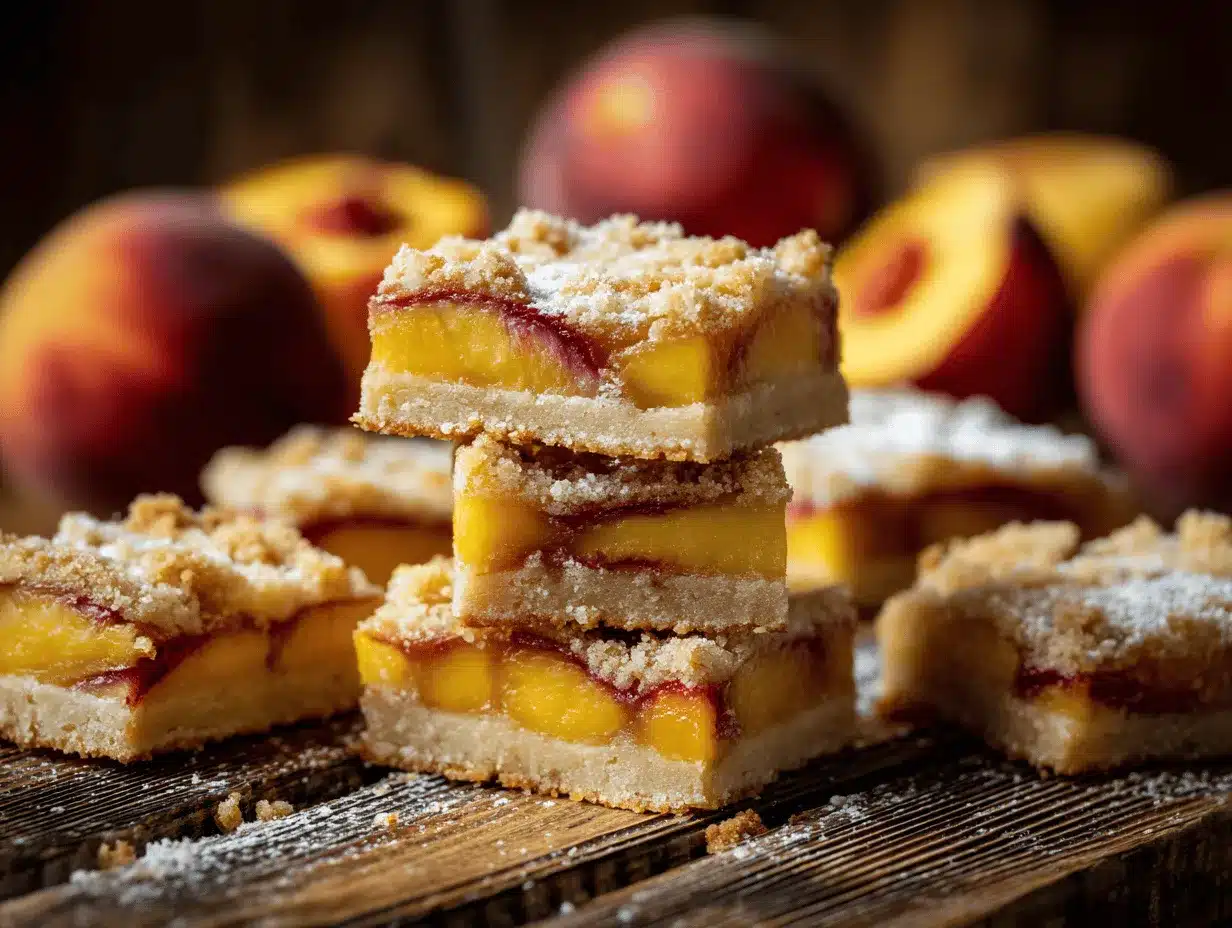
The sizzle of summer isn’t complete until you’ve tasted a gooey, golden slice of homemade peach bars, fresh from the oven and bursting with juicy fruit. The first time I made these peach bars, the sweet aroma filled the whole house, and I just knew the neighbors would come knocking! There’s something magical about peaches—maybe it’s their fuzzy skin or that sun-drenched flavor—but when you tuck them into a buttery crust and bake them into bars, the magic multiplies.
Honestly, these peach bars have become a summer tradition in my kitchen. I first put them together on a whim during a heatwave, when the farmers’ market peaches were overflowing and my kids wanted something sweet (but not too fussy). I’d seen similar recipes floating around, but I couldn’t resist playing with the ingredients to get the balance just right—lots of peaches, the perfect crumbly topping, and a little hint of cinnamon that makes every bite feel like sunshine.
If you’re craving a dessert that’s both easy and impressive, this peach bars recipe is about to become your new go-to. Whether you’re baking with the kids, surprising the family at a summer barbecue, or just need a quick treat for yourself, these bars tick all the boxes. They’re also a lifesaver for using up soft, ripe peaches before they go past their prime. And since I’ve tested (and tasted) these more times than I can count, you can trust you’re getting a foolproof, delicious result every single time. Let’s jump in and make these irresistible peach bars together—you’ll see why they’re the summer dessert everyone raves about!
Why You’ll Love This Peach Bars Recipe
After countless batches, I can honestly tell you, this peach bars recipe is a keeper. If you’re still on the fence, let me share why these homemade peach bars deserve a spot in your summer dessert lineup:
- Quick & Easy: You can have these bars mixed, baked, and cooling in about an hour. Perfect for last-minute plans or a spontaneous craving!
- Simple Ingredients: No wild goose chase at the grocery store. Everything you need is probably hanging out in your pantry and fridge (especially if you’ve got a few ripe peaches waiting to be used).
- Perfect for Every Occasion: These peach bars are the hit of every barbecue, pool party, or casual picnic. I’ve even snuck them into a brunch spread and watched them disappear before the coffee was brewed.
- Crowd-Pleaser: Even picky kids (and skeptical adults) fall for the gooey, jammy peach filling and crumbly crust. They’re sweet, but not too sweet, and have that homemade touch that feels special.
- Unbelievably Delicious: The combination of buttery crust, juicy peaches, and a hint of cinnamon is so good, you might even skip dinner just to get to dessert sooner.
What really sets this peach bars recipe apart? For starters, I blend the peaches just a bit to keep some chunks—so you get both jammy bites and juicy pieces in each bar. The crust does double duty as the topping, saving time and dishes. I’ve also tested different amounts of sugar and flour to nail that not-too-sweet, perfectly tender bite (no dry, crumbly bars here!). There’s even a little lemon zest for a bright, fresh finish.
Honestly, these bars are the kind you dream about—the ones that make you close your eyes after the first bite and smile. They’re easy enough for a weekday snack, but special enough for celebrations. And every time I bake them, I remember why I fell in love with summer peaches in the first place. If you’re ready for a new family favorite, this is it!
What Ingredients You Will Need
This peach bars recipe keeps things simple, letting the natural flavor of ripe summer peaches shine through. Everything in this recipe works together to create that perfect balance of sweet, tart, and buttery. Here’s what you’ll need:
- For the Crust & Topping:
- 2 1/2 cups (310g) all-purpose flour (for the perfect crumb texture—King Arthur is my fave for baking)
- 1 cup (200g) granulated sugar (just enough for sweetness without overpowering the peaches)
- 1/2 teaspoon baking powder (helps with a tender, slightly airy crust)
- 1/4 teaspoon salt (balances the sweet and brings out the flavor)
- 1 cup (226g) unsalted butter, cold and cubed (cold butter is key for a flaky, crumbly base—use plant-based if dairy-free)
- 1 large egg (for richness and binding—room temp is best)
- 1 teaspoon pure vanilla extract (adds warmth and depth)
- For the Peach Filling:
- 4 cups (about 600g) ripe fresh peaches, peeled and diced (the juicier the better—clingstone or freestone both work)
- 1/2 cup (100g) granulated sugar (you can cut back if your peaches are super sweet, or use coconut sugar for a hint of caramel)
- 2 tablespoons (16g) all-purpose flour (thickens the filling so it’s not runny—swap for gluten-free flour if needed)
- 1 tablespoon lemon juice (brightens the flavor and keeps the peaches from browning)
- 1 teaspoon lemon zest (totally optional but highly recommended for zing!)
- 1/2 teaspoon ground cinnamon (adds a cozy warmth—skip if you want pure peach flavor)
Ingredient Notes and Swaps:
- Frozen Peaches: You can use frozen if fresh aren’t available—just thaw and drain them first.
- Gluten-Free: Substitute your favorite 1:1 gluten-free flour blend for all-purpose flour. I’ve had great luck with Cup4Cup.
- Vegan: Swap butter for a vegan baking stick and use a flaxseed “egg” (1 tbsp ground flax + 3 tbsp water).
- Low-Sugar: Try monk fruit sweetener or stevia blend, but keep an eye on texture.
- Other Fruit: Nectarines or plums work beautifully if peaches are out of season.
Trust me, the key to the best peach bars is using the ripest, most fragrant peaches you can find. If you’re lucky enough to have backyard peaches, this is the recipe to show them off. But don’t worry—store-bought works too. Just give them a sniff; if they smell like summer, you’re good to go!
Equipment Needed
You won’t need a kitchen full of gadgets for these easy homemade peach bars. Here’s what you’ll want on hand:
- 9×13-inch (23x33cm) baking pan: The classic size for bars—glass, metal, or ceramic all work. I’ve used a parchment sling for super easy removal, but a well-greased pan does the trick too.
- Mixing bowls: Two medium to large bowls—one for dry, one for wet/filling.
- Pastry cutter or clean hands: For cutting butter into the flour. If you don’t have a cutter, two forks or your fingers work (sometimes the old-school way is best!).
- Measuring cups and spoons: Accurate measuring really helps the crust come out right. I prefer metal cups for dry and glass for liquids.
- Cutting board and sharp knife: For peeling and chopping peaches. If you’re like me and love quick shortcuts, a serrated peeler can make peeling peaches a breeze.
- Microplane or grater: For lemon zest (optional, but adds a fresh punch).
- Rubber spatula or wooden spoon: For mixing and spreading the filling.
If you only bake bars a few times a year, don’t stress about fancy tools! I’ve made these with just a fork, knife, and my hands—sometimes that’s the most fun. Just wash up quickly after using butter, as it can get slippery on utensils. And if you’re eyeing a new baking pan, this is the recipe to break it in!
How to Make Peach Bars – Step by Step
-
Prep Your Pan and Oven (5 minutes)
Preheat your oven to 350°F (175°C). Grease a 9×13-inch (23x33cm) baking pan with butter, oil, or nonstick spray. For easy removal, line with parchment paper, leaving an overhang on the sides—this makes lifting the bars out so much easier! -
Make the Crust and Topping (10 minutes)
In a large bowl, whisk together 2 1/2 cups (310g) flour, 1 cup (200g) sugar, 1/2 teaspoon baking powder, and 1/4 teaspoon salt. Add in 1 cup (226g) cold, cubed butter. Use a pastry cutter, two forks, or your hands to work the butter into the flour until the mixture looks like coarse, damp sand with some pea-sized pieces. Stir in 1 egg and 1 teaspoon vanilla extract until just combined—the dough will be crumbly but should hold together when squeezed. -
Press the Bottom Crust (5 minutes)
Scoop about 2/3 of the crust mixture into the prepared pan. Press it down firmly and evenly with your hands or the back of a measuring cup to form the bottom layer. Make sure to get into the corners—an even base helps the bars slice neatly. -
Prepare the Peach Filling (10 minutes)
In another bowl, toss together 4 cups (about 600g) diced peaches, 1/2 cup (100g) sugar, 2 tablespoons (16g) flour, 1 tablespoon lemon juice, 1 teaspoon lemon zest, and 1/2 teaspoon cinnamon. Mix gently until the peaches are coated. If your peaches are extra juicy, you can add an extra tablespoon of flour to thicken up the filling. -
Assemble the Bars (5 minutes)
Spread the peach mixture evenly over the bottom crust. Sprinkle the remaining crumb mixture evenly over the peaches. Don’t worry if it looks a little rustic—those crumbly bits bake up golden and delicious! -
Bake (35–40 minutes)
Bake in the preheated oven for 35–40 minutes (check at 35), until the top is light golden and the peach filling is bubbling around the edges. Your kitchen will smell like pure summer at this point! -
Cool and Slice (30–60 minutes)
Let the bars cool in the pan for at least 30 minutes (an hour is even better for clean slices). Use the parchment overhang to lift them out, then cut into 16 squares or rectangles. Warm bars are gooey, while fully cooled bars hold their shape better.
Troubleshooting: If your crust is too dry, add 1–2 tablespoons of cold water. If the peaches seem runny, sprinkle a little extra flour over the filling before adding the topping. Got dark spots on your topping? Tent loosely with foil for the last 10 minutes.
Personal Tip: I like to chill the bars for an hour if I’m serving them at a party—they’re easier to cut and transport, and the flavors meld perfectly. But don’t worry, they’re absolutely dreamy eaten warm with a scoop of vanilla ice cream, too!
Pro Tips & Techniques for Perfect Peach Bars
After way too many test batches (and a few late-night cravings), I’ve got some tried-and-true tips for nailing this peach bars recipe every single time:
- Keep Butter Cold: Cold butter is your friend for a crumbly, tender crust. If your kitchen is warm, pop the butter cubes in the freezer for 10 minutes before mixing.
- Don’t Overmix: Once you add the egg to the crust, mix just until combined. Overmixing can make the bars tough—think “just enough” and stop there.
- Use Ripe, But Firm Peaches: Super-soft peaches get mushy when baked. Aim for ripe but not squishy fruit. If your peaches are underripe, slice thin and add a touch more sugar.
- Even Layers Matter: Take an extra minute to press the bottom crust firmly and spread the peach filling evenly. This helps with both texture and slicing later on.
- Let Them Cool: I know it’s tough, but bars need at least 30 minutes to set up. Cutting them too soon means they’ll fall apart (still tasty, but messy—been there, done that!).
- Troubleshooting: If the topping starts to brown too quickly, lay a piece of foil on top for the last 10 minutes. If your filling is runny, next time add an extra tablespoon of flour or cornstarch.
Trust me, I’ve cut into a pan too soon and ended up with peach “slump” instead of bars—delicious but not so pretty! The secret is patience and not skipping that cooling time. And don’t be afraid to get a little messy; that crumbly topping is part of their charm. Once you get the hang of it, you’ll be making these peach bars in your sleep (almost!).
Variations & Adaptations
The beauty of this peach bars recipe is how easily you can switch things up for different tastes, seasons, or dietary needs. Here are a few of my favorite twists:
- Berry Peach Bars: Swap out 1 cup of peaches for blueberries, raspberries, or blackberries. The tart berries add a beautiful pop of color and flavor—my kids beg for this version every Fourth of July.
- Gluten-Free Version: Use a 1:1 gluten-free flour blend instead of all-purpose. I love Cup4Cup or Bob’s Red Mill. The bars will still be wonderfully tender and just as delicious.
- Vegan Peach Bars: Replace butter with vegan baking sticks and use a flaxseed “egg” (1 tablespoon ground flaxseed + 3 tablespoons water, mixed and rested for 5 minutes). The crumb still bakes up beautifully.
- Spiced Peach Bars: Add 1/4 teaspoon ground ginger or cardamom to the filling for a cozy, fragrant twist—perfect for the first cool days of fall.
- Lemon-Lover’s Bars: Double the lemon zest and add a lemon glaze (powdered sugar + lemon juice) drizzled over the top once the bars are cool. It’s bright, sweet, and totally irresistible.
Personal favorite? Last summer, I added a handful of chopped pecans to the topping and it gave the bars a lovely crunch. My family went wild for it! Don’t be afraid to experiment—sometimes the best recipes happen by accident or when you’re cleaning out the fridge.
Serving & Storage Suggestions
I almost always serve these peach bars at room temperature, cut into generous squares and stacked on a pretty platter. They’re perfect for picnics, potlucks, and backyard barbecues—no forks needed, just napkins!
- Serving: For a showstopping summer dessert, top each bar with a dollop of whipped cream or a scoop of vanilla ice cream. A little fresh mint or a dusting of powdered sugar adds a bakery-style touch.
- Beverage Pairings: These bars pair beautifully with iced tea, lemonade, or a cold glass of Prosecco (trust me, it’s a vibe!).
- Storage: Keep leftover bars in an airtight container at room temperature for up to 2 days. For longer storage, pop them in the fridge for up to 5 days—they taste just as good chilled!
- Freezing: Peach bars freeze surprisingly well. Wrap individual bars in plastic wrap and store in a zip-top bag for up to 2 months. Thaw in the fridge or at room temperature before serving.
- Reheating: For gooey, warm bars, microwave for 15–20 seconds or warm in a low oven (300°F/150°C) for 5–10 minutes.
Honestly, the flavors get even better after a day or two—the juices settle, and the crust softens just a bit. If you’re making them for a party, you can easily bake them ahead and not worry about last-minute fuss. Just try not to eat them all straight from the pan!
Nutritional Information & Benefits
Here’s a quick look at what you’re getting with each peach bar (based on 16 bars per batch):
- Calories: ~220
- Fat: 9g
- Carbohydrates: 33g
- Fiber: 1g
- Protein: 2g
These peach bars aren’t just a treat—they’ve got benefits too. Peaches are loaded with vitamin C, antioxidants, and fiber, making them a sneaky-good choice for dessert. Swapping in whole wheat flour adds more fiber, and you can use less sugar if you like. If you’re gluten-free or dairy-free, easy swaps make this recipe accessible for nearly everyone. Just a heads up—these do contain egg, wheat, and dairy (unless adapted), so plan accordingly if allergies are a concern.
From a wellness perspective, I love that these bars satisfy my sweet tooth with real fruit and homemade goodness. They’re a great way to use up fruit and share a little summer sunshine with friends and family!
Conclusion
If there’s one summer dessert you need in your life, it’s this peach bars recipe. They’re easy, reliable, and absolutely packed with juicy, sun-ripened flavor—the kind of treat that turns any day into a celebration. Whether you follow the recipe to the letter or put your own twist on it, you’re guaranteed a pan full of smiles (and maybe a few crumbs left behind!).
I’ve made these peach bars more times than I can count, and every time I discover a new favorite way to enjoy them. Don’t be afraid to play with the recipe—extra cinnamon, a handful of berries, or a drizzle of glaze all work beautifully. Baking should be fun and a little bit messy!
Give this recipe a try and let me know how it goes in the comments! I love hearing about your kitchen adventures and personal spins on my favorite desserts. If you snap a pic, share it on Pinterest or Instagram and tag me—I can’t wait to see your irresistible peach bars. Happy baking, and may your summer be extra sweet!
Frequently Asked Questions
Can I use canned or frozen peaches for this peach bars recipe?
Yes, absolutely! If using canned, drain well and pat dry. For frozen, thaw and drain off excess liquid before dicing. Fresh peaches give the brightest flavor, but canned or frozen work great in a pinch.
How do I keep the peach bars from getting soggy?
Be sure to toss the peaches with flour (or cornstarch) to help thicken the filling. Also, let the bars cool fully before slicing so the juices have time to set.
Can I make these peach bars gluten-free?
Definitely! Substitute a 1:1 gluten-free flour blend in place of all-purpose flour. I’ve tested it with Cup4Cup and Bob’s Red Mill—works like a charm.
What’s the best way to peel peaches for this recipe?
If your peaches are ripe, a quick blanch in boiling water (about 30 seconds) makes the skins slip off easily. Or use a serrated peeler for less mess. Don’t worry if a little skin remains—it adds rustic charm!
Can I freeze peach bars?
Yes! Wrap individual bars tightly and freeze for up to 2 months. They thaw quickly at room temperature and taste just as good as fresh—perfect for unexpected guests or midnight cravings!
PrintPeach Bars Recipe Easy Homemade Summer Dessert You’ll Love

These easy homemade peach bars feature a buttery crust, juicy peach filling, and a crumbly topping, making them the perfect summer dessert for any occasion. Quick to prepare and bursting with fresh fruit flavor, they’re a crowd-pleaser you’ll want to bake all season long.
- Prep Time: 20 minutes
- Cook Time: 40 minutes
- Total Time: 1 hour
- Yield: 16 bars 1x
- Category: Dessert
- Cuisine: American
Ingredients
- 2 1/2 cups all-purpose flour
- 1 cup granulated sugar
- 1/2 teaspoon baking powder
- 1/4 teaspoon salt
- 1 cup unsalted butter, cold and cubed
- 1 large egg
- 1 teaspoon pure vanilla extract
- 4 cups ripe fresh peaches, peeled and diced
- 1/2 cup granulated sugar
- 2 tablespoons all-purpose flour
- 1 tablespoon lemon juice
- 1 teaspoon lemon zest (optional)
- 1/2 teaspoon ground cinnamon
Instructions
- Preheat your oven to 350°F (175°C). Grease a 9×13-inch baking pan or line with parchment paper for easy removal.
- In a large bowl, whisk together 2 1/2 cups flour, 1 cup sugar, 1/2 teaspoon baking powder, and 1/4 teaspoon salt.
- Add 1 cup cold, cubed butter. Use a pastry cutter, two forks, or your hands to work the butter into the flour until the mixture resembles coarse, damp sand with some pea-sized pieces.
- Stir in 1 egg and 1 teaspoon vanilla extract until just combined. The dough will be crumbly but should hold together when squeezed.
- Press about 2/3 of the crust mixture firmly and evenly into the bottom of the prepared pan.
- In another bowl, toss together 4 cups diced peaches, 1/2 cup sugar, 2 tablespoons flour, 1 tablespoon lemon juice, 1 teaspoon lemon zest, and 1/2 teaspoon cinnamon until peaches are coated.
- Spread the peach mixture evenly over the bottom crust.
- Sprinkle the remaining crumb mixture evenly over the peaches.
- Bake for 35–40 minutes, until the top is light golden and the peach filling is bubbling around the edges.
- Let the bars cool in the pan for at least 30 minutes (an hour is better for clean slices). Use the parchment overhang to lift them out, then cut into 16 squares or rectangles.
Notes
For gluten-free bars, use a 1:1 gluten-free flour blend. For vegan, substitute butter with vegan baking sticks and use a flaxseed egg (1 tbsp ground flax + 3 tbsp water). If using frozen peaches, thaw and drain before using. Let bars cool fully before slicing for best results. Bars can be made ahead and freeze well for up to 2 months.
Nutrition
- Serving Size: 1 bar (1/16 of recipe)
- Calories: 220
- Sugar: 17
- Sodium: 70
- Fat: 9
- Saturated Fat: 5
- Carbohydrates: 33
- Fiber: 1
- Protein: 2
Keywords: peach bars, summer dessert, easy peach bars, homemade peach bars, fruit bars, picnic dessert, potluck dessert, peach recipes, bar cookies, summer baking


