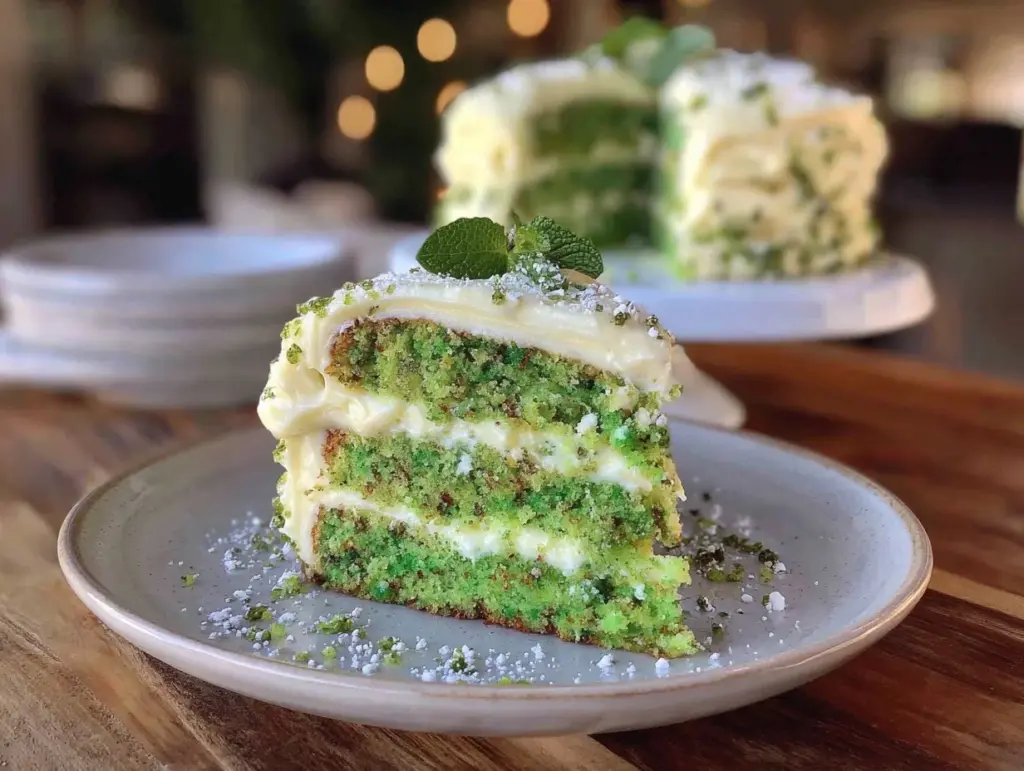
The first time I pulled a lush green velvet cake from my oven, the scent of sweet vanilla and cocoa filled the kitchen—honestly, it was like a magic trick had happened right there in my battered baking pans. The vibrant emerald hue shimmered against the soft crumb, and as I slathered on creamy frosting layers, it looked almost too good to eat (almost!). You know, there’s something about that striking green color that just makes people pause, smile, and reach for a slice without hesitation.
I remember discovering green velvet cake at a small-town bake sale years ago, when I was knee-high to a grasshopper and obsessed with anything colorfully baked. Someone’s grandma had made it, and it was gone before I could blink. That was the kind of moment where you pause, take a deep breath, and just smile because you know you’re onto something truly special. I spent my college days trying to recreate that recipe—sometimes with hilarious flops—until I finally landed on this easy homemade green velvet cake that’s perfect for parties, birthdays, and Pinterest-perfect celebrations.
Let’s face it, my family couldn’t stop sneaking slices off the cooling rack (and I can’t really blame them). Every birthday, holiday, or random Tuesday, this cake pops up and disappears just as fast. The kids love the color, the grown-ups swoon over the creamy frosting layers, and I secretly wish I’d found this recipe years ago for all those potlucks I struggled to impress at. Honestly, this is dangerously easy to whip up—pure, nostalgic comfort with a twist.
I’ve tested it more times than I care to admit (in the name of research, of course), and it’s become a staple for family gatherings, gifting, and just brightening up your Pinterest board. It feels like a warm hug, and you’re going to want to bookmark this one for every celebration that needs a little wow factor.
Why You’ll Love This Green Velvet Cake Recipe
If you’re the kind of baker who wants a show-stopping cake without a ton of fuss, this green velvet cake recipe is about to become your new favorite. Trust me, it’s not just about the color—though that lush, vibrant green is always a conversation starter. After years of tweaking and taste-testing (sometimes at midnight because, well, cravings happen), I can say with confidence that this cake absolutely delivers.
- Quick & Easy: Comes together in just about one hour—perfect for those last-minute party plans or when you’re short on time but want something fabulous.
- Simple Ingredients: No wild goose chases to specialty stores; you probably already have everything you need in your pantry or fridge.
- Perfect for Parties: This green velvet cake recipe is ideal for birthdays, St. Patrick’s Day, themed gatherings, or anytime you want to wow your guests.
- Crowd-Pleaser: Kids love the bright color, adults rave about the soft crumb and rich frosting, and everyone asks for seconds (or thirds!).
- Unbelievably Delicious: The flavor is a little cocoa, a little vanilla, and a lot of tender, moist cake—it’s comfort food in cake form.
What sets this green velvet cake recipe apart? It’s all about balance. The gentle touch of cocoa pairs perfectly with the creamy frosting layers, creating a texture that’s light but rich, and never dry. I use a specific blending technique for the batter so every bite is smooth and even—trust me, it’s worth the extra minute.
Let’s be honest, there are plenty of velvet cakes out there, but the green version feels playful and festive. It’s comfort food reimagined: faster, easier, and with a color that makes everyone smile. Plus, you can make it ahead, frost it easily, and serve up slices that look Pinterest-worthy every time. It’s my go-to for impressing guests without the stress, and for turning a regular get-together into something memorable.
Close your eyes after the first bite—yeah, it’s that good. If you want a cake that’s easy, fun, and guaranteed to spark joy, you’re in the right place.
What Ingredients You Will Need
This easy homemade green velvet cake uses simple, wholesome ingredients to deliver bold flavor and a satisfyingly soft texture—no fancy tricks required. Most of these are pantry staples you probably already have, but a couple of special touches make all the difference for those lush layers and creamy frosting. If you’re like me, you’ll have fun mixing and matching a few options for different occasions.
- For the Cake Batter:
- 2 ½ cups (315g) all-purpose flour (I usually stick with King Arthur for consistency)
- 1 ½ cups (300g) granulated sugar
- 1 tablespoon (8g) unsweetened cocoa powder (just enough for that velvet touch)
- 1 teaspoon baking powder
- ½ teaspoon baking soda
- ½ teaspoon salt
- 1 cup (240ml) buttermilk, room temperature (adds tang and keeps it moist—substitute with milk + lemon juice if you’re in a pinch)
- ½ cup (120ml) vegetable oil (can use melted coconut oil for a hint of flavor)
- 2 large eggs, room temperature
- 1 teaspoon pure vanilla extract
- 1 tablespoon white vinegar (helps with texture and color)
- 1 tablespoon green food coloring (gel works best for that vivid, Pinterest-perfect hue)
- For the Creamy Frosting Layers:
- 8 ounces (225g) cream cheese, softened
- ½ cup (115g) unsalted butter, softened
- 3 ½ cups (400g) powdered sugar, sifted
- 1 teaspoon vanilla extract
- Pinch of salt
- 2–3 tablespoons milk or heavy cream (for spreading consistency)
- Optional Garnishes:
- White chocolate shavings (for a fancy look)
- Sprinkles (especially for parties)
- Fresh berries (for a pop of color and flavor)
If you need this cake gluten-free, swap in a 1:1 gluten-free flour blend. For dairy-free, use vegan butter and coconut yogurt instead of buttermilk. I’ve tried all the swaps—trust me, they work! In summer, I add fresh berries on top, while winter calls for a sprinkle of crushed peppermint. The green velvet cake recipe is flexible, so don’t be shy about customizing it to fit your pantry or your tastes.
Equipment Needed
- Two 8-inch (20cm) round cake pans (nonstick or lined with parchment—I’ve made it in a single 9×13 pan for sheet cake style too)
- Mixing bowls (one large, one medium)
- Electric mixer or stand mixer (hand whisk works if you’ve got strong arms and patience!)
- Rubber spatula (for scraping every last bit of batter)
- Measuring cups and spoons (digital scale recommended for best results)
- Wire cooling rack (helps the cake cool evenly and prevents soggy bottoms)
- Offset spatula (for smooth frosting layers)
- Optional: Cake turntable (makes frosting a breeze but not mandatory)
If you only have one cake pan, just bake the layers one after the other—no big deal, but allow extra cooling time. I’ve used ceramic pans, metal pans, and even glass; just check for doneness early, since baking times can vary. And here’s a tip: always line your pans with parchment and give them a little spritz of nonstick spray. It saves you from those heart-sinking moments when half the cake sticks.
Budget-friendly tools are totally fine. I’ve had the same $10 hand mixer for years, and it still gets the job done. Just keep those blades clean and your mixing bowls dry before you start. No need for fancy gadgets—just the essentials for this green velvet cake recipe.
Preparation Method
- Preheat and Prep: Preheat your oven to 350°F (175°C). Grease and line two 8-inch (20cm) cake pans with parchment paper. (Trust me, parchment makes all the difference for easy removal.)
- Mix Dry Ingredients: In a large bowl, sift together 2 ½ cups (315g) flour, 1 ½ cups (300g) sugar, 1 tablespoon (8g) cocoa powder, 1 teaspoon baking powder, ½ teaspoon baking soda, and ½ teaspoon salt. (This helps avoid lumps and ensures an even crumb.)
- Combine Wet Ingredients: In a medium bowl, whisk 1 cup (240ml) buttermilk, ½ cup (120ml) vegetable oil, 2 eggs, and 1 teaspoon vanilla extract until smooth. Add 1 tablespoon white vinegar and 1 tablespoon green food coloring. (Gel coloring yields the brightest green—liquid works in a pinch but may be less vibrant.)
- Blend Batter: Pour the wet mixture into the dry ingredients. Mix on low speed with an electric mixer, scraping down the sides with a rubber spatula, until just combined. (Overmixing can make the cake tough—stop as soon as the batter is uniform.)
- Divide and Bake: Evenly divide the batter between the prepared pans. Smooth the tops with a spatula. Bake for 28–32 minutes, or until a toothpick inserted into the center comes out clean and the cakes spring back lightly. (If your oven runs hot—like mine—check at 25 minutes.)
- Cool Completely: Let the cakes cool in the pans for 10 minutes, then transfer to a wire rack to cool fully. (Warm cakes + frosting = melted mess. I learned that the hard way!)
- Prepare Frosting: In a large bowl, beat together 8 ounces (225g) cream cheese and ½ cup (115g) butter until creamy and smooth. Gradually add 3 ½ cups (400g) powdered sugar, 1 teaspoon vanilla, a pinch of salt, and 2–3 tablespoons milk or cream. Beat until light and fluffy. (If frosting is too thick, add a splash more milk; too thin, sift in more powdered sugar.)
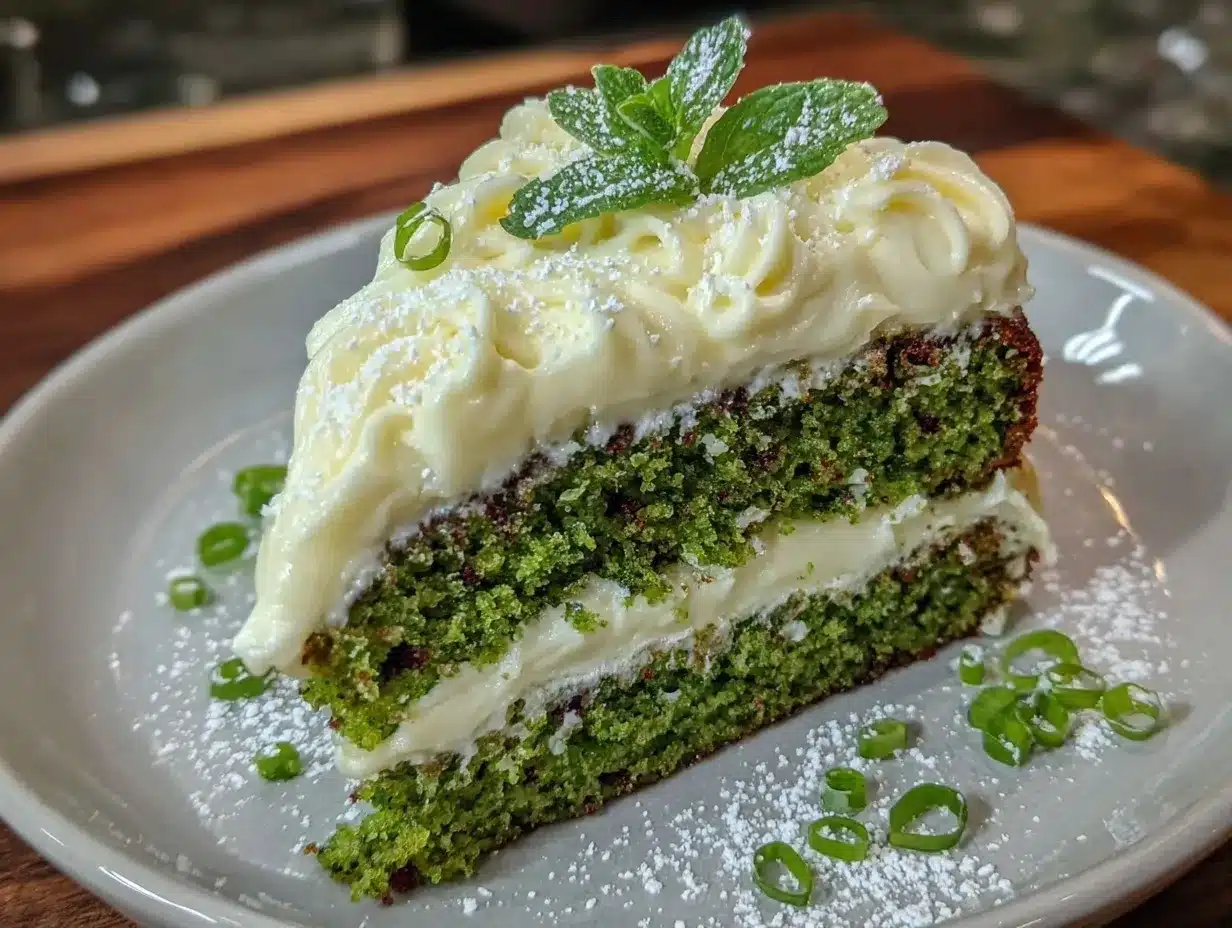
- Assemble Layers: Place one cake layer on your serving plate. Spread a generous amount of frosting over the top. (Don’t skimp—this is the creamy layer everyone loves!) Add the second cake layer, and frost the top and sides. For smooth edges, use an offset spatula and spin the cake gently on a turntable, if you have one.
- Decorate: Add white chocolate shavings, sprinkles, or fresh berries on top for a festive touch. (I sometimes pipe extra frosting around the edges for party flair.)
- Serve: Slice and enjoy! The color is best when you cut into the cake—bright, lush green that gets everyone talking. (If the cake seems too crumbly, chill it for 30 minutes before slicing.)
If you run into trouble—like cakes sticking or frosting sliding off—just remember to chill your layers and use parchment. If your cake domes too much, trim it flat with a serrated knife. The green velvet cake recipe is forgiving, but a little patience goes a long way!
Cooking Tips & Techniques
After baking this green velvet cake recipe more times than I can count, I’ve picked up a few tricks that turn good cake into party-worthy cake. First, always use room temperature eggs and buttermilk—they blend better and help the batter stay smooth. Cold ingredients can cause uneven texture, and that’s just no fun.
Don’t overmix the batter. I learned the hard way (with a few dry cakes!) that gentle mixing means a softer crumb. Use a rubber spatula to finish off any streaks of flour, and tap the pans on the counter to release air bubbles for an even rise.
For ultra-vivid green color, stick with gel food coloring. Liquid coloring works, but sometimes the shade is more pastel than lush. If you’re going for that Pinterest look, gel is your best bet.
When frosting, if the cake layers feel too soft, chill them for 20–30 minutes before assembling. It makes stacking and spreading frosting way easier (and prevents sliding layers). If your frosting gets too soft, pop it in the fridge for a few minutes to firm up. I’ve had a few “slippery cake” moments—patience always wins.
Timing is everything—bake the layers a day ahead if you’re hosting a big party. Wrap cooled cakes tightly in plastic wrap and assemble the next day for the freshest flavor. And here’s a multitasking tip: make your frosting while the cake cools, then clean up the kitchen so you’re ready to decorate as soon as the layers are done.
Consistency is key. Always measure flour by spooning it into the cup and leveling off—packing it down makes cakes dense. For easy slicing, use a sharp serrated knife and wipe between cuts. Every time I stick to these tips, my green velvet cake turns out party-perfect.
Variations & Adaptations
One of the best things about this green velvet cake recipe is how easily you can adapt it for different tastes, seasons, and dietary needs. Here are a few favorite twists I’ve tried (and loved):
- Gluten-Free: Swap the all-purpose flour for a 1:1 gluten-free blend. I’ve used Bob’s Red Mill and it works beautifully—just check for doneness a few minutes early.
- Dairy-Free: Use non-dairy milk (almond or oat) plus a tablespoon of vinegar instead of buttermilk, and vegan butter plus dairy-free cream cheese for the frosting. The cake stays moist and the frosting is still dreamy.
- Flavor Boost: Add 1 teaspoon peppermint extract to the batter for a cool, minty twist—especially fun for winter holidays or themed parties. Or, fold in mini chocolate chips for extra richness.
- Cooking Method Adaptation: Bake in a 9×13-inch (23x33cm) pan for a sheet cake version—no layers, just easy slicing for a crowd.
- Allergen Substitutions: For nut allergies, stick to sunflower oil instead of almond. For egg-free, use flaxseed “eggs” (1 tablespoon flaxseed meal + 3 tablespoons water per egg).
- Seasonal Variation: Top with fresh strawberries or blueberries in summer, or crushed peppermint candies in winter. I once added candied orange peel for a citrusy surprise—highly recommend!
My personal favorite? Swapping out the vanilla for almond extract and adding a handful of chopped pistachios on top. It’s a nutty, festive twist that always gets rave reviews. Don’t be afraid to experiment—this green velvet cake recipe is as flexible as your imagination.
Serving & Storage Suggestions
This green velvet cake recipe tastes best served at room temperature, when the frosting layers are soft and creamy and the cake crumb is tender. For parties, I like to slice the cake into generous wedges and arrange them on a pretty platter—those lush green layers always pop against white plates.
Pair with fresh berries, whipped cream, or a simple cup of tea or coffee. If you want to get fancy, drizzle a little white chocolate sauce over each slice. For birthdays or themed celebrations, colorful sprinkles or edible glitter make it extra festive.
To store, cover the cake tightly with plastic wrap or place in an airtight container. It’ll keep in the fridge for up to 4 days, though the frosting may firm up a bit—just let it sit out for 30 minutes before serving. For longer storage, freeze unfrosted cake layers wrapped in parchment and foil for up to 2 months. Thaw overnight in the fridge, then frost and serve as usual.
Reheating isn’t usually necessary, but if you want that “just baked” warmth, zap individual slices in the microwave for 10–15 seconds. The flavors seem to deepen overnight, so leftovers (if you have any) taste even better the next day. Honestly, the hardest part is not sneaking a slice every time you open the fridge.
Nutritional Information & Benefits
This green velvet cake recipe, when sliced into 12 servings, delivers roughly 380 calories per slice, with about 18g fat, 50g carbohydrates, and 4g protein. There’s a moderate amount of sugar from the cake and frosting, so it’s definitely a treat rather than an everyday snack.
Buttermilk adds calcium and a bit of protein, while cocoa powder gives a tiny antioxidant boost. If you use almond flour or coconut oil, you’ll get some healthy fats in the mix. For gluten-free or dairy-free adaptations, the nutritional values shift a bit, but the cake remains festive and delicious.
Allergens to note: contains gluten, dairy, eggs, and may contain nuts if you add pistachios or almond extract. Always check ingredient labels if you’re baking for guests with sensitivities.
From a personal wellness perspective, I see this cake as pure joy—something to share, celebrate, and savor. Balance it out with fresh fruit and enjoy every bite. Sometimes, happiness comes in the form of a lush green slice!
Conclusion
If you’re searching for a party-perfect dessert, this easy homemade green velvet cake recipe is worth every minute in the kitchen. It’s bold, beautiful, and loaded with creamy frosting layers that make every celebration feel extra special. Whether you stick to the classic version or try one of the fun adaptations, you’re guaranteed a cake that gets people talking (and asking for seconds).
Customize the color, tweak the frosting, or add your own favorite toppings—this recipe is all about making it yours. I love it for the nostalgia, the wow-factor, and the happy faces it brings to the table. If you make it, I’d love to hear about your creative twists and party stories!
Leave a comment below, share your photos, or tell me how you adapted the green velvet cake recipe for your own occasion. Here’s to more slices, more smiles, and more memories in every lush green layer!
Frequently Asked Questions
Can I make this green velvet cake recipe without buttermilk?
Yes! Mix 1 cup milk with 1 tablespoon lemon juice or vinegar and let it sit for 5 minutes. It works just as well as store-bought buttermilk.
How do I get a vibrant green color in my velvet cake?
Gel food coloring gives the brightest, most consistent results. Liquid coloring works, but may not be as vivid—add a little extra if needed.
Can I freeze the cake layers ahead of time?
Absolutely! Wrap unfrosted layers in parchment and foil, freeze for up to 2 months, and thaw overnight in the fridge before frosting.
Is this green velvet cake recipe suitable for gluten-free diets?
Yes, just substitute a 1:1 gluten-free flour blend for the all-purpose flour. I’ve had great results using Bob’s Red Mill blend.
How do I stop my cake from sticking to the pan?
Grease your pans well and line with parchment paper. Let the cakes cool for 10 minutes before turning out onto a wire rack—works every time!
Pin This Recipe!
Green Velvet Cake Recipe Easy Homemade Lush Layers for Parties
This easy homemade green velvet cake features vibrant emerald layers and creamy frosting, making it a show-stopping centerpiece for parties, birthdays, and celebrations. With a tender crumb and a hint of cocoa, it’s a festive twist on classic velvet cake that’s sure to wow your guests.
- Prep Time: 20 minutes
- Cook Time: 30 minutes
- Total Time: 1 hour
- Yield: 12 servings 1x
- Category: Dessert
- Cuisine: American
Ingredients
- 2 1/2 cups all-purpose flour
- 1 1/2 cups granulated sugar
- 1 tablespoon unsweetened cocoa powder
- 1 teaspoon baking powder
- 1/2 teaspoon baking soda
- 1/2 teaspoon salt
- 1 cup buttermilk, room temperature
- 1/2 cup vegetable oil
- 2 large eggs, room temperature
- 1 teaspoon pure vanilla extract
- 1 tablespoon white vinegar
- 1 tablespoon green food coloring (gel preferred)
- 8 ounces cream cheese, softened
- 1/2 cup unsalted butter, softened
- 3 1/2 cups powdered sugar, sifted
- 1 teaspoon vanilla extract
- Pinch of salt
- 2–3 tablespoons milk or heavy cream
- Optional: White chocolate shavings
- Optional: Sprinkles
- Optional: Fresh berries
Instructions
- Preheat oven to 350°F (175°C). Grease and line two 8-inch round cake pans with parchment paper.
- In a large bowl, sift together flour, sugar, cocoa powder, baking powder, baking soda, and salt.
- In a medium bowl, whisk buttermilk, vegetable oil, eggs, and vanilla extract until smooth. Add vinegar and green food coloring.
- Pour wet mixture into dry ingredients. Mix on low speed with an electric mixer, scraping down the sides, until just combined.
- Divide batter evenly between prepared pans. Smooth tops with a spatula.
- Bake for 28–32 minutes, or until a toothpick inserted into the center comes out clean.
- Let cakes cool in pans for 10 minutes, then transfer to a wire rack to cool completely.
- For frosting: In a large bowl, beat cream cheese and butter until creamy. Gradually add powdered sugar, vanilla, salt, and milk or cream. Beat until light and fluffy.
- Place one cake layer on serving plate. Spread frosting over top. Add second layer and frost top and sides.
- Decorate with white chocolate shavings, sprinkles, or fresh berries as desired.
- Slice and serve. For best results, chill cake for 30 minutes before slicing if crumbly.
Notes
For best color, use gel food coloring. Room temperature eggs and buttermilk yield a smoother batter. Chill cake layers before frosting for easier assembly. Gluten-free and dairy-free adaptations work well with 1:1 flour blends and vegan substitutes. Store cake tightly wrapped in the fridge for up to 4 days, or freeze unfrosted layers for up to 2 months.
Nutrition
- Serving Size: 1 slice (1/12 of cak
- Calories: 380
- Sugar: 35
- Sodium: 320
- Fat: 18
- Saturated Fat: 10
- Carbohydrates: 50
- Fiber: 1
- Protein: 4
Keywords: green velvet cake, velvet cake, party cake, easy cake recipe, homemade cake, cream cheese frosting, St. Patrick's Day dessert, birthday cake, colorful cake, festive cake


