Let me tell you, the first time I pulled a bubbling Green Chile and Cheese Grits Casserole out of the oven, the aroma alone was enough to stop my family mid-conversation and send everyone scrambling to the kitchen. The scent—a little bit smoky, a little bit creamy, with that unmistakable kick from green chiles—filled the house and had us all hungry before the meal was even ready. I was instantly hooked; it was the kind of moment where you pause, take a deep breath, and just smile because you know you’re onto something truly special. You know what? This recipe feels like pure, nostalgic comfort, the kind I wish I’d stumbled across years ago during those chilly holiday mornings when the only thing missing was a little extra warmth on the table.
Back when I was knee-high to a grasshopper, my grandma used to whip up her famous cheese grits—it was the stuff of family legend. But it wasn’t until a rainy weekend, years later, that I tried adding roasted green chiles to the mix. One bite and I realized I’d found the holiday casserole my family didn’t even know they were craving. Now, every time I make it, my kids and husband can’t stop sneaking forkfuls off the cooling rack (and honestly, neither can I). It’s become a staple for family gatherings, gifting, and those lazy weekends when you want something hearty but dangerously easy. The creamy cheese base, dotted with flecks of vibrant green chile, is just the thing to brighten up your Pinterest board and your holiday table.
I’ve tested this Green Chile and Cheese Grits Casserole more times than I’d like to admit—all in the name of research, of course! Every batch comes out a little better, a little more “just right.” Whether you’re looking for something to impress at a potluck or just want a sweet treat for your kids on a cold morning, this casserole is what you’ve been searching for. Trust me, you’re going to want to bookmark this one (it honestly feels like a warm hug every time).
Why You’ll Love This Recipe
As someone who’s spent years perfecting comfort food recipes, I can tell you—this Green Chile and Cheese Grits Casserole is the real deal. It’s been chef-tested in my own kitchen and has earned raves from family, friends, and even picky eaters. Here’s why it stands out:
- Quick & Easy: Comes together in under 45 minutes, which is perfect for busy holiday mornings or when you need something last-minute for brunch.
- Simple Ingredients: No fancy grocery trips needed; you probably have everything in your pantry right now—grits, cheese, eggs, milk, and canned green chiles.
- Perfect for Holidays: Whether it’s Christmas breakfast, Easter brunch, or even a cozy weeknight dinner, this casserole fits right in.
- Crowd-Pleaser: Kids love the creamy texture and cheesy flavor, grown-ups love the subtle heat and Southern nostalgia. It’s always the first dish to disappear!
- Unbelievably Delicious: The combo of rich cheese, tender grits, and smoky green chile is next-level comfort food.
What makes this Green Chile and Cheese Grits Casserole different from all the other grits recipes out there? For starters, blending the green chiles directly into the cheese grits gives you a smooth, flavorful base that’s never bland or grainy. I use a blend of sharp cheddar and Monterey Jack for the ultimate melt and flavor, plus a little cream cheese for extra silkiness. You can customize the spice level to suit your crew—mild for the kids, or hot if you want to wake everyone up!
This isn’t just “another casserole”—it’s my best version, crafted from years of experimenting and more than a few holiday flops. The first bite is the kind that makes you close your eyes and just savor. It’s comfort food reimagined—faster, easier, and with deeper flavor, but still with that soul-soothing satisfaction. Perfect for impressing guests without stress, or for turning a simple meal into something memorable. (Honestly, you’ll probably want to make a double batch.)
What Ingredients You Will Need
This Green Chile and Cheese Grits Casserole leans on simple, wholesome ingredients to deliver bold flavor and a satisfying, creamy texture—no fuss, just goodness. Most of these are pantry staples and easy to swap if needed, so you’re covered even on those “oops, I forgot to shop” days.
- For the grits base:
- Stone-ground grits (1 cup / 180g) (I love Bob’s Red Mill for a hearty, consistent texture)
- Water (2 cups / 480ml)
- Whole milk (2 cups / 480ml) (adds creaminess; swap with 2% or plant-based milk as needed)
- Unsalted butter (4 tablespoons / 56g), cut into cubes (for rich flavor)
- Salt (1 teaspoon / 6g)
- Black pepper (1/2 teaspoon / 2g)
- For the cheese & chile layer:
- Sharp cheddar cheese (1 cup / 120g), shredded (for depth)
- Monterey Jack cheese (1 cup / 120g), shredded (melts beautifully)
- Cream cheese (2 ounces / 56g), softened (optional, but adds silky texture)
- Canned diced green chiles (1 can / 4 ounces / 113g), drained (mild or hot, your choice)
- Optional: roasted hatch green chiles (1/2 cup / 60g), diced (for a more authentic kick)
- For binding:
- Large eggs (3, room temperature) (helps set the casserole)
- For topping:
- Extra shredded cheese (1/2 cup / 60g) (for golden, bubbly finish)
- Chopped scallions or cilantro (optional, for freshness)
Ingredient notes:
- If you need this to be gluten-free, stick with certified gluten-free grits (most are, but check labels just in case).
- Swap in dairy-free cheese and milk for a vegan version (I’ve tried Violife cheese with good results!).
- If fresh green chiles are in season, roast and peel your own for even more smoky flavor.
- Don’t have cream cheese? Just use a little extra cheddar or Monterey Jack.
I always recommend grating your own cheese (pre-shredded won’t melt quite as nicely). And if you’re lucky enough to be near a farmers market, pick up some local chiles—they’re worth it! The beauty of this casserole is how forgiving it is; if you’re missing one cheese, just adjust with what you have. It’s still delicious.
Equipment Needed
Here’s what you’ll need for this Green Chile and Cheese Grits Casserole—no fancy gadgets required:
- Large saucepan or pot (for cooking grits)
- Whisk (essential for smooth, lump-free grits)
- Medium mixing bowl (for eggs and cheese mixture)
- 9×13-inch baking dish (or 3-quart casserole dish; glass or ceramic work best)
- Cheese grater (trust me, freshly grated cheese makes a difference!)
- Measuring cups and spoons (accuracy matters for grits texture)
- Silicone spatula (for easy mixing and scraping)
- Oven mitts (the dish gets seriously hot—speaking from experience)
If you don’t have a whisk, a sturdy wooden spoon can work, though you may have a few more lumps. For budget-friendly options, I’ve used a basic Pyrex dish and a cheap hand grater—still came out perfect. If you ever get stuck with stuck-on cheese, soaking your grater in warm water with a little dish soap works wonders (learned that the hard way after a holiday marathon!).
This casserole is pretty forgiving with equipment, so don’t stress if you’re missing one specialty item. I’ve made it in everything from cast iron to disposable foil pans for potlucks. It’s always a winner.
Preparation Method

Ready to whip up a Green Chile and Cheese Grits Casserole? Here’s my tried-and-true process—step by step, with tips for every stage.
- Preheat the oven: Set your oven to 350°F (175°C) and grease a 9×13-inch baking dish with butter or nonstick spray.
- Cook the grits: In a large saucepan over medium-high heat, bring 2 cups (480ml) water and 2 cups (480ml) milk to a gentle boil. Whisk in 1 cup (180g) grits slowly to avoid lumps. Reduce heat to low and stir constantly for 5-7 minutes, until thickened. (Grits should be creamy, not stiff.) If the mixture seems dry, add a splash more milk. If lumps form, whisk vigorously—don’t panic, they’ll break down!
- Add butter and seasonings: Remove grits from heat, stir in 4 tablespoons (56g) unsalted butter, 1 teaspoon (6g) salt, and 1/2 teaspoon (2g) black pepper. The butter should melt smoothly—if it sits on top, just keep stirring.
- Mix the cheeses: In a medium bowl, combine 1 cup (120g) shredded cheddar, 1 cup (120g) Monterey Jack, and 2 ounces (56g) cream cheese if using. Fold in the drained green chiles (1 can, 4 ounces / 113g) and, if desired, 1/2 cup (60g) roasted hatch green chiles. Mix until evenly coated.
- Beat the eggs: In a separate bowl, whisk 3 large eggs until light and frothy. (This helps the casserole set up nice and fluffy.)
- Combine everything: Slowly pour the eggs into the hot grits, whisking constantly so the eggs don’t scramble. Add the cheese and chile mixture, stirring until everything is well combined. The batter should be thick, creamy, and flecked with green chiles.
- Transfer to baking dish: Pour the mixture into your prepared baking dish, smoothing the top with a spatula. Sprinkle with 1/2 cup (60g) extra cheese and a handful of scallions or cilantro if desired.
- Bake: Bake uncovered for 35-40 minutes, until the top is golden brown and the casserole is set (a knife inserted in the center should come out mostly clean). If the edges start to brown too quickly, tent with foil.
- Cool slightly: Let the casserole rest for 10 minutes before serving. This helps it firm up and makes slicing easier. (I know it’s tempting to dig in right away, but patience pays off!)
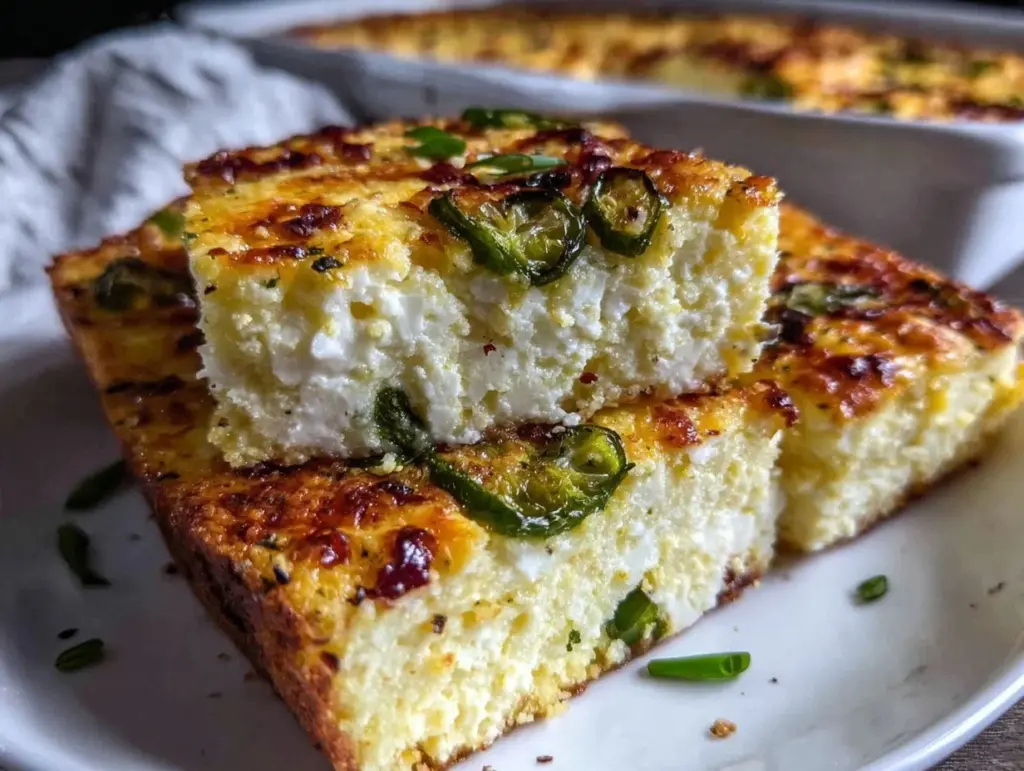
- Serve: Cut into squares and serve warm. The inside should be creamy, with gooey cheese and bursts of green chile in every bite.
Troubleshooting tips: If your casserole is runny, it likely needs a few more minutes in the oven. If it’s too firm, try reducing the bake time next time or add a splash more milk to the mixture. Grits can be finicky—sometimes they soak up more liquid than expected, so adjust as needed. For extra flavor, add a pinch of garlic powder or smoked paprika to the grits before baking.
Personal tip: I prep the grits and cheese mixture the night before and store separately in the fridge—then just combine and bake in the morning for a seriously effortless holiday breakfast!
Cooking Tips & Techniques
Getting your Green Chile and Cheese Grits Casserole just right is all about the details. Here are some professional tips (and a few lessons learned the hard way):
- Whisk, whisk, whisk: Smooth grits are key. Whisk constantly as you add the grits to the hot liquid, and don’t be afraid to use a little elbow grease if lumps appear.
- Don’t overbake: The casserole should be creamy, not dry. Start checking at 35 minutes—the edges will set first, but the center should still be slightly soft.
- Layer flavors: Mixing both cheddar and Monterey Jack creates a richer flavor. If you only have one, add a little cream cheese for depth.
- Customize the spice: Add more green chiles for extra heat or use only mild for a kid-friendly version. I once went a little wild with hot hatch chiles—let’s just say my family was wide awake that morning!
- Prep ahead: You can cook the grits and prep the cheese mixture a day in advance. Combine everything and bake when ready—makes holiday mornings SO much easier.
- Multitasking: While the grits cook, shred your cheese and chop chiles. It saves time and keeps you from scrambling at the last minute.
- Consistency matters: If your grits seem too thick before combining with eggs, add a splash more milk. Too thin? Let them cook another minute or two.
- Let it rest: Giving the casserole 10 minutes to cool allows the cheese to set and makes serving easier. Trust me, it’s worth it.
I’ve had a few failures (like scrambled eggs in the grits from pouring too fast), but with these tips, you’ll get that perfect creamy, cheesy bite every time. If you want to add a little crunch, toss on some crushed tortilla chips or crispy bacon before baking—my husband swears by it!
Variations & Adaptations
This Green Chile and Cheese Grits Casserole is perfect as written, but let’s face it—everyone likes to put their own spin on a classic! Here are a few ways to make it work for different diets, tastes, and occasions:
- Gluten-free: Use certified gluten-free grits (most are, but double-check). The casserole is naturally gluten-free otherwise.
- Vegan: Swap in plant-based milk and dairy-free cheese. Use a vegan egg replacer (like flax eggs) for binding. I’ve made this with almond milk and Violife cheddar—still creamy and flavorful!
- Low-carb: Substitute cauliflower rice for grits (about 3 cups / 300g), though the texture is a little different. It’s surprisingly tasty and a good option for carb-watchers.
- Meaty version: Stir in 1 cup (120g) cooked, crumbled breakfast sausage or bacon for a heartier dish—great for brunch.
- Seasonal twist: Add roasted red peppers or fresh corn kernels in summer, or swap green chiles for jarred pimientos when chiles aren’t available.
- Spicy lovers: Top with pickled jalapeños or a dash of hot sauce before serving for an extra kick.
For different cooking methods, you can make this casserole in a slow cooker (on low for 3-4 hours) or portion into muffin tins for individual servings (bake 20-25 minutes). I’ve tried the muffin tin version for brunch parties—super cute and easy to serve!
Allergen swaps are easy, too—just use nut-free milk and cheese if allergies are a concern. My personal favorite variation is adding a handful of fresh spinach to the cheese layer before baking. It wilts beautifully and adds a pop of color and nutrients. Honestly, you can’t go wrong.
Serving & Storage Suggestions
Green Chile and Cheese Grits Casserole is best served warm, straight from the oven, when the cheese is golden and the edges just a little crisp. Cut into squares for tidy brunch plates or scoop out generous portions for casual family style.
- Presentation: Garnish with chopped scallions, cilantro, or a sprinkle of smoked paprika for color. Serve on a pretty platter or right in the baking dish for that rustic, homey vibe.
- Pairings: This casserole goes perfectly with crispy bacon, scrambled eggs, or a fresh fruit salad. For dinner, pair with grilled chicken or a leafy green salad. A hot mug of coffee or spiced chai is the dream combo for breakfast!
- Storage: Leftovers keep well in the fridge, covered, for up to 4 days. The flavors deepen overnight, making it even tastier the next day.
- Freezing: Wrap tightly and freeze for up to 2 months. Thaw overnight in the fridge before reheating.
- Reheating: Warm slices in the microwave (1-2 minutes) or cover and bake at 325°F (163°C) for 15-20 minutes, until heated through. Add a splash of milk if it seems dry.
If you’re making ahead for a holiday, bake as usual, cool, cover, and refrigerate. Just reheat before serving—easy and stress-free. The cheese and chile flavors get even better as they sit. Honestly, if you’re lucky enough to have leftovers, they make a killer breakfast burrito filling!
Nutritional Information & Benefits
Here’s a quick look at the estimated nutrition for one serving of Green Chile and Cheese Grits Casserole (based on 12 servings):
- Calories: ~210
- Protein: 8g
- Carbs: 18g
- Fat: 12g
- Fiber: 2g
- Sugar: 2g
This casserole is naturally gluten-free and packs a decent amount of protein from the eggs and cheese. The green chiles add vitamin C and antioxidants, while grits provide complex carbs for lasting energy. If you use reduced-fat cheese or plant-based swaps, it can be made lower in calories and saturated fat.
Potential allergens include dairy and eggs—easy to substitute if needed. From a personal wellness angle, I love that it satisfies comfort cravings without being heavy or greasy. It’s hearty enough to stick with you but light enough for a second helping (no judgment here!).
Conclusion
If you’re looking for the ultimate holiday comfort dish, you can’t go wrong with this Green Chile and Cheese Grits Casserole. It’s creamy, cheesy, and just the right amount of spicy—perfect for family brunches, potlucks, or any cozy gathering. The recipe is flexible, forgiving, and always a crowd-pleaser.
Don’t be afraid to tweak it to suit your tastes or dietary needs. Add extra veggies, swap cheeses, or dial up the heat—it’s your kitchen, your rules. Honestly, that’s what makes this casserole so special: it brings everyone together and feels like a warm, cheesy hug (with a little kick!).
Why do I love it? Because it’s the dish my family always asks for, the one I know will be a hit, and the one that makes every holiday just a little more delicious. If you try it, let me know! Drop a comment, share your own adaptations, or tag me in your Pinterest photos. Here’s to comfort, community, and casseroles that don’t disappoint—happy cooking!
FAQs
Can I use instant grits instead of stone-ground?
You can, but the texture will be softer and a bit less hearty. Stone-ground grits give the best flavor and structure.
How spicy is the casserole with canned green chiles?
Usually, canned green chiles are mild, but you can use hot varieties or add jalapeños if you want more heat.
Can I make Green Chile and Cheese Grits Casserole ahead of time?
Absolutely! Prep everything the night before, refrigerate, and bake in the morning. Or bake, cool, and reheat before serving.
Is this recipe gluten-free?
Yes, as long as you use certified gluten-free grits. Most grits are naturally gluten-free, but always check the label.
Can I freeze leftovers?
Definitely! Wrap tightly and freeze for up to two months. Thaw and reheat for an easy breakfast or side dish anytime.
Pin This Recipe!

Green Chile and Cheese Grits Casserole

This creamy, cheesy casserole combines stone-ground grits, a blend of cheeses, and smoky green chiles for the ultimate holiday comfort dish. Perfect for brunches, potlucks, or cozy family gatherings, it’s easy to make, crowd-pleasing, and naturally gluten-free.
- Prep Time: 15 minutes
- Cook Time: 35-40 minutes
- Total Time: 50-55 minutes
- Yield: 12 servings 1x
- Category: Breakfast, Brunch, Side Dish
- Cuisine: Southern, American
Ingredients
- 1 cup stone-ground grits
- 2 cups water
- 2 cups whole milk (or 2% or plant-based milk)
- 4 tablespoons unsalted butter, cut into cubes
- 1 teaspoon salt
- 1/2 teaspoon black pepper
- 1 cup sharp cheddar cheese, shredded
- 1 cup Monterey Jack cheese, shredded
- 2 ounces cream cheese, softened (optional)
- 1 can (4 ounces) diced green chiles, drained (mild or hot)
- 1/2 cup roasted hatch green chiles, diced (optional)
- 3 large eggs, room temperature
- 1/2 cup extra shredded cheese (for topping)
- Chopped scallions or cilantro (optional, for topping)
Instructions
- Preheat oven to 350°F (175°C) and grease a 9×13-inch baking dish.
- In a large saucepan over medium-high heat, bring water and milk to a gentle boil.
- Slowly whisk in grits to avoid lumps. Reduce heat to low and stir constantly for 5-7 minutes until thickened and creamy.
- Remove grits from heat and stir in butter, salt, and black pepper until melted and smooth.
- In a medium bowl, combine cheddar, Monterey Jack, and cream cheese (if using). Fold in drained green chiles and roasted hatch chiles (if using).
- In a separate bowl, whisk eggs until light and frothy.
- Slowly pour eggs into hot grits, whisking constantly to prevent scrambling.
- Add cheese and chile mixture to grits, stirring until well combined.
- Pour mixture into prepared baking dish and smooth the top. Sprinkle with extra shredded cheese and scallions or cilantro if desired.
- Bake uncovered for 35-40 minutes, until golden brown and set (a knife inserted in the center should come out mostly clean). Tent with foil if edges brown too quickly.
- Let casserole rest for 10 minutes before serving to firm up.
- Cut into squares and serve warm.
Notes
For a gluten-free version, use certified gluten-free grits. You can prep the grits and cheese mixture ahead and bake in the morning. Customize spice level with mild or hot chiles. Add cooked sausage or bacon for a meaty version, or swap in plant-based cheese and milk for vegan adaptation. Let casserole rest before serving for best texture. Leftovers make great breakfast burrito filling.
Nutrition
- Serving Size: 1/12 of casserole (a
- Calories: 210
- Sugar: 2
- Sodium: 350
- Fat: 12
- Saturated Fat: 7
- Carbohydrates: 18
- Fiber: 2
- Protein: 8
Keywords: green chile casserole, cheese grits, holiday brunch, comfort food, gluten-free, southern recipe, breakfast casserole, easy casserole, potluck dish


