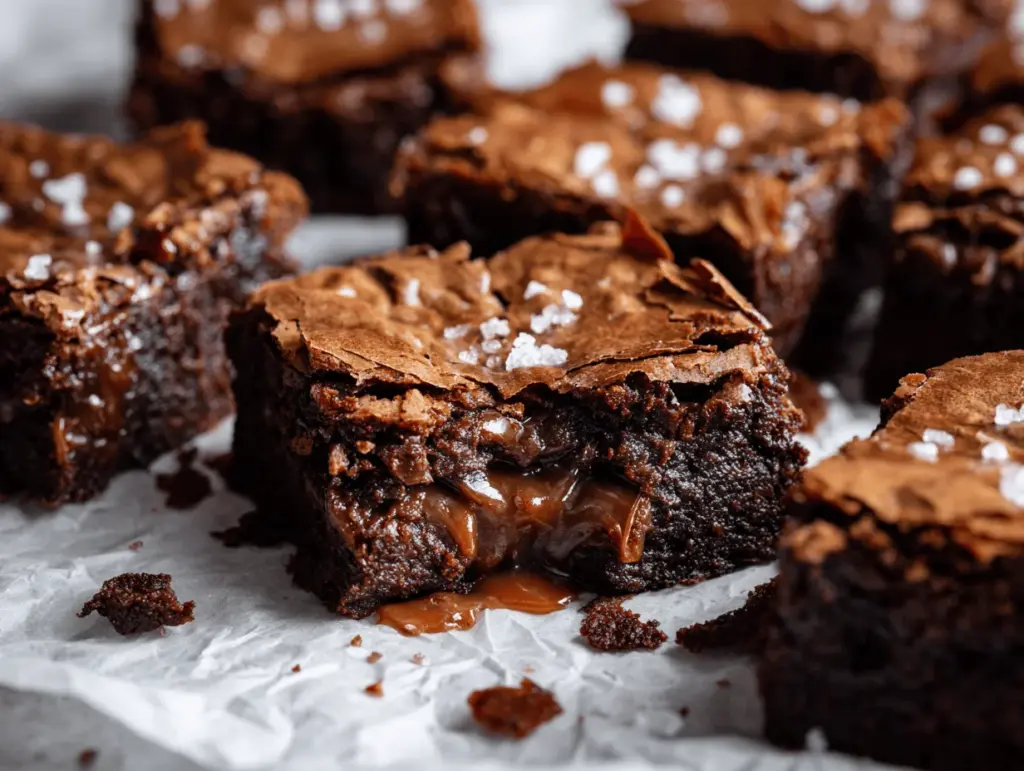
The first time I pulled a tray of these fudgy chewy browkies from the oven, my kitchen smelled like pure chocolate heaven. Imagine the best brownie and the chewiest cookie getting tangled up in the same pan—oh wow, you’re in for a treat! Honestly, I came up with this browkies recipe on a rainy weekend when I just couldn’t choose between cookies or brownies (classic dessert dilemma, right?). So, I did what anyone would do—swirled ’em together!
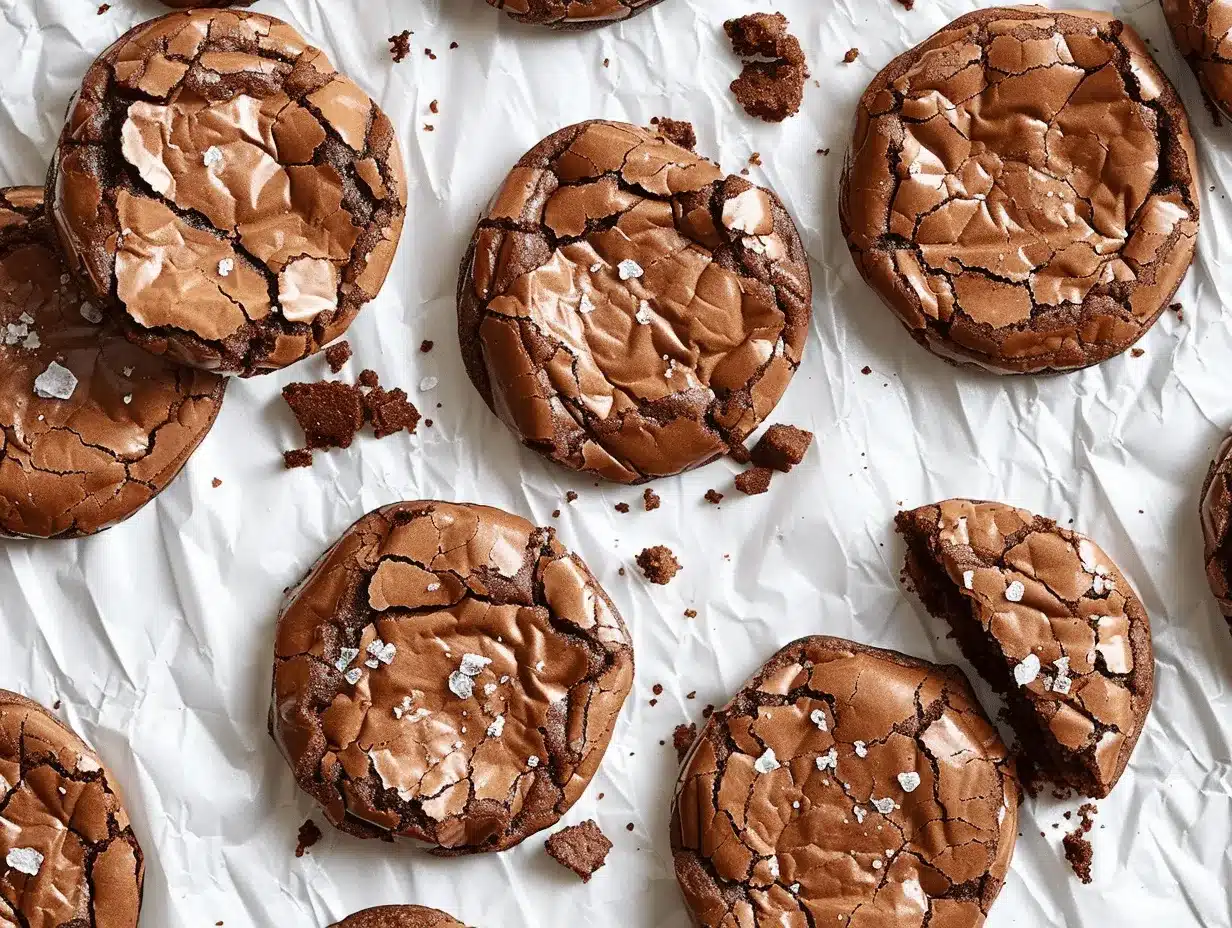
There’s something magical about the crackly top, the gooey center, and those chewy edges that make these browkies a true crowd favorite. My kids call them “the ultimate chocolate bars,” and I have to agree. Whether you’re baking for a party, looking for a special lunchbox treat, or just need serious chocolate comfort, this fudgy chewy browkies recipe is pure joy. Trust me, I’ve tested this recipe over a dozen times, tweaking the ratios so you get that perfect marriage of dense brownie and soft cookie in every square. It’s become a staple in our house for movie nights and birthday celebrations.
So, if you love chocolate (and who doesn’t?), get ready to meet your new favorite homemade treat. These browkies are a game-changer for anyone who can’t decide and, honestly, they’ll disappear faster than you think. Whether you’re a seasoned baker or just starting out, you’ll find this recipe easy to follow, totally reliable, and guaranteed to satisfy every chocolate craving—no fancy skills required. By the end, you’ll have a pan full of irresistible fudgy chewy browkies, ready to share… or not!
Why You’ll Love This Fudgy Chewy Browkies Recipe
- Quick & Easy: You can whip these browkies up in under an hour, so they’re perfect for last-minute dessert emergencies or spontaneous chocolate cravings.
- Simple Ingredients: No need for specialty chocolate or hard-to-find items—basic pantry staples are all you need.
- Perfect for Any Occasion: These brownie cookie bars are a hit at potlucks, bake sales, family gatherings, or just a Tuesday night when you want something sweet.
- Crowd-Pleaser: Kids beg for seconds, adults sneak extra slices, and even picky eaters go back for more. I’ve watched them disappear at birthday parties and holiday feasts!
- Unbelievably Delicious: The gooey centers, chewy cookie swirls, and crackly tops are just unbeatable. You get the best of both worlds in every bite.
What sets this browkies recipe apart? Well, for starters, I blend melted chocolate with cocoa powder for an extra deep flavor, and chill the cookie dough just long enough to keep the swirls distinct. The secret is in the layering—spread the brownie batter first, then dollop the cookie dough on top so it bakes into golden, chewy pockets. I’ve tried countless versions, but this one gives you that fudgy interior, crisp edge, and chewy cookie bite every single time.
Honestly, these aren’t just good—they’re the kind of dessert that makes people close their eyes and sigh happily after the first taste. There’s no need for frosting, glaze, or fancy toppings. The chocolate flavor is so rich and satisfying, you’ll want another piece (and maybe a third). If you want to impress guests, reward yourself after a tough week, or just make something fun with the kids, these browkies deliver big time. It’s comfort food, but with a playful twist that makes baking way more exciting.
What Ingredients You Will Need
This recipe uses simple, wholesome ingredients to deliver bold chocolate flavor and a satisfyingly chewy texture—no fuss, just pure deliciousness. You probably have most of these in your pantry already, and if not, there are easy swaps for just about everything.
- For the Brownie Layer:
- 1/2 cup (115g) unsalted butter, melted (adds richness and fudgy texture)
- 3/4 cup (150g) granulated sugar
- 1/4 cup (50g) brown sugar (for deep flavor and moisture)
- 1/2 cup (90g) semi-sweet chocolate chips, melted (I love Ghirardelli for a super smooth melt)
- 2 large eggs, room temperature
- 1 tsp vanilla extract
- 1/2 cup (60g) all-purpose flour
- 1/4 cup (25g) unsweetened cocoa powder (Dutch-process for extra depth)
- 1/4 tsp salt
- For the Cookie Layer:
- 1/2 cup (115g) unsalted butter, softened
- 1/2 cup (100g) brown sugar
- 1/4 cup (50g) granulated sugar
- 1 large egg
- 1 tsp vanilla extract
- 1 1/4 cups (150g) all-purpose flour
- 1/2 tsp baking soda
- 1/2 tsp salt
- 3/4 cup (135g) semi-sweet chocolate chips (mini chips work great here for better swirl)
Ingredient Tips: For the butter, you can swap in vegan butter if needed—just make sure it’s solid, not liquid. Gluten-free flour blends work well for both layers; I’ve had success with Bob’s Red Mill 1:1. Want dairy-free? Use coconut oil in place of butter and dairy-free chocolate chips. If you like things a bit less sweet, you can reduce the sugar by a couple tablespoons in either layer without hurting the texture.
During the holidays, I swap in peppermint chips for half the chocolate chips in the cookie layer, or add a pinch of cinnamon to the brownie batter for a cozy twist. Don’t have Dutch-process cocoa? Natural cocoa works fine, but your browkies might be a touch lighter in color. If you’re using salted butter, skip the added salt—or use half. Easy peasy!
Equipment Needed
- 8×8-inch (20x20cm) square baking pan (glass or metal both work—metal gives crispier edges)
- Parchment paper (for easy removal and clean-up)
- Two mixing bowls (one for each batter)
- Spatula or wooden spoon (I prefer silicone for scraping every bit of chocolate!)
- Electric hand mixer or stand mixer (you can mix by hand, but a mixer makes it quicker)
- Measuring cups and spoons (for accuracy)
- Small saucepan or microwave-safe bowl (for melting chocolate and butter)
If you don’t have an 8×8 pan, a 9×9-inch pan works—the bars will be a bit thinner and bake a few minutes faster. No parchment? Grease the pan well with butter or nonstick spray, but parchment makes everything easier. For melting chocolate, I usually use the microwave in 30-second bursts (less mess), but a double boiler works fine too.
Budget tip: Dollar store spatulas and mixing bowls totally do the job! If you invest in anything, let it be a sturdy baking pan—it’ll last forever if you hand-wash. I keep a dedicated spatula for chocolate so it doesn’t pick up any onion smells (learned that the hard way!).
Preparation Method
- Preheat & Prep: Preheat your oven to 350°F (175°C). Line your baking pan with parchment paper, leaving an overhang for easy browkie removal. If you skip the parchment, grease the pan generously.
- Make the Brownie Batter: In a small saucepan or microwave-safe bowl, melt 1/2 cup (115g) butter and 1/2 cup (90g) chocolate chips together. Stir until smooth and glossy. Let it cool slightly (about 5 minutes).
- In a medium bowl, whisk together 3/4 cup (150g) granulated sugar, 1/4 cup (50g) brown sugar, 2 eggs, and 1 tsp vanilla extract until light and fluffy—about 1 minute. Add the cooled chocolate/butter mixture and whisk until combined.
- Gently fold in 1/2 cup (60g) flour, 1/4 cup (25g) cocoa powder, and 1/4 tsp salt just until no dry streaks remain. Don’t overmix! Set aside.
- Make the Cookie Dough: In another bowl, beat 1/2 cup (115g) softened butter with 1/2 cup (100g) brown sugar and 1/4 cup (50g) granulated sugar until creamy and pale—1-2 minutes. Add 1 egg and 1 tsp vanilla, beating until smooth.
- Stir in 1 1/4 cups (150g) flour, 1/2 tsp baking soda, and 1/2 tsp salt just until combined. Fold in 3/4 cup (135g) chocolate chips. If the dough feels super soft, chill it for 10-15 minutes to help keep the layers distinct.
- Layer & Swirl: Spread the brownie batter evenly into the prepared pan. Dollop the cookie dough in spoonfuls over the top. Use a butter knife to gently swirl—don’t overmix, or you’ll lose those chewy cookie pockets.
- Bake: Bake for 28–32 minutes, or until the top is crackly and a toothpick inserted in the center comes out with a few moist crumbs (not wet batter). If you’re using a glass pan, start checking at 30 minutes; metal pans may finish a bit sooner.
- Cool & Slice: Allow the browkies to cool in the pan for at least 30 minutes (trust me, this makes slicing easier and keeps them fudgy). Lift out using the parchment overhang and cut into 16 squares.
Troubleshooting: If your browkies seem too gooey, bake for another 2–3 minutes. If the edges brown too quickly, tent with foil for the last 10 minutes. If your cookie dough sinks, chill it for longer next time. Crumbly bars? Let them cool fully before slicing.
Personal Tip: I always save a corner piece for myself—those chewy edges are my favorite! If you want extra gooeyness, take them out right at 28 minutes and let them finish setting as they cool. And, if you’re impatient (like me), a quick blast in the fridge makes slicing even easier.
Cooking Tips & Techniques
After baking way too many browkies to count, I’ve picked up some tricks that make all the difference. The biggest lesson? Don’t overmix either layer—too much stirring kills that fudgy texture and makes the cookie part tough. I learned this the hard way after a batch came out more “cake-like” than chewy. You want the batters just combined, with a few streaks for good measure.
- Room Temperature Ingredients: Use room temp eggs and butter for both layers—this helps everything blend smoothly and creates that crackly top.
- Swirl, Don’t Mix: When adding the cookie dough, just swirl lightly. Over-swirling makes the layers blend too much, losing the distinct cookie pockets.
- Pan Choice Matters: Metal pans give crispier edges, glass pans keep things softer. Both work, but adjust your bake time accordingly.
- Check Early: Ovens run hot or cold, so start checking at 28 minutes. A toothpick with moist crumbs is perfect—wet batter means they’re not done.
- Cool Completely: Seriously, let them cool before slicing. Browkies firm up as they cool, so you get neat squares and that gooey middle.
I’ve made the mistake of slicing too soon—ended up with a chocolatey mess (good for spooning, not so much for sharing). For multitasking, make both batters at the same time—start melting chocolate while creaming the cookie dough. Batch prepping? Double the recipe and use a 9×13 pan; just add 5–8 minutes to bake time.
Consistency is key! Keep your measurements precise, and don’t substitute baking soda for baking powder or vice versa. If your browkies are too dry, double-check your flour measurement (spoon and level, don’t scoop). And, if you’re feeling adventurous, try a sprinkle of flaky sea salt on top before baking—it brings out the chocolate flavor beautifully.
Variations & Adaptations
- Gluten-Free Browkies: Swap all-purpose flour for a 1:1 gluten-free blend. I’ve tried it with King Arthur’s and Bob’s Red Mill—results are chewy and fudgy, just like the original.
- Dairy-Free Browkies: Use coconut oil or vegan butter in place of regular butter, and choose dairy-free chocolate chips. The texture stays moist, and the flavor is still rich (just a hint of coconut if you use the oil).
- Peanut Butter Swirl: Add 1/3 cup (80g) creamy peanut butter, dolloped and swirled between the layers. This is my personal favorite twist—chocolate and peanut butter are meant to be together!
If you want a seasonal spin, try adding chopped pecans or walnuts to the brownie layer for crunch, or mix in dried cranberries around the holidays. For a flavor boost, swap vanilla extract for almond extract (1/2 tsp is plenty).
Allergen swaps: For egg-free browkies, use a flax egg (1 tbsp ground flax + 2.5 tbsp water, sit for 5 minutes). If nuts are a concern, skip any add-ins and stick to chocolate chips only. My kids love adding a handful of mini marshmallows on top for a s’mores vibe!
One variation I made last summer: swirling in a bit of raspberry jam on top before baking—tart, sweet, and totally unexpected! There’s room to play, so don’t be afraid to customize these browkies to fit your cravings or dietary needs.
Serving & Storage Suggestions
Browkies taste best slightly warm, so I recommend serving them at room temperature or with a quick zap in the microwave (10 seconds does the trick!). For parties, cut into neat squares and arrange on a pretty platter—dust with powdered sugar for a Pinterest-worthy look.
Pair these fudgy chewy browkies with a scoop of vanilla ice cream or a glass of cold milk. For grown-ups, they’re awesome with espresso or a bold red wine. Looking for a full dessert spread? Serve with fresh berries or whipped cream to balance all that chocolate goodness.
To store, keep browkies in an airtight container at room temperature for up to 4 days. They’ll stay soft and chewy! In the fridge, they last a week, although the texture gets denser. For longer storage, freeze individual squares in a zip-top bag—thaw at room temp, or microwave for 15 seconds to revive that fudgy bite.
Flavor tip: The chocolate actually deepens after a day or two, so leftovers are even better. If you want to reheat for gooeyness, a quick oven warm-up (5 minutes at 325°F/160°C) does wonders. Just don’t overbake during reheating!
Nutritional Information & Benefits
Each browkie square (1 of 16) is about 210 calories, with 13g fat, 24g carbs, and 3g protein. You get fiber from cocoa and a touch from the flour, plus antioxidants from the dark chocolate chips. Browkies are naturally nut-free if you skip add-ins, and you can make them gluten-free or dairy-free with the swaps above.
Chocolate provides a little magnesium and mood-boosting effects—honestly, that’s reason enough for me to bake these after a long week. If you want lower sugar, reduce each sugar by a tablespoon, or use coconut sugar for a slightly healthier option. Always check your chocolate chips for allergens; some brands sneak in soy or milk.
I love browkies as an occasional treat because they combine comfort with a little nutritional boost from good-quality chocolate. Perfect for balancing out a healthy meal plan with something sweet and satisfying!
Conclusion
So, why should you bake these irresistible fudgy chewy browkies? For starters, you get the best of brownies and cookies in one pan—no need to choose. This recipe is easy, reliable, and endlessly adaptable, whether you’re baking for a crowd or just treating yourself.
Customize them with your favorite add-ins or swaps, and don’t be afraid to get creative. I love this recipe because it brings people together—nothing gets my family around the table faster than the smell of fresh browkies.
If you give these a try, let me know! I’d love to hear your favorite twists or see your creations. Drop a comment below, share with friends, or tag me in your photos. Happy baking—and enjoy every chocolatey bite!
FAQs
Can I make browkies ahead of time?
Absolutely! Bake, cool, and store in an airtight container up to 4 days. They’re even tastier after a day as the flavors meld together.
Can I double the recipe for a bigger crowd?
Yes, just use a 9×13-inch pan and add 5–8 minutes to the bake time. Keep an eye on the edges so they don’t overbake.
Are browkies gluten-free?
They can be! Substitute a 1:1 gluten-free flour blend for all-purpose flour in both layers. The texture stays chewy and delicious.
How do I know when browkies are done?
Check with a toothpick—if it comes out with moist crumbs (not wet batter), they’re ready. The top should look crackly and set.
Can I freeze browkies?
Definitely! Slice, wrap tightly, and freeze for up to 2 months. Thaw at room temp or microwave for 15 seconds for fresh-from-the-oven taste.
Pin This Recipe!

Fudgy Chewy Browkies Recipe – Best Homemade Brownie Cookie Bars

These fudgy chewy browkies combine the best of brownies and cookies in one irresistible bar. With a crackly top, gooey center, and chewy cookie swirls, they’re the ultimate chocolate treat for any occasion.
- Prep Time: 20 minutes
- Cook Time: 30 minutes
- Total Time: 50 minutes
- Yield: 16 squares 1x
- Category: Dessert
- Cuisine: American
Ingredients
- For the Brownie Layer:
- 1/2 cup (115g) unsalted butter, melted
- 3/4 cup (150g) granulated sugar
- 1/4 cup (50g) brown sugar
- 1/2 cup (90g) semi-sweet chocolate chips, melted
- 2 large eggs, room temperature
- 1 tsp vanilla extract
- 1/2 cup (60g) all-purpose flour
- 1/4 cup (25g) unsweetened cocoa powder
- 1/4 tsp salt
- For the Cookie Layer:
- 1/2 cup (115g) unsalted butter, softened
- 1/2 cup (100g) brown sugar
- 1/4 cup (50g) granulated sugar
- 1 large egg
- 1 tsp vanilla extract
- 1 1/4 cups (150g) all-purpose flour
- 1/2 tsp baking soda
- 1/2 tsp salt
- 3/4 cup (135g) semi-sweet chocolate chips (mini chips recommended)
Instructions
- Preheat your oven to 350°F (175°C). Line an 8×8-inch baking pan with parchment paper, leaving an overhang for easy removal, or grease the pan generously.
- In a small saucepan or microwave-safe bowl, melt 1/2 cup butter and 1/2 cup chocolate chips together. Stir until smooth and glossy. Let cool slightly (about 5 minutes).
- In a medium bowl, whisk together 3/4 cup granulated sugar, 1/4 cup brown sugar, 2 eggs, and 1 tsp vanilla extract until light and fluffy (about 1 minute). Add the cooled chocolate/butter mixture and whisk until combined.
- Gently fold in 1/2 cup flour, 1/4 cup cocoa powder, and 1/4 tsp salt just until no dry streaks remain. Do not overmix. Set aside.
- In another bowl, beat 1/2 cup softened butter with 1/2 cup brown sugar and 1/4 cup granulated sugar until creamy and pale (1-2 minutes). Add 1 egg and 1 tsp vanilla, beating until smooth.
- Stir in 1 1/4 cups flour, 1/2 tsp baking soda, and 1/2 tsp salt just until combined. Fold in 3/4 cup chocolate chips. If the dough feels very soft, chill for 10-15 minutes.
- Spread the brownie batter evenly into the prepared pan. Dollop the cookie dough in spoonfuls over the top. Use a butter knife to gently swirl—do not overmix.
- Bake for 28–32 minutes, or until the top is crackly and a toothpick inserted in the center comes out with a few moist crumbs (not wet batter). If using a glass pan, start checking at 30 minutes; metal pans may finish sooner.
- Allow the browkies to cool in the pan for at least 30 minutes. Lift out using the parchment overhang and cut into 16 squares.
Notes
For best results, use room temperature eggs and butter. Do not overmix either batter to keep the texture fudgy and chewy. Metal pans yield crispier edges, while glass pans keep the bars softer. Let browkies cool completely before slicing for neat squares. For gluten-free or dairy-free versions, use appropriate flour blends and butter substitutes. Store in an airtight container at room temperature for up to 4 days, or freeze for longer storage.
Nutrition
- Serving Size: 1 square (1/16 of pan)
- Calories: 210
- Sugar: 16
- Sodium: 120
- Fat: 13
- Saturated Fat: 8
- Carbohydrates: 24
- Fiber: 2
- Protein: 3
Keywords: browkies, brownie cookie bars, fudgy brownies, chewy cookies, chocolate dessert, easy dessert, homemade browkies, brownie cookie recipe, party dessert, lunchbox treat


