“Can you believe I just threw together an iced coffee bar in my kitchen, and it quickly became the highlight of my week?” That’s exactly how it happened one sweltering afternoon when the usual café run felt too much effort. Honestly, I was skeptical at first—could a DIY iced coffee bar really match the fancy flavors from those coffee shops? Spoiler: it did, and then some.
What started as a simple craving turned into an obsession phase where I found myself mixing and matching custom syrups and creams multiple times in just one week. There was something so satisfying about crafting your own coffee exactly how you like it, and the endless flavor possibilities kept me hooked. Plus, it made those hectic mornings feel a bit more special without adding stress.
The best part? This flavorful DIY iced coffee bar is approachable for anyone—not just the coffee aficionados. You don’t need fancy equipment or complicated steps, just some basic ingredients and a willingness to experiment. The kitchen fills with the rich aroma of fresh brewed coffee, sweet vanilla, and hints of cinnamon, making it feel like a cozy little café right at home.
It’s funny how a simple idea like this stuck with me because it wasn’t about perfection but about the comfort of ritual and the joy of making something delicious from scratch. If you’re ready to bring a little handcrafted magic to your coffee routine, this recipe offers a fun, easy way to do just that.
Why You’ll Love This Recipe
- Quick & Easy: The entire iced coffee bar setup comes together in under 30 minutes, perfect for busy mornings or last-minute afternoon pick-me-ups.
- Simple Ingredients: No need to hunt down obscure items—most syrups and creams use pantry staples you likely already have, making this an accessible treat anytime.
- Perfect for Gatherings: Whether you’re hosting brunch or a casual get-together, setting up a DIY coffee bar adds a fun, interactive element that guests will appreciate.
- Crowd-Pleaser: Kids love the sweet syrups, and adults enjoy tweaking flavors to their preference, so it’s a hit across the board.
- Unbelievably Delicious: The balance of smooth, creamy textures with bold coffee flavors and just the right amount of sweetness makes this more than your average iced coffee.
This isn’t just another iced coffee—this recipe stands out because of the homemade syrups, which you can tweak endlessly to match your taste. For example, blending cinnamon sticks right into the simple syrup gives a warm spice note that feels cozy but fresh. Or swapping out heavy cream for a lightly whipped coconut cream gives a tropical twist that’s both indulgent and dairy-free.
In my experience, these little custom touches make the coffee bar feel like a personalized experience, not just a drink. It’s the kind of recipe that turns your kitchen into a mini café, where every sip is a small celebration.
What Ingredients You Will Need
This recipe uses simple, wholesome ingredients to deliver bold flavor and satisfying texture without a fuss. You’ll find most are pantry staples or easy to source, and many have substitutions to suit your preferences.
- For the Coffee Base:
- Freshly brewed strong coffee or espresso (about 2 cups / 480 ml, cooled)
- Ice cubes
- For the Classic Vanilla Syrup:
- 1 cup (200 g) granulated sugar
- 1 cup (240 ml) water
- 1 tablespoon pure vanilla extract (I prefer Nielsen-Massey for authentic flavor)
- For the Cinnamon Spice Syrup:
- 1 cup (200 g) brown sugar
- 1 cup (240 ml) water
- 2 cinnamon sticks
- For the Creams:
- Heavy cream or half-and-half (1 cup / 240 ml)
- Sweetened condensed milk (optional, 2 tablespoons for extra sweetness)
- Coconut cream (for dairy-free option, chilled and whipped)
- Flavored creamers (store-bought or homemade, like hazelnut or caramel)
- Optional Flavor Boosters & Toppings:
- Chocolate syrup
- Caramel sauce
- Flavored extracts (almond, peppermint)
- Whipped cream
- Ground nutmeg or cocoa powder for sprinkling
Feel free to swap out the coffee for cold brew if you prefer a smoother, less acidic base. For a seasonal twist, adding a splash of pumpkin spice syrup (homemade or store-bought) can bring that cozy fall vibe to your bar. I love how flexible this setup is, which is why it keeps me coming back to it for a refreshing treat at home.
Equipment Needed
- Coffee maker or espresso machine (or a French press for a strong brew)
- Saucepan for making syrups
- Measuring cups and spoons
- Mixing bowls or large pitchers for coffee and cream mixtures
- Whisk or small hand mixer (especially helpful for whipping creams)
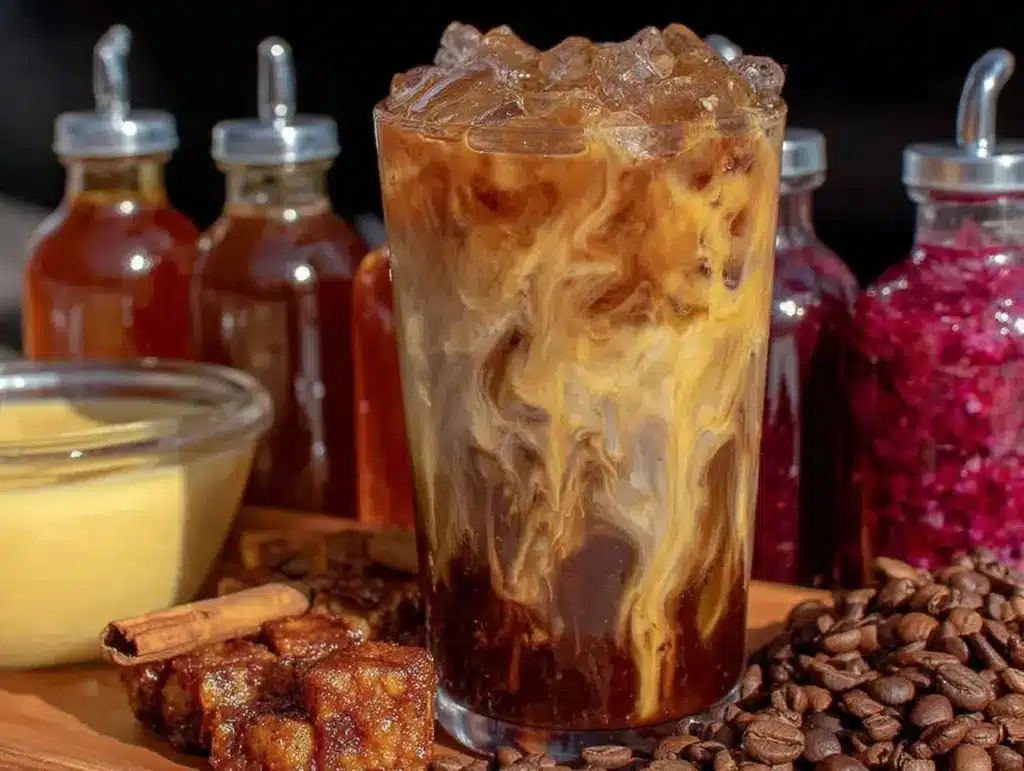
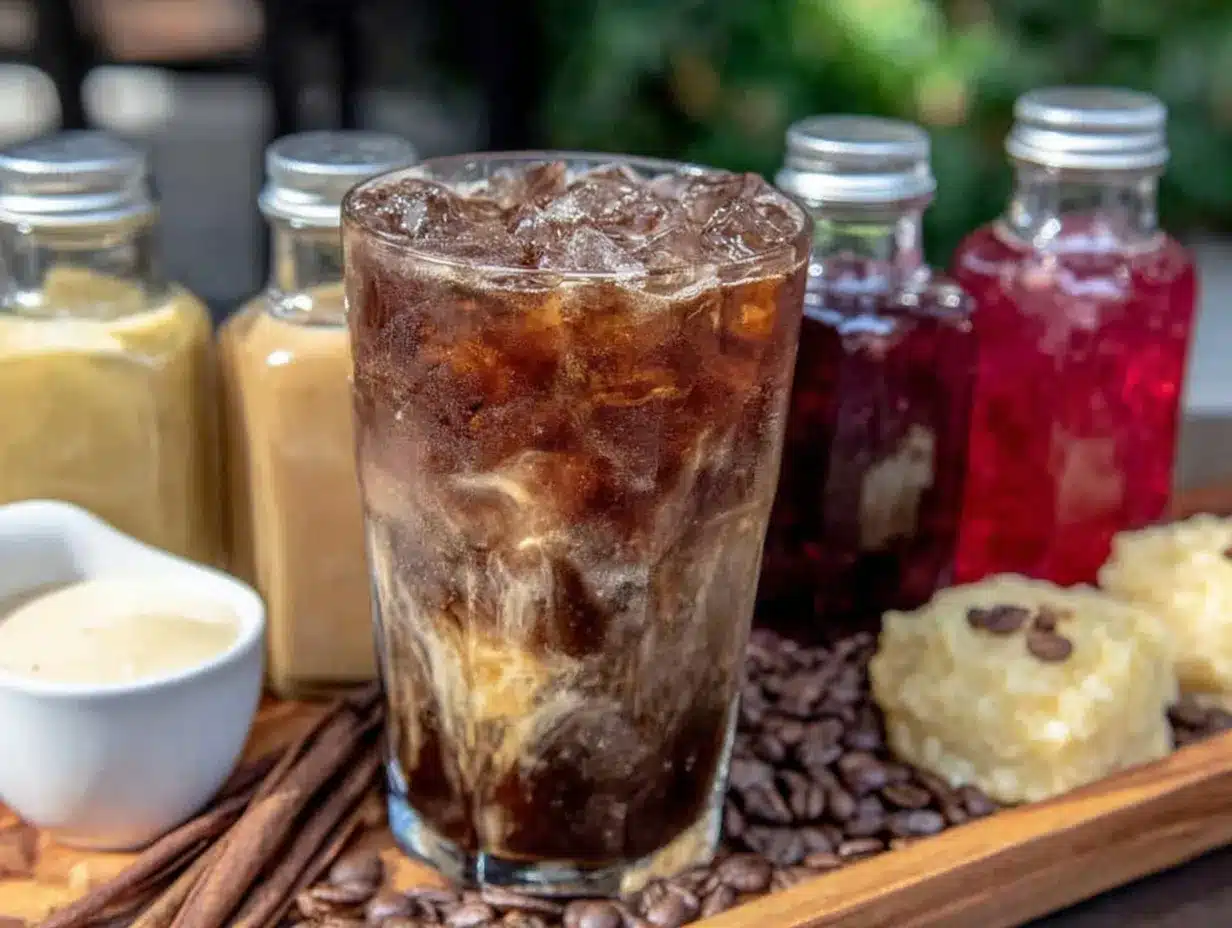
- Serving cups or glasses (clear glasses show off the layered beauty!)
- Optional: small bottles or jars for storing syrups
Honestly, you don’t need anything fancy. My favorite setup is a simple drip coffee maker and a small saucepan. For whipping cream, a handheld whisk works just fine, though a small mixer saves your arm some work if you’re making larger batches. Plus, those little syrup bottles not only look cute but keep your bar organized and invite experimentation.
Preparation Method
- Brew the Coffee: Start by making 2 cups (480 ml) of strong coffee or espresso. Use your preferred method—drip, French press, or espresso machine. Allow it to cool to room temperature, or refrigerate to speed up the process (about 15-20 minutes).
Tip: Brew it a bit stronger than usual since ice will dilute the flavor. - Prepare the Classic Vanilla Syrup: In a small saucepan, combine 1 cup (200 g) granulated sugar and 1 cup (240 ml) water. Bring to a gentle boil over medium heat, stirring occasionally until sugar dissolves.
Remove from heat and stir in 1 tablespoon vanilla extract. Let cool completely before transferring to a bottle or jar. - Make the Cinnamon Spice Syrup: In another saucepan, combine 1 cup (200 g) brown sugar, 1 cup (240 ml) water, and 2 cinnamon sticks. Simmer over medium heat for 10 minutes, stirring occasionally.
Remove from heat, discard cinnamon sticks, and cool the syrup before storing. - Whip the Cream: Whisk 1 cup (240 ml) heavy cream or half-and-half until it just starts to thicken but isn’t fully whipped (about 1-2 minutes). For a dairy-free option, whip chilled coconut cream similarly. Add 2 tablespoons sweetened condensed milk if you want a richer, sweeter cream. Keep refrigerated until ready to serve.
- Set Up Your Coffee Bar: Arrange cooled coffee, ice cubes, syrups, creams, and optional toppings on a counter or table. Use clear glasses to showcase the layers and colors.
Encourage guests (or yourself!) to build custom iced coffees by starting with coffee over ice, then adding syrups to taste, finishing with a splash of cream and a sprinkle of nutmeg or cocoa powder. - Serve and Enjoy: Stir gently to combine flavors or sip layered for a visual and taste experience. Adjust sweetness and creaminess as desired.
Pro tip: If making this for a gathering, prepare syrups and coffee ahead and keep them chilled. The bar comes together quickly when guests arrive, and the fun really begins when everyone starts mixing their own combos. I once paired this with a spread that included the crispy Greek spanakopita triangles—the savory and sweet contrast was a hit!
Cooking Tips & Techniques
Getting the right balance for your DIY iced coffee bar is a bit of an art, but here are some tips I picked up after a few trial runs:
- Use Strong Coffee: Make sure your coffee is robust since the ice and syrups dilute the flavor. Brewing it a little stronger than usual helps maintain that rich coffee taste.
- Cool Coffee Completely: Hot coffee will melt the ice too fast and water down your drink—patience here pays off.
- Make Syrups in Batches: Store homemade syrups in the fridge in sealed bottles—they last about two weeks. This way, you can quickly whip up drinks without starting from scratch each time.
- Whip Cream Just Right: Don’t overwhip the cream; it should be thick but still pourable. If it’s too stiff, it won’t blend well with the coffee.
- Multitask Smartly: While syrups simmer, brew coffee and prep cream. This keeps the process efficient and your kitchen less cluttered.
- Experiment with Flavors: Don’t hesitate to add a pinch of salt to your syrups—it enhances sweetness without extra sugar. Also, a splash of flavored extract (almond or peppermint) can add unexpected depth.
One time, I accidentally burned a batch of cinnamon syrup, but instead of tossing it, I added a dash of orange zest to mask the bitterness, and it turned out surprisingly delightful. Cooking always teaches you new tricks!
Variations & Adaptations
This DIY iced coffee bar is versatile and easy to customize—here are some variations I love:
- Seasonal Flavors: Swap classic vanilla syrup for a maple cinnamon version in fall, or try a refreshing lavender syrup in spring.
- Dairy-Free Options: Use coconut cream or almond milk whipped with a bit of sweetener for a creamy, dairy-free alternative that still feels indulgent.
- Low-Sugar Adaptation: Substitute sugar with monk fruit sweetener or erythritol in your syrups to keep sweetness but cut calories.
- Cold Brew Base: Replace hot brewed coffee with cold brew concentrate for a smoother, less acidic flavor.
- Spiced Variations: Add cardamom pods or star anise to your cinnamon syrup for a Middle Eastern-inspired twist.
Personally, I once added a splash of the Mexican rice recipe’s cinnamon-spiced syrup to my coffee for a subtle warmth that made the afternoon feel extra cozy. These little customizations make the bar feel uniquely yours.
Serving & Storage Suggestions
Serve your iced coffee immediately over fresh ice for the best texture and taste. Clear glasses show off the beautiful layers of coffee, syrup, and cream—making it almost too pretty to drink!
Pair this coffee bar with light bites or pastries—you might enjoy it alongside a fresh fruit salad or the savory creamy Japanese sesame spinach goma-ae for a surprising flavor combo.
Store leftover syrups in sealed bottles or jars in the refrigerator for up to two weeks. Keep coffee chilled and cream refrigerated as well. If you want to prep in advance, brew coffee the night before and refrigerate it.
To reheat leftover coffee, warm gently on the stove or microwave just until hot—avoid boiling as it changes flavor. Flavors often deepen overnight, so syrups may taste even richer the next day.
Nutritional Information & Benefits
This DIY iced coffee bar offers a customizable indulgence that can fit into various dietary lifestyles. The classic syrups are primarily sugar and water, so monitoring portions helps manage calorie intake. Using unsweetened coffee and moderate syrup amounts keeps it balanced.
Key benefits include antioxidants from brewed coffee, which support alertness and metabolism. Choosing dairy or dairy-free creams allows you to accommodate lactose intolerance or vegan preferences.
For those watching carbs, opting for sugar-free syrups or natural sweeteners is a smart move. This recipe is gluten-free and can be adapted for low-carb diets with ingredient swaps. Just be mindful of allergens like dairy or nuts in flavored creamers.
Conclusion
This flavorful DIY iced coffee bar with custom syrups and creams isn’t just a recipe; it’s a little ritual that turns everyday coffee into a personalized treat. Whether you’re craving a quick pick-me-up or want to impress friends with a fun setup, this bar makes it simple and enjoyable.
I love this recipe because it lets you play with flavors and textures while keeping things straightforward—no complicated ingredients or steps. It’s perfect for those moments when you want your coffee experience to feel special without the fuss.
If you try mixing up your own syrups or come up with a unique cream combo, I’d love to hear about it in the comments. Let’s keep this coffee conversation brewing!
Here’s to countless refreshing sips and flavorful mornings ahead.
FAQs About DIY Iced Coffee Bar
How long can I store homemade coffee syrups?
Store syrups in airtight bottles in the refrigerator for up to two weeks. Always check for any changes in smell or appearance before use.
Can I use instant coffee for this iced coffee bar?
While fresh brewed coffee is best for flavor, you can use a strong instant coffee concentrate if needed. Just make sure it’s fully dissolved and cooled before serving.
What’s the best way to make dairy-free cream for this recipe?
Chilled coconut cream whipped until thick is a great dairy-free option. You can also try almond or oat milk creamers, but whipping coconut cream provides the best texture.
Can I make the syrups without sugar?
Yes, substitute sugar with natural sweeteners like monk fruit or erythritol, but note that texture and sweetness may vary slightly.
How do I prevent coffee from getting watered down by ice?
Brew your coffee stronger than usual to account for dilution. Alternatively, freeze coffee in ice cube trays and use those cubes in your iced drinks for full flavor with no watering down.
Pin This Recipe!
Flavorful DIY Iced Coffee Bar Easy Custom Syrups and Creams Recipe

Create a personalized iced coffee bar with homemade syrups and creams that are quick, easy, and perfect for gatherings or everyday indulgence.
- Prep Time: 10 minutes
- Cook Time: 20 minutes
- Total Time: 30 minutes
- Yield: 4 servings 1x
- Category: Beverage
- Cuisine: American
Ingredients
- 2 cups (480 ml) freshly brewed strong coffee or espresso, cooled
- Ice cubes
- Classic Vanilla Syrup:
- 1 cup (200 g) granulated sugar
- 1 cup (240 ml) water
- 1 tablespoon pure vanilla extract
- Cinnamon Spice Syrup:
- 1 cup (200 g) brown sugar
- 1 cup (240 ml) water
- 2 cinnamon sticks
- Creams:
- 1 cup (240 ml) heavy cream or half-and-half
- 2 tablespoons sweetened condensed milk (optional)
- Chilled and whipped coconut cream (dairy-free option)
- Flavored creamers (hazelnut, caramel, store-bought or homemade)
- Optional Flavor Boosters & Toppings:
- Chocolate syrup
- Caramel sauce
- Flavored extracts (almond, peppermint)
- Whipped cream
- Ground nutmeg or cocoa powder for sprinkling
Instructions
- Brew 2 cups (480 ml) of strong coffee or espresso using your preferred method and allow it to cool to room temperature or refrigerate for 15-20 minutes.
- Prepare the Classic Vanilla Syrup by combining 1 cup granulated sugar and 1 cup water in a saucepan. Bring to a gentle boil over medium heat, stirring until sugar dissolves. Remove from heat and stir in 1 tablespoon vanilla extract. Let cool completely before storing.
- Make the Cinnamon Spice Syrup by combining 1 cup brown sugar, 1 cup water, and 2 cinnamon sticks in a saucepan. Simmer over medium heat for 10 minutes, stirring occasionally. Remove from heat, discard cinnamon sticks, and cool before storing.
- Whip 1 cup heavy cream or half-and-half until it just starts to thicken (1-2 minutes). For dairy-free cream, whip chilled coconut cream similarly. Optionally add 2 tablespoons sweetened condensed milk for extra sweetness. Keep refrigerated until serving.
- Set up the coffee bar by arranging cooled coffee, ice cubes, syrups, creams, and optional toppings on a counter or table with clear glasses.
- Build custom iced coffees by pouring coffee over ice, adding syrups to taste, finishing with a splash of cream and a sprinkle of nutmeg or cocoa powder.
- Serve immediately and enjoy. Stir gently to combine flavors or sip layered for a visual and taste experience.
Notes
[‘Brew coffee stronger than usual to compensate for dilution by ice.’, ‘Cool coffee completely before assembling drinks to prevent melting ice too quickly.’, ‘Store homemade syrups in sealed bottles in the refrigerator for up to two weeks.’, ‘Whip cream until thick but still pourable; avoid overwhipping.’, ‘Experiment with flavor extracts and toppings for personalized drinks.’, ‘Use cold brew concentrate as an alternative coffee base for smoother flavor.’, ‘Substitute sugar with monk fruit sweetener or erythritol for low-sugar syrups.’]
Nutrition
- Serving Size: 1 glass (about 8 oz)
- Calories: 150
- Sugar: 18
- Sodium: 35
- Fat: 7
- Saturated Fat: 4.5
- Carbohydrates: 20
- Protein: 1
Keywords: iced coffee, DIY coffee bar, homemade syrups, vanilla syrup, cinnamon syrup, coffee cream, dairy-free coffee, coffee recipe, easy iced coffee


