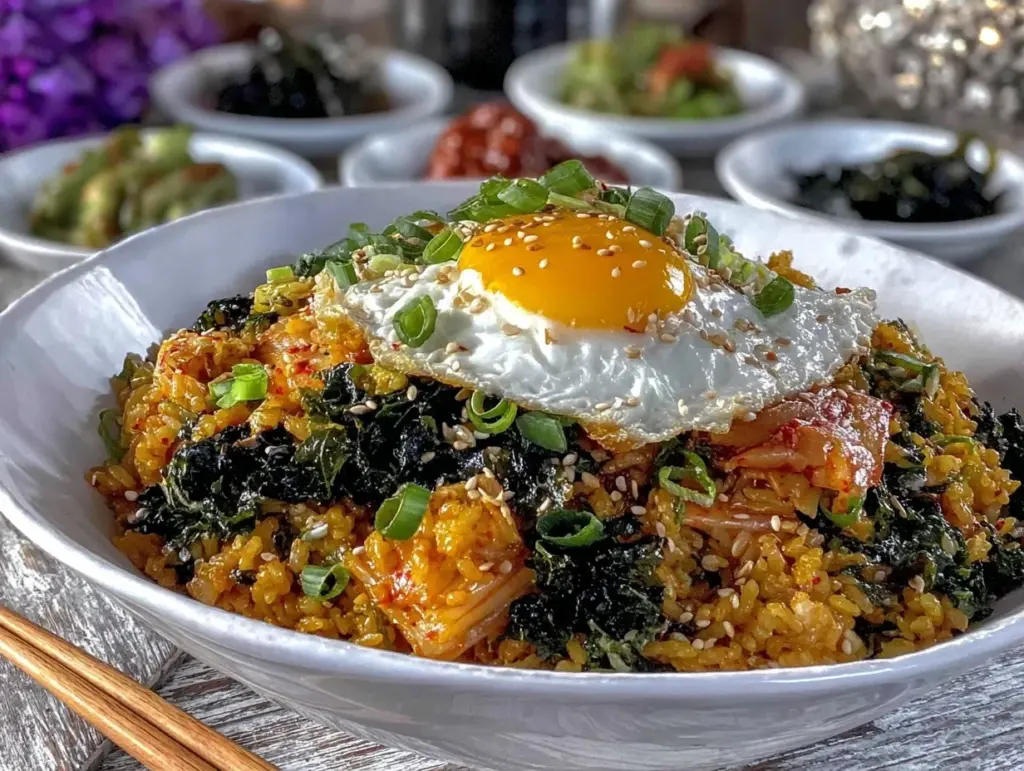
Let me tell you, the sizzle and pop of kimchi hitting a hot pan is a sound that instantly wakes up your senses. There’s this tangy, spicy aroma that fills the kitchen—almost electric, honestly—that makes you want to drop everything and grab a fork. When the rice gets tossed in and starts crisping up, the grains turning golden with little crunchy bits forming around the edges, it’s game over for self-control. The first time I made crispy kimchi fried rice with a sunny-side-up egg, I was standing at my stove on a rainy Saturday, craving something cozy and bold. I took that first bite—gooey egg yolk running into the rice, spicy kimchi crunching between my teeth—and it was the kind of moment where you pause, take a deep breath, and just smile because you know you’re onto something truly special.
My connection to this dish runs deep. Years ago, when I was knee-high to a grasshopper, my grandma would make kimchi bokkeumbap with whatever leftovers she had. It wasn’t fancy, but the flavors were unforgettable—sour, savory, a little funky, and packed with comfort. I stumbled across my own crispy version while trying to recreate that old-school magic with a modern twist. Let’s face it, the crispy bits are the best part! I wish I’d figured that out sooner. Now, my family will gather around the table, forks at the ready, fighting over who gets the largest scoop with egg yolk. They sneak bites straight from the pan when my back’s turned (and I can’t really blame them).
Honestly, this crispy kimchi fried rice has become the star of our weeknight dinners and potluck parties. It’s dangerously easy, pure nostalgia, and just the thing to brighten up your Pinterest board—whether you want a quick lunch, a midnight snack, or a simple dish for your kids. I’ve tested this recipe more times than I’ll admit (in the name of research, of course), and it’s now a staple for family gatherings and those days when you just need a warm hug from your food. You’re going to want to bookmark this one—trust me.
Why You’ll Love This Crispy Kimchi Fried Rice Recipe
Let me share a few reasons why this crispy kimchi fried rice with sunny-side-up egg is more than just another meal—it’s my go-to comfort food, chef-tested and family-approved!
- Quick & Easy: Comes together in under 30 minutes. Perfect for busy nights or when you’re running low on time and patience.
- Simple Ingredients: You won’t need a trip to a specialty store. Most things are probably hanging out in your fridge or cupboard already.
- Perfect for Any Occasion: Great for brunch, potlucks, cozy family dinners, or even a solo treat when you need a pick-me-up.
- Crowd-Pleaser: Kids love it, adults rave about it. It always disappears faster than you expect.
- Unbelievably Delicious: The crispy texture, tangy kimchi, and rich egg yolk are a next-level comfort combo. Seriously, close-your-eyes good.
What sets this recipe apart? I use cold, day-old rice for maximum crunch (don’t skip this!), sauté the kimchi until it caramelizes and add a dash of toasted sesame oil right at the end for that deep nutty flavor. I even tried blending kimchi juice into the sauce once—it makes the rice extra punchy. You know what? This is the version I wish I’d had growing up—just as soul-soothing as grandma’s, but faster and even crispier.
It’s not just a meal—it’s an experience. The kind that makes you pause after the first bite. Comfort food, reimagined for today’s busy life, but with every bit of satisfaction and heart. Whether you want to impress guests without fuss or simply turn a regular weeknight into something memorable, this recipe is your ticket. I wouldn’t share it if I didn’t believe it could make your kitchen feel like home.
What Ingredients You Will Need
This crispy kimchi fried rice recipe uses simple, wholesome ingredients that deliver bold flavor and satisfying texture—no fuss, just comfort in a bowl. Most are pantry staples or fridge regulars, and you can easily swap things out depending on what you’ve got.
- For the Fried Rice:
- 2 cups cooked white rice (preferably cold and day-old, 300g)
- 1 cup kimchi, chopped (about 150g; I love Mother In Law’s or homemade for best flavor)
- 2 tablespoons kimchi juice (from the jar; adds a tangy, spicy kick)
- 2 tablespoons neutral oil (canola or vegetable; for the best crispy texture)
- 1 tablespoon soy sauce (use low-sodium if you prefer)
- 1 teaspoon toasted sesame oil (for nutty aroma)
- 2 green onions, thinly sliced (plus extra for garnish)
- 1 small carrot, peeled and diced (optional, adds sweetness and crunch)
- 1/2 cup diced cooked protein (leftover pork belly, diced ham, tofu, or chicken; totally up to you)
- 1 teaspoon gochugaru (Korean chili flakes; optional for extra heat)
- 1/4 teaspoon sugar (balances the sourness of kimchi)
- For the Sunny-Side-Up Eggs:
- 2 large eggs (room temperature for best results)
- 1 teaspoon neutral oil (for frying)
- Pinch of salt and pepper
- For Garnish:
- Roasted seaweed strips (gim), torn or sliced
- Sesame seeds (for crunch and flavor)
- Extra sliced green onions
Ingredient Tips: Always use day-old rice—fresh rice gets mushy and won’t crisp up. For the kimchi, older, funkier kimchi brings more depth, but any will work. Feel free to swap in brown rice, cauliflower rice (for low-carb), or even quinoa. For protein, leftover rotisserie chicken or baked tofu is perfect. If you’re vegetarian, skip the meat and add extra veggies like bell pepper or peas. Don’t have gochugaru? Use red pepper flakes or leave it out for a milder dish. Allergic to eggs? Top with avocado slices or a dollop of dairy-free yogurt.
Equipment Needed
- Large Nonstick Skillet or Wok: This is key for crisping the rice without sticking. If you only have stainless steel, just use extra oil and keep the rice moving.
- Spatula or Rice Paddle: A sturdy spatula helps scrape up those golden crispy bits (trust me, you want them all!).
- Sharp Knife: For chopping kimchi and veggies. A small chef’s knife works best.
- Cutting Board: Any size will do, but a medium board keeps things tidy.
- Measuring Spoons and Cups: For precise seasoning (but a little eyeballing is fine here and there).
- Small Frying Pan: For those sunny-side-up eggs. Nonstick works best, but a well-seasoned cast iron pan does the trick.
- Mixing Bowl (optional): For prepping all your ingredients in advance.
If you don’t have a wok, a large nonstick skillet works just fine (I’ve tried both, and honestly, the skillet makes cleanup easier). I’ve used metal spatulas and even a wooden spoon—both get the job done if you’re careful. If you’re on a budget, you can find great pans at thrift stores or online. Keep your nonstick gear in good shape by avoiding metal utensils and handwashing when you can.
Preparation Method
- Prep All Ingredients: Gather and measure your rice, chop the kimchi, slice the green onions, and dice any veggies or protein. This takes about 10 minutes. (Tip: Have everything ready before you turn on the heat. Fried rice moves fast!)
- Heat the Pan: Place your large nonstick skillet or wok over medium-high heat. Add 2 tablespoons of neutral oil and swirl to coat. Wait until the oil shimmers—this is your cue that the pan’s hot enough for crisping.
- Sauté Kimchi and Veggies: Toss in the chopped kimchi and diced carrot (if using). Stir-fry for 2-3 minutes until the kimchi softens and the edges start to caramelize. You’ll smell that deep, tangy aroma—so good.
- Add Protein: If using cooked protein (pork, chicken, tofu), add it now and stir-fry for another minute. This helps warm it through and coat it in the kimchi juice.
- Season: Sprinkle in 1 teaspoon gochugaru (if using), 1 tablespoon soy sauce, 1/4 teaspoon sugar, and 2 tablespoons kimchi juice. Stir everything together. The mixture should look vibrant and glossy.
- Add Rice: Crumble the day-old rice into the pan, breaking up any clumps. Stir and toss for 2-3 minutes, spreading the rice out so it contacts the hot surface. Let it sit undisturbed for 30 seconds at a time to develop crispy bits. (If rice is sticking, add a splash more oil.)
- Finish with Sesame Oil and Green Onion: Drizzle 1 teaspoon toasted sesame oil around the pan’s edge, then toss in sliced green onions. Stir for 1 minute, then taste and adjust seasoning (add more soy sauce or kimchi juice if needed).
- Make Sunny-Side-Up Eggs: In a small nonstick pan, heat 1 teaspoon oil over medium. Crack in an egg (one at a time if needed), sprinkle with salt and pepper. Cook for 2-3 minutes until the whites are set but the yolk is still runny. (If you like your yolk firmer, cover the pan for a minute.)
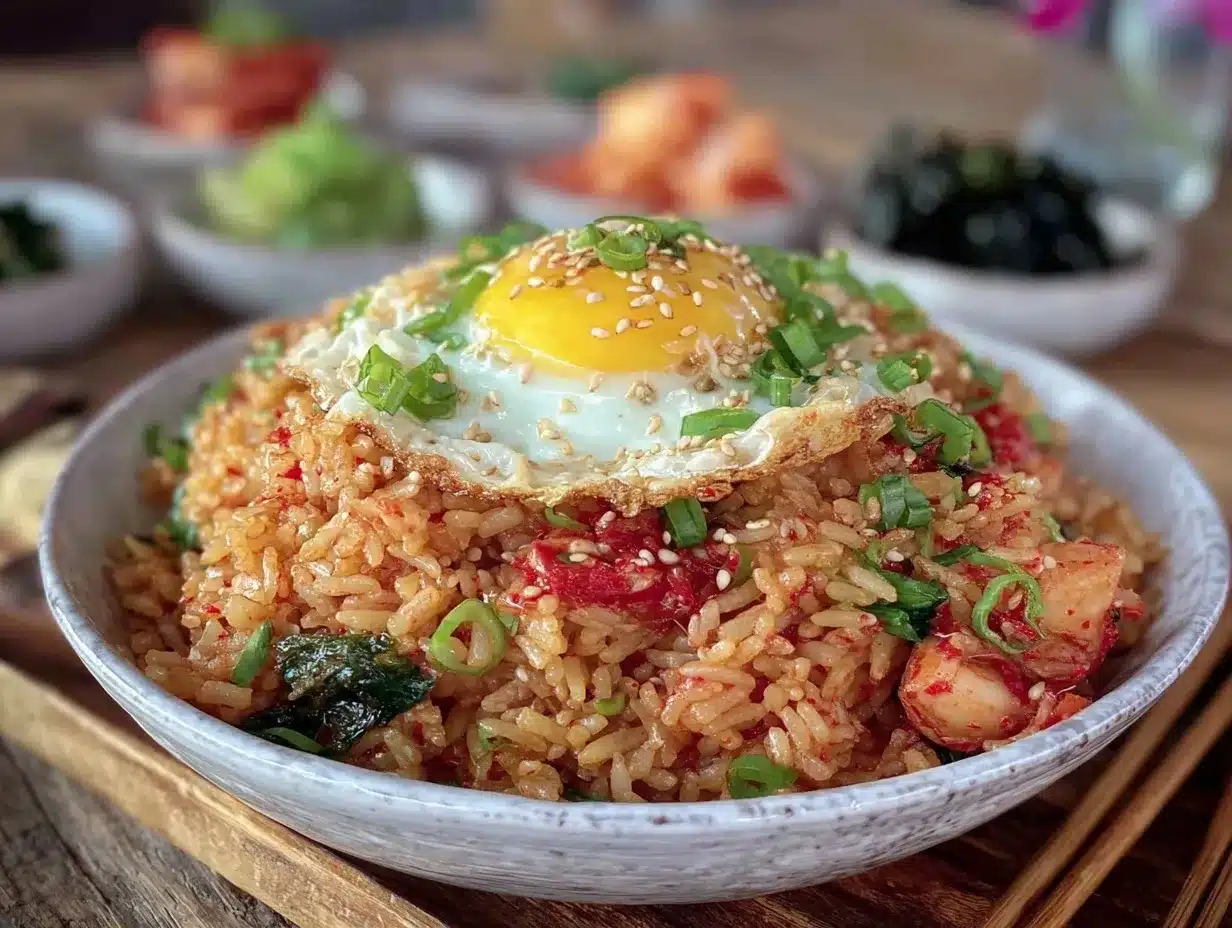
- Assemble and Garnish: Scoop crispy kimchi fried rice into bowls or plates. Top each serving with a sunny-side-up egg. Sprinkle with roasted seaweed strips, sesame seeds, and extra green onion.
- Serve Immediately: Enjoy right away while the rice is still sizzling and the egg yolk is gloriously gooey. (Tip: Break the yolk and mix it into the rice—pure bliss!)
Troubleshooting: If rice seems soggy, turn up the heat and let it crisp longer. If kimchi is too pungent, add a pinch more sugar. For extra crunch, let the rice sit undisturbed for a minute before stirring. I always keep a little extra kimchi juice on hand to amp up flavor if things taste flat.
Cooking Tips & Techniques
Here’s what I’ve learned after countless fried rice experiments (including a few kitchen disasters!):
- Use Day-Old Rice: Fresh rice is too moist and turns mushy. Cold, refrigerated grains are dry enough to crisp beautifully—don’t skip this step.
- Don’t Overcrowd the Pan: If your skillet is small, cook in batches. Overcrowding leads to steaming, not frying, and you’ll miss out on those golden crispy bits.
- Let Rice Sit: After tossing, let the rice sit undisturbed for 30-60 seconds between stirs. This gives it time to crisp up—resist the urge to stir constantly.
- Caramelize the Kimchi: Cook it until the edges darken and its aroma deepens. This step brings out sweetness and cuts the sharp funk a bit.
- Egg Timing: If you’re multitasking, fry the eggs while the rice is crisping up. I’ve burned a few yolks by getting distracted—set a timer if you need!
- Adjust to Taste: Kimchi varies in flavor. Taste as you go and adjust soy sauce, sugar, or kimchi juice. Some kimchi is saltier, some spicier—trust your taste buds.
- Personal Failures: Once, I used freshly made rice and ended up with a sticky mess (lesson learned!). Another time, I forgot the sesame oil at the end—the dish tasted flat. Little things make a big difference here.
- Consistency: Cut all veggies the same size for even cooking. Use a hot pan, and don’t be shy with oil if you want extra crunch.
Cooking crispy kimchi fried rice isn’t rocket science, but these tips make every batch reliably delicious. Sometimes, the simplest tricks are the ones you wish you’d learned years ago!
Variations & Adaptations
One of the best things about crispy kimchi fried rice is how endlessly customizable it is. I’ve tried dozens of versions, and here are my favorites:
- Vegetarian or Vegan: Skip the meat, and use baked tofu or tempeh for protein. Top with avocado instead of egg, and swap soy sauce with tamari or coconut aminos for gluten-free.
- Low-Carb or Keto: Use cauliflower rice instead of white rice. You’ll still get that crispy texture with fewer carbs—just cook a little less since cauliflower browns faster.
- Seasonal Flavors: In summer, toss in fresh corn kernels or snap peas. In fall, add roasted squash or mushrooms for earthiness.
- Allergen Adaptations: For soy allergies, skip the soy sauce and use salt or a splash of fish sauce (if not vegan). For egg allergies, simply leave off the egg or use a vegan egg substitute like Just Egg.
- Spicy Lovers: Add extra gochugaru, sriracha, or even a diced jalapeño for a fiery kick. I’ve tried a version with chili oil drizzled on top—wow!
- Personal Twist: Sometimes I add cubes of mozzarella cheese, let them melt into the rice, and it’s unexpectedly delicious—like Korean-Italian fusion!
Don’t be afraid to play around. Every family has their own version, and yours should reflect what you love most. If you’re feeling adventurous, mix and match—sometimes the best recipes are born from happy accidents.
Serving & Storage Suggestions
Crispy kimchi fried rice with sunny-side-up egg is best served piping hot, right out of the pan. The egg yolk should be runny, ready to mingle with the spicy rice. I like to serve it in wide, shallow bowls to show off those crispy edges and colorful toppings.
Pair it with a light cucumber salad, miso soup, or pickled radish for a classic Korean meal. Green tea or ice-cold barley tea makes a refreshing companion. If you’re sharing at a party, set out extra roasted seaweed and sesame seeds for folks to sprinkle as they wish.
For leftovers, cool the rice quickly and transfer to an airtight container. Store in the refrigerator for up to 3 days. You can freeze portions for up to a month—just thaw in the fridge overnight. To reheat, spread rice in a hot skillet with a splash of oil and stir until warmed and crispy again. (Microwaving works in a pinch, but you’ll lose that crunch.) The flavors deepen with time, so the next day’s batch is often even tastier.
Nutritional Information & Benefits
Each serving of crispy kimchi fried rice with egg is about 400-500 calories, depending on add-ins. You’ll get a good mix of carbs from rice, protein from eggs and meat (if used), and vitamins from kimchi and veggies. Kimchi is loaded with probiotics, which are great for gut health, and eggs add healthy fats and extra protein. Sesame oil and seaweed bring minerals like iron and calcium.
This recipe can be gluten-free if you use tamari or coconut aminos and is easily made vegetarian or dairy-free. Watch out for soy (in kimchi and soy sauce) and eggs if you have allergies. Personally, I love the energy boost and comfort this meal provides—satisfying but not too heavy. It’s a wellness win in my book, especially with all those fermented flavors!
Conclusion
If you’re searching for a recipe that’s easy, bold, and bursting with Korean comfort, this crispy kimchi fried rice with sunny-side-up egg is your answer. It’s fuss-free, customizable, and delivers a nostalgic punch in every bite. Honestly, it’s the kind of dish that never gets old—whether you tweak it with your favorite veggies, swap out proteins, or play with spice levels.
I love this recipe because it’s a blend of my childhood memories, quick weeknight fixes, and pure flavor. Don’t be shy—make it your own and share your twist! If you try it, let me know in the comments how it turned out or tag your version online. Your feedback and adaptations inspire me to keep experimenting (and let’s face it, crispy rice is always worth celebrating!).
Bookmark this recipe, share it with friends, and keep coming back for that cozy, crispy comfort—your kitchen deserves a little Korean magic!
Frequently Asked Questions
Can I use brown rice instead of white rice?
Absolutely! Brown rice works great and adds a nutty flavor. Just make sure it’s day-old and cold for the best crispy texture.
What’s the best kimchi for fried rice?
Older, more fermented kimchi brings the most depth. Any brand works, but homemade or Mother In Law’s is my personal favorite.
Can I make this recipe vegetarian or vegan?
Yes! Skip the meat, use tofu, and replace the egg with avocado or a vegan egg substitute. Use tamari for gluten-free, vegan seasoning.
My rice isn’t getting crispy—what am I doing wrong?
Make sure the rice is cold and dry, use enough oil, and let it sit undisturbed in the pan for 30-60 seconds at a time. Overcrowding the pan can also prevent crisping.
How spicy is crispy kimchi fried rice?
It’s moderately spicy, but you can adjust the heat with more or less gochugaru or kimchi juice. Leave out chili flakes for a milder version or add sriracha for extra fire!
Pin This Recipe!
Crispy Kimchi Fried Rice with Sunny-Side-Up Egg

This easy Korean comfort dish features tangy, spicy kimchi fried rice with crispy edges, topped with a gooey sunny-side-up egg. It’s quick, customizable, and perfect for cozy weeknight dinners or potlucks.
- Prep Time: 10 minutes
- Cook Time: 15 minutes
- Total Time: 25 minutes
- Yield: 2 servings 1x
- Category: Main Course
- Cuisine: Korean
Ingredients
- 2 cups cooked white rice (preferably cold and day-old, about 10 oz)
- 1 cup kimchi, chopped (about 5 oz)
- 2 tablespoons kimchi juice
- 2 tablespoons neutral oil (canola or vegetable)
- 1 tablespoon soy sauce (low-sodium optional)
- 1 teaspoon toasted sesame oil
- 2 green onions, thinly sliced (plus extra for garnish)
- 1 small carrot, peeled and diced (optional)
- 1/2 cup diced cooked protein (pork belly, ham, tofu, or chicken)
- 1 teaspoon gochugaru (Korean chili flakes, optional)
- 1/4 teaspoon sugar
- 2 large eggs (room temperature)
- 1 teaspoon neutral oil (for frying eggs)
- Pinch of salt and pepper
- Roasted seaweed strips (gim), torn or sliced, for garnish
- Sesame seeds, for garnish
- Extra sliced green onions, for garnish
Instructions
- Gather and measure all ingredients. Chop kimchi, slice green onions, dice carrot and protein.
- Heat a large nonstick skillet or wok over medium-high heat. Add 2 tablespoons neutral oil and swirl to coat.
- Add chopped kimchi and diced carrot (if using). Stir-fry for 2-3 minutes until kimchi softens and caramelizes.
- Add cooked protein and stir-fry for 1 minute to warm through.
- Sprinkle in gochugaru (if using), soy sauce, sugar, and kimchi juice. Stir until mixture is vibrant and glossy.
- Crumble day-old rice into the pan, breaking up clumps. Stir and toss for 2-3 minutes, letting rice sit undisturbed for 30 seconds at a time to crisp.
- Drizzle toasted sesame oil around the pan’s edge and add sliced green onions. Stir for 1 minute, taste, and adjust seasoning.
- In a small nonstick pan, heat 1 teaspoon oil over medium. Crack in eggs, sprinkle with salt and pepper, and cook 2-3 minutes until whites are set and yolks are runny.
- Scoop crispy kimchi fried rice into bowls or plates. Top each serving with a sunny-side-up egg.
- Garnish with roasted seaweed strips, sesame seeds, and extra green onion. Serve immediately.
Notes
Use day-old rice for best crispiness. Adjust spice level with gochugaru or kimchi juice. For vegetarian, use tofu and omit meat. For gluten-free, use tamari. Let rice sit undisturbed for extra crunch. Top with avocado for egg-free version.
Nutrition
- Serving Size: 1 bowl (about 1 1/2
- Calories: 450
- Sugar: 6
- Sodium: 900
- Fat: 18
- Saturated Fat: 3
- Carbohydrates: 56
- Fiber: 4
- Protein: 14
Keywords: kimchi fried rice, Korean comfort food, crispy rice, easy dinner, egg, spicy, weeknight meal, vegetarian option, gluten-free option


