Let me tell you, the scent of fresh lemons mingling with buttery crust as this creamy lemon tart bakes is enough to make anyone’s mouth water. The first time I whipped up this recipe, I was instantly hooked—the kind of moment where you pause, take a deep breath, and just smile because you know you’re onto something truly special. It all started years ago, when I was knee-high to a grasshopper, watching my grandma zest lemons in her tiny kitchen on a rainy weekend. She called it her “sunshine slice,” and honestly, that name stuck with me ever since.
I stumbled upon this creamy lemon tart recipe while trying to recreate that nostalgic treat for a family gathering. My relatives couldn’t stop sneaking slices off the cooling rack (and I can’t really blame them). This tart has become a staple in my kitchen, perfect for potlucks, summer brunches, or just a sweet treat when you want a little brightness in your day. You know what? It’s dangerously easy to make and offers pure, nostalgic comfort wrapped in a zesty, fresh flavor that you’re going to want to bookmark forever.
Why You’ll Love This Creamy Lemon Tart Recipe
Honestly, this creamy lemon tart recipe has been tested time and again in my kitchen (in the name of research, of course). Here’s why it’s a winner:
- Quick & Easy: It comes together in under an hour, making it perfect for busy weeknights or last-minute dessert cravings.
- Simple Ingredients: No fancy grocery trips needed; you probably already have everything in your pantry and fridge.
- Perfect for Any Occasion: Whether it’s a holiday morning, a cozy dinner, or a vibrant potluck, this tart fits right in.
- Crowd-Pleaser: Kids and adults alike rave about the creamy, tangy flavor and the crisp crust.
- Unbelievably Delicious: The smooth, velvety lemon filling balances perfectly with that buttery, flaky crust—pure comfort food with a zesty twist.
This isn’t just any lemon tart—it’s my best version. The secret? Blending cream cheese into the lemon curd for an ultra-smooth, rich texture that sets it apart. Plus, the fresh zest adds a punch that’s bright but not overpowering. It’s the kind of dessert that makes you close your eyes after the first bite. You can impress guests without breaking a sweat, or treat yourself to something memorable on a quiet evening.
What Ingredients You Will Need
This creamy lemon tart recipe uses simple, wholesome ingredients that come together beautifully to deliver bold flavor and satisfying texture without any fuss. Most are pantry staples, with a few fresh additions to keep it lively.
- For the Crust:
- 1 ½ cups (180g) all-purpose flour (I usually use King Arthur for consistent results)
- ½ cup (115g) unsalted butter, cold and cubed (adds richness and flakiness)
- ¼ cup (50g) granulated sugar
- ¼ teaspoon salt
- 1 large egg yolk, room temperature
- 2-3 tablespoons ice cold water (to bring the dough together)
- For the Creamy Lemon Filling:
- 1 cup (240ml) fresh lemon juice (about 4-5 large lemons)
- Zest of 2 lemons (adds zesty fresh flavor)
- 1 cup (200g) granulated sugar
- 3 large eggs
- 4 oz (115g) cream cheese, softened (for that silky texture)
- 1 tablespoon all-purpose flour (helps thicken filling)
- 2 tablespoons unsalted butter, melted (adds shine and richness)
- Optional Topping:
- Powdered sugar for dusting
- Fresh lemon slices or mint leaves for garnish
If you want to swap the all-purpose flour in the crust, almond flour works well for a gluten-free twist. And if cream cheese isn’t your thing, Greek yogurt is a decent substitute, though the texture will be less silky. For the lemon juice, always go fresh—bottled just doesn’t cut it here.
Equipment Needed
- 9-inch (23 cm) tart pan with removable bottom (makes releasing the tart a breeze)
- Mixing bowls (one large, one medium)
- Electric mixer or hand whisk (for smooth filling)
- Citrus zester or microplane (fresh zest is key for that zing)
- Measuring cups and spoons
- Rolling pin (or a clean bottle if you’re in a pinch!)
- Fine mesh sieve (optional, to strain lemon filling for extra smoothness)
I personally prefer a tart pan with a removable bottom because it saves me the headache of trying to flip the tart out. If you don’t have one, a pie dish will work, but the edges won’t be as neat. For zesting, a microplane is a must-have—trust me on this, it’s worth the investment and easy to clean. Need a budget-friendly rolling pin? A wine bottle wrapped in plastic wrap can do the trick!
Preparation Method
- Make the Crust: In a large bowl, combine the flour, sugar, and salt. Add the cold cubed butter and use a pastry cutter or your fingers to work it into the flour until the mixture resembles coarse crumbs (about the size of peas). This usually takes around 5 minutes.
- Add Egg Yolk and Water: Stir in the egg yolk. Gradually add ice water, one tablespoon at a time, mixing gently until the dough just comes together. Be careful not to overwork it—about 6-8 tablespoons of water should do the trick. Form the dough into a disk, wrap it in plastic, and chill in the fridge for at least 30 minutes.
- Roll Out the Dough: On a lightly floured surface, roll the chilled dough into a 12-inch (30 cm) circle. Transfer it to your tart pan, pressing it into the edges. Trim any excess dough and prick the bottom with a fork a few times to prevent bubbling.
- Blind Bake: Preheat your oven to 375°F (190°C). Line the crust with parchment paper and fill with pie weights or dried beans. Bake for 15 minutes, then remove the weights and parchment and bake another 10 minutes until golden brown. Let cool slightly.
- Prepare the Lemon Filling: In a medium bowl, whisk together the eggs and sugar until combined. Add the cream cheese and blend until smooth—an electric mixer helps here. Stir in the lemon juice, zest, melted butter, and flour until fully incorporated.
- Strain the Filling (Optional): For an ultra-smooth tart, strain the filling through a fine mesh sieve to remove zest bits and lumps. It’s a little extra step but worth it for that silky texture.
- Bake the Tart: Pour the filling into the pre-baked crust. Bake at 325°F (160°C) for 20-25 minutes, or until the filling is just set but still slightly jiggly in the center.
- Cool and Chill: Let the tart cool at room temperature for about 30 minutes, then refrigerate for at least 2 hours (or overnight) to fully set and develop flavor.
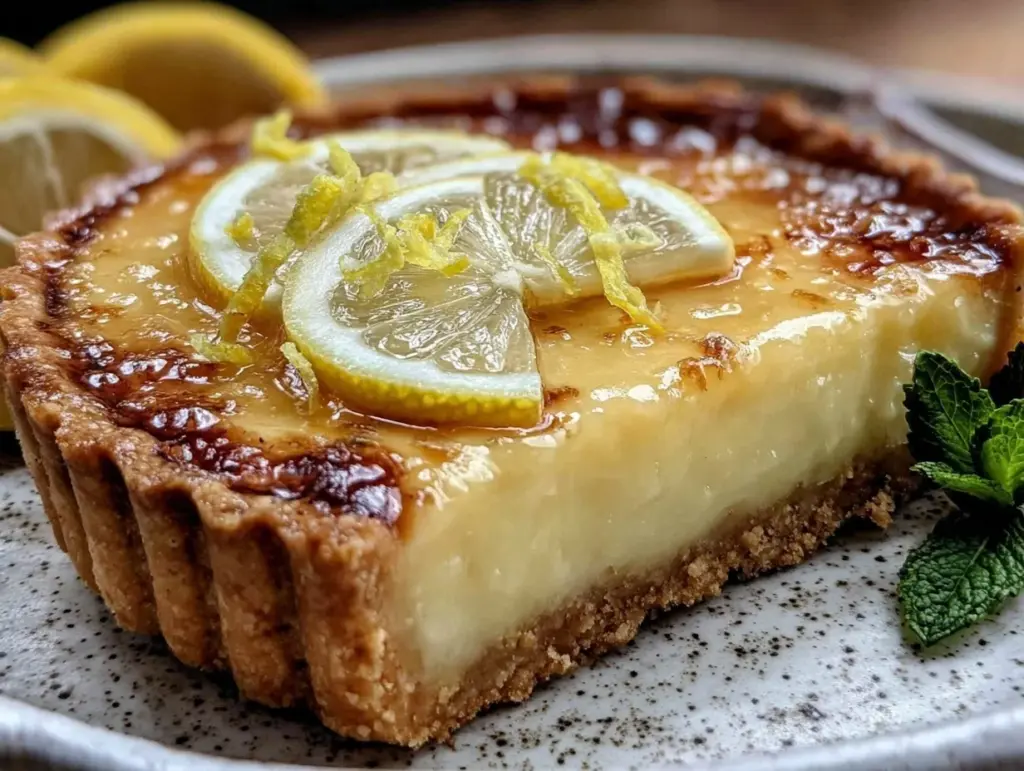
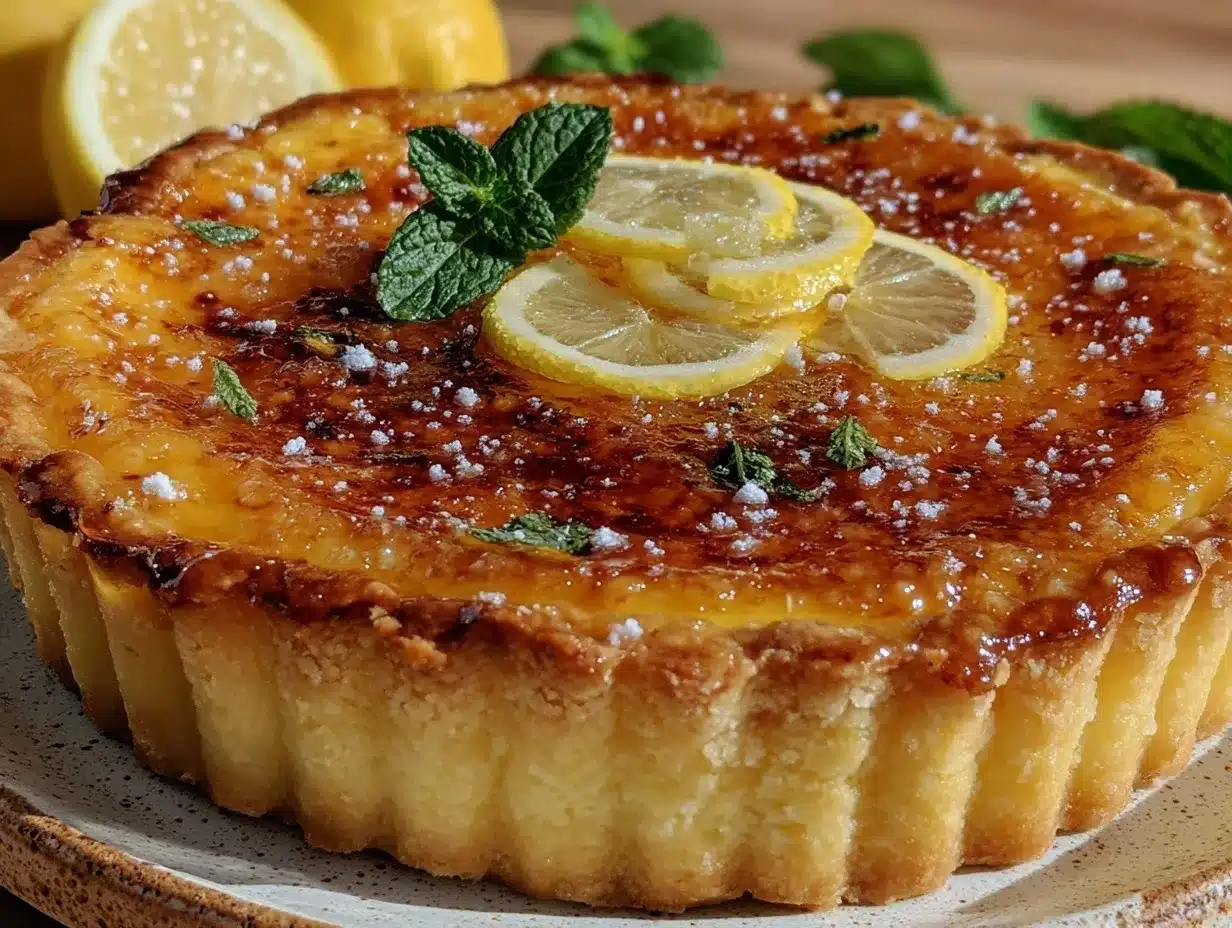
- Serve: Dust with powdered sugar and garnish with fresh lemon slices or mint if desired. Slice and enjoy!
Watch out for overbaking—the filling should tremble slightly when you take it out; it continues to set as it cools. If your crust starts to brown too fast, tent it with foil. When rolling the dough, keep your surface lightly floured, but not too much or the crust turns tough.
Cooking Tips & Techniques for the Perfect Creamy Lemon Tart
Let’s face it, getting the perfect lemon tart can be tricky. Here are some tips I’ve learned the hard way:
- Keep Ingredients Cold: For a flaky crust, cold butter and chilled dough are your best friends. Don’t skip the chilling step—it makes rolling out much easier.
- Don’t Overmix the Dough: Handle the dough gently to avoid developing gluten, which can make your crust tough.
- Use Fresh Lemons: Bottled lemon juice just doesn’t cut it here. Fresh juice and zest give that bright, zesty fresh flavor that defines this tart.
- Blind Bake Thoroughly: This prevents a soggy bottom—a common mistake. Make sure to use pie weights or dried beans to keep the crust from puffing up.
- Strain Your Filling: This extra step removes any lumps or zest bits, creating that beautifully smooth, creamy texture that makes your tart stand out.
- Watch Baking Times: The filling should be just set—overbaking leads to cracks or a dry texture.
- Chill Well: Cooling the tart completely before slicing helps it hold its shape and enhances the flavor.
Personally, I once skipped chilling the dough and ended up with a crust that shrank all over the place—lesson learned! Also, multitask by preparing your filling while the crust chills; it saves time and keeps your workflow smooth.
Variations & Adaptations
You can easily customize this creamy lemon tart recipe to suit your taste or dietary needs:
- Gluten-Free Crust: Swap the all-purpose flour with a gluten-free blend or almond flour. Just keep an eye on the dough consistency—it may need a little more water.
- Vegan Version: Use a dairy-free butter alternative and substitute cream cheese with vegan cream cheese or blended silken tofu. Replace eggs with a flax egg (1 tablespoon ground flaxseed + 3 tablespoons water).
- Berry Twist: Add fresh raspberries or blueberries to the filling before baking for a colorful, tangy surprise.
- Herbal Infusion: Stir in finely chopped fresh herbs like basil or thyme into the crust or garnish for a subtle, sophisticated flavor.
- Lower Sugar: Reduce sugar by ¼ cup (50g) or swap in a natural sweetener like honey or maple syrup, adjusting the liquid accordingly.
I once tried a lavender-infused lemon tart by adding dried lavender to the crust and it was a subtle, delightful change that wowed my brunch guests. Feel free to experiment and make this recipe your own!
Serving & Storage Suggestions
This creamy lemon tart is best served chilled or at cool room temperature—either way, it’s refreshing and satisfying. Presentation-wise, dust it lightly with powdered sugar and add a few thin lemon slices or fresh mint sprigs for a pop of color.
Pair it with a cup of hot tea, a glass of chilled white wine, or even a dollop of whipped cream for extra indulgence. It’s a winner at brunch, dinner parties, or just a sunny afternoon snack.
For storage, wrap the tart tightly with plastic wrap or keep it in an airtight container in the refrigerator for up to 4 days. It also freezes well—slice first, then freeze in a sealed container for up to 2 months. To reheat, thaw overnight in the fridge and enjoy chilled or bring to room temperature.
Flavors actually deepen after a day or two, so if you can wait, the tart tastes even better the next day. Just keep it covered to prevent it from absorbing fridge odors.
Nutritional Information & Benefits
Each slice of this creamy lemon tart (assuming 8 servings) provides approximately:
| Calories | Fat | Carbohydrates | Protein | Sugar |
|---|---|---|---|---|
| 320 kcal | 18 g | 35 g | 5 g | 22 g |
Lemons are packed with vitamin C and antioxidants, which support immunity and skin health. The cream cheese adds a nice dose of calcium and protein, while the moderate sugar keeps things sweet without going overboard. If you prefer, swapping sugar for natural sweeteners can lower the glycemic impact. This tart fits nicely into a balanced diet, especially when enjoyed in moderation as a treat.
From a wellness perspective, fresh lemon juice stimulates digestion and adds a refreshing zest that feels light, even in a creamy dessert.
Conclusion
Honestly, this creamy lemon tart with zesty fresh flavor is one of those recipes you’ll come back to again and again. It’s easy enough for a weeknight dessert but special enough for celebrations. Customize it as you like, and don’t be afraid to get creative with toppings or crust options.
I love this tart because it reminds me of sunny afternoons with family and simple pleasures that make life sweeter. If you give it a try, I’d love to hear your thoughts or any fun twists you added! Feel free to leave a comment, share with friends, or tag me in your baking adventures. Remember, good food brings people together—this tart will do just that!
Happy baking and enjoy every creamy, zesty bite!
FAQs about Creamy Lemon Tart with Zesty Fresh Flavor
Can I make the lemon tart ahead of time?
Yes! In fact, chilling the tart overnight helps the flavors meld and the filling set perfectly. Just keep it covered in the fridge.
How do I prevent the crust from becoming soggy?
Blind baking the crust with pie weights or dried beans is key. Also, let the crust cool slightly before adding the filling to avoid soaking.
Can I use bottled lemon juice instead of fresh?
Fresh lemon juice is highly recommended for the best flavor and brightness. Bottled juice tends to be less vibrant and can affect the tart’s texture.
What’s the best way to slice the tart cleanly?
Use a sharp knife dipped in hot water and wiped dry between slices. This helps cut through the creamy filling without sticking.
Is there a dairy-free version of this tart?
Absolutely! Use dairy-free butter and cream cheese alternatives, and substitute eggs with flax eggs. The texture will be slightly different but still delicious.
Pin This Recipe!

Creamy Lemon Tart

A quick and easy creamy lemon tart with a buttery flaky crust and a smooth, velvety lemon filling blended with cream cheese for a zesty fresh flavor. Perfect for any occasion and a crowd-pleaser.
- Prep Time: 15 minutes
- Cook Time: 45 minutes
- Total Time: 1 hour
- Yield: 8 servings 1x
- Category: Dessert
- Cuisine: American
Ingredients
- 1 ½ cups (180g) all-purpose flour
- ½ cup (115g) unsalted butter, cold and cubed
- ¼ cup (50g) granulated sugar
- ¼ teaspoon salt
- 1 large egg yolk, room temperature
- 2–3 tablespoons ice cold water
- 1 cup (240ml) fresh lemon juice (about 4–5 large lemons)
- Zest of 2 lemons
- 1 cup (200g) granulated sugar
- 3 large eggs
- 4 oz (115g) cream cheese, softened
- 1 tablespoon all-purpose flour
- 2 tablespoons unsalted butter, melted
- Powdered sugar for dusting (optional)
- Fresh lemon slices or mint leaves for garnish (optional)
Instructions
- Make the Crust: In a large bowl, combine the flour, sugar, and salt. Add the cold cubed butter and use a pastry cutter or your fingers to work it into the flour until the mixture resembles coarse crumbs (about the size of peas).
- Add Egg Yolk and Water: Stir in the egg yolk. Gradually add ice water, one tablespoon at a time, mixing gently until the dough just comes together. Form the dough into a disk, wrap it in plastic, and chill in the fridge for at least 30 minutes.
- Roll Out the Dough: On a lightly floured surface, roll the chilled dough into a 12-inch circle. Transfer it to your tart pan, pressing it into the edges. Trim any excess dough and prick the bottom with a fork a few times.
- Blind Bake: Preheat oven to 375°F (190°C). Line the crust with parchment paper and fill with pie weights or dried beans. Bake for 15 minutes, then remove weights and parchment and bake another 10 minutes until golden brown. Let cool slightly.
- Prepare the Lemon Filling: In a medium bowl, whisk together eggs and sugar until combined. Add cream cheese and blend until smooth. Stir in lemon juice, zest, melted butter, and flour until fully incorporated.
- Strain the Filling (Optional): Strain the filling through a fine mesh sieve to remove zest bits and lumps for an ultra-smooth texture.
- Bake the Tart: Pour filling into the pre-baked crust. Bake at 325°F (160°C) for 20-25 minutes, or until filling is just set but still slightly jiggly in the center.
- Cool and Chill: Let tart cool at room temperature for about 30 minutes, then refrigerate for at least 2 hours or overnight to fully set and develop flavor.
- Serve: Dust with powdered sugar and garnish with fresh lemon slices or mint if desired. Slice and enjoy.
Notes
Keep ingredients cold for a flaky crust. Do not overmix dough to avoid toughness. Use fresh lemon juice and zest for best flavor. Blind bake crust thoroughly to prevent sogginess. Strain filling for smooth texture. Watch baking times to avoid overbaking. Chill tart well before slicing. Use a sharp knife dipped in hot water for clean slices.
Nutrition
- Serving Size: 1 slice (1/8 of tart
- Calories: 320
- Sugar: 22
- Fat: 18
- Carbohydrates: 35
- Protein: 5
Keywords: lemon tart, creamy lemon tart, lemon dessert, easy lemon tart, zesty lemon tart, lemon curd tart, creamy dessert, summer dessert


