
Let me tell you, the smell of melted chocolate and roasted peanuts swirling through my kitchen every spring is absolutely intoxicating. It’s one of those aromas that stops you in your tracks, makes your stomach rumble, and honestly, triggers a wave of pure, nostalgic comfort. The first time I sank my teeth into a homemade creamy chocolate peanut butter Easter egg, I knew I’d stumbled onto something mighty special—like the kind of treat that turns a quiet afternoon into a celebration.
Years ago, when I was knee-high to a grasshopper, my grandma used to make her own Easter candies. She’d let me help (well, “help” meant licking the bowl and sneaking a few chocolate chips, but you get the idea). That tradition stuck with me, especially after realizing just how much better homemade Easter eggs are compared to anything store-bought. The first batch I ever made was on a rainy Saturday, determined to recreate those magical flavors from childhood. That moment—where I paused, took a deep breath, and just smiled—was all the proof I needed.
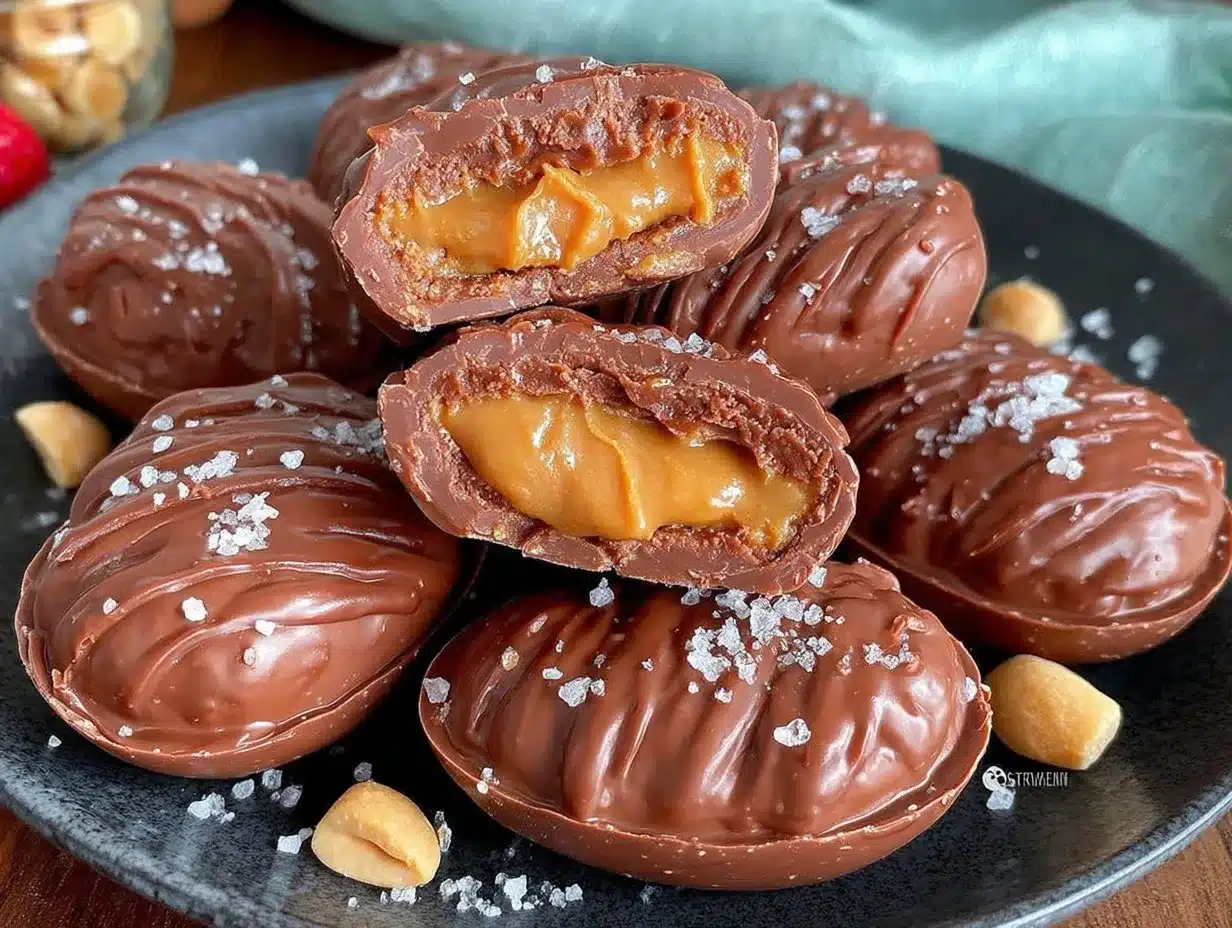
My family couldn’t stop sneaking creamy chocolate peanut butter Easter eggs off the cooling rack (and I can’t really blame them). My kids, who are usually picky about sweets, asked if we could make them “every weekend, please!” That’s the kind of honest reaction you want. There’s something about the smooth, buttery peanut butter center wrapped in rich chocolate that gets everyone talking—and reaching for seconds.
Honestly, these eggs are dangerously easy to whip up and deliver pure, homemade joy. They’re perfect for potlucks, Easter baskets, or just brightening up your Pinterest treat board. Whether you’re gifting them, serving them at a holiday brunch, or sneaking one late at night (no judgment), creamy chocolate peanut butter Easter eggs have quickly become a staple for family gatherings. I’ve tested this recipe more times than I care to admit (in the name of research, of course), and each batch feels like a warm hug. You’re going to want to bookmark this one—trust me.
Why You’ll Love This Recipe
After years of making homemade holiday treats, I can safely say that creamy chocolate peanut butter Easter eggs are the kind of recipe that checks every box. Here’s why you’ll want to make them again and again:
- Quick & Easy: These eggs come together in under 40 minutes, making them perfect for busy spring days or last-minute cravings.
- Simple Ingredients: You won’t need fancy groceries—most of what you need is probably already sitting in your pantry (which is a relief, right?).
- Perfect for Celebrations: Great for Easter brunches, holiday baskets, potlucks, or just adding a bit of homemade magic to your dessert table.
- Crowd-Pleaser: Kids, adults, grandparents—everyone loves these. I’ve watched entire plates disappear at family parties.
- Unbelievably Delicious: The velvety peanut butter filling paired with creamy chocolate is just next-level comfort food.
What really sets these creamy chocolate peanut butter Easter eggs apart is the ultra-smooth filling. I blend the peanut butter mixture until it’s almost mousse-like—so soft you could eat it with a spoon (no shame). Plus, the chocolate shell is thick enough to give you that satisfying snap but thin enough not to overpower the center. I’ve tried plenty of recipes, and honestly, none compare to this balance of texture and flavor.
This isn’t just another copycat—it’s the version that makes you close your eyes after the first bite. It’s comfort food, but with a little holiday sparkle. You get all the joy of store-bought favorites, but with cleaner ingredients and a flavor that’s tailor-made for your family. Whether you’re impressing guests or just treating yourself, these eggs turn a simple moment into something memorable (and let’s face it, we could all use more moments like that).
What Ingredients You Will Need
This recipe uses simple, wholesome ingredients to deliver bold flavor and that signature creamy texture—no weird additives or complicated steps. If you’ve got a well-stocked pantry, you’re already halfway there. Here’s what you need for creamy chocolate peanut butter Easter eggs:
- For the Filling:
- Peanut butter, creamy (unsweetened or lightly sweetened works best)
- Unsalted butter, softened (for richness and smoothness)
- Powdered sugar (helps create that classic, melt-in-your-mouth texture)
- Vanilla extract (adds warmth and depth)
- Salt (just a pinch to balance the sweetness)
- For the Chocolate Shell:
- Semisweet chocolate chips or melting wafers (I love Guittard or Ghirardelli for the best snap)
- Coconut oil or vegetable shortening (just a bit, to help the chocolate set with a glossy finish)
- Optional Toppings:
- Sprinkles (for a festive look—my kids go wild for pastel colors)
- Sea salt flakes (for a grown-up twist)
- Chopped peanuts (adds crunch and a rustic touch)
If you need substitutions, it’s easy: swap creamy peanut butter for almond or sunflower seed butter if there’s a nut allergy. Use dairy-free butter and chocolate for vegan eggs. Powdered erythritol works for a lower-sugar option.
For the chocolate, avoid “baking” chocolate bars—they can be grainy. Chocolate chips or melting wafers work best for a smooth shell. I always keep a stash of coconut oil on hand, but vegetable shortening works in a pinch.
Seasonal swaps: In spring, pastel sprinkles are fun. Around holidays, crushed candy canes or mini M&Ms work great. Honestly, this recipe is forgiving—play around and see what you love!
Equipment Needed
You don’t need a fancy candy-making kit to whip up creamy chocolate peanut butter Easter eggs. Here’s what I use (and a few budget-friendly alternatives):
- Mixing Bowls: One large and one medium—stainless steel or glass is best for easy cleanup.
- Hand Mixer or Stand Mixer: Makes the filling extra fluffy, but a sturdy wooden spoon works if you’re feeling old-school.
- Spatula: Silicone is my go-to—it gets every last bit of filling out of the bowl.
- Easter Egg Molds: Plastic or silicone molds shape the eggs perfectly. If you don’t have molds, you can shape by hand (they’ll look rustic, but taste amazing).
- Baking Sheet: Lined with parchment paper for easy transfer and mess-free dipping.
- Microwave or Double Boiler: For melting chocolate. If you’re using a microwave, go slow to avoid scorching.
- Forks or Dipping Tools: I just use a regular fork—works like a charm.
I’ve tried both silicone and hard plastic molds; silicone is easier to release, but the plastic ones are sturdy. For cleanup, soak chocolate tools in warm water right away—trust me, it saves time! If you’re starting out, don’t worry about perfection. Even hand-shaped eggs are adorable.
Preparation Method
-
Make the Peanut Butter Filling:
In a large mixing bowl, combine 1 cup (240g) creamy peanut butter and 1/2 cup (113g) unsalted butter, softened. Beat with a hand mixer on medium speed until smooth and fluffy (about 2 minutes). Add 2 cups (240g) powdered sugar, 1 teaspoon (5ml) vanilla extract, and a pinch of salt. Mix on low until just combined, then increase speed to medium until the mixture is light and creamy (another 2 minutes). The filling should be thick but scoopable—like soft cookie dough. If it’s too sticky, add 1-2 tablespoons more powdered sugar.
-
Shape the Eggs:
Scoop out heaping tablespoons (about 30g each) of filling. Roll each into an oval and gently flatten into an egg shape. Place on a parchment-lined baking sheet. If using molds, press filling into the molds, then pop them out. Repeat until all filling is used (you should get 16-18 eggs).
-
Chill the Eggs:
Transfer the shaped eggs to the refrigerator for 30 minutes. This helps them hold their shape and makes dipping easier. If you’re in a hurry, pop them in the freezer for 10-15 minutes, but don’t freeze solid or the chocolate may crack later.
-
Melt the Chocolate:
Place 2 cups (340g) semisweet chocolate chips and 2 tablespoons (30g) coconut oil in a microwave-safe bowl. Heat in 30-second bursts, stirring after each, until just melted and smooth (about 1-2 minutes). If using a double boiler, melt gently over simmering water, stirring constantly. Chocolate should be glossy and pourable—if it’s too thick, add a touch more coconut oil.
-
Dip the Eggs:
Using two forks, gently lower each chilled egg into the melted chocolate. Turn to coat, then lift out and let excess chocolate drip off. Place back on the parchment-lined sheet. Work quickly—if the filling softens, chill again before dipping remaining eggs.
-
Add Toppings:
While chocolate is still wet, sprinkle with festive toppings—pastel sprinkles, chopped peanuts, or sea salt flakes. This is where you can get creative and let kids help!
-
Set the Shell:
Refrigerate dipped eggs for 20-30 minutes, until chocolate is firm. Test by gently tapping—if it’s hard, you’re good to go!
-
Serve or Store:
Once set, creamy chocolate peanut butter Easter eggs are ready to enjoy. If you notice chocolate “bloom” (white spots), it’s just cocoa butter—totally safe, but keep eggs away from heat for best appearance.
Prep notes: If chocolate gets too thick during dipping, rewarm gently. If eggs stick to parchment, slide a thin spatula underneath. I’ve learned (the hard way) to chill everything well—warm filling melts fast, so don’t skip that step!
Cooking Tips & Techniques
Here’s what I’ve learned from years of making creamy chocolate peanut butter Easter eggs (and a few kitchen messes along the way):
- Consistency Matters: The filling should be thick but not crumbly. If it’s too soft, add more powdered sugar; if it’s dry, add a teaspoon of melted butter.
- Chill Everything: Warm filling softens quickly. Keep shaped eggs cold until you’re ready to dip, and even chill your dipping forks for extra insurance.
- Chocolate Tempering: For the glossiest shell, melt chocolate slowly and avoid overheating. If it seizes, add a splash of coconut oil and stir gently.
- Don’t Overwork: Hand-shaping is fine—don’t stress about perfection! Slightly rustic eggs are charming (and no one will complain).
- Multitasking: While eggs are chilling, prep your chocolate and toppings. It keeps things flowing smoothly.
- Troubleshooting Common Mistakes: Cracked chocolate? Eggs too warm. Gritty filling? Overmixed or powdered sugar clumps—sift first. Chocolate shell too thin? Double dip for extra thickness (my kids love this trick).
I’ve had batches go wonky—filling too sticky, chocolate shells that wouldn’t set—but it’s all part of the fun. If something goes sideways, just laugh, adjust, and try again. The best tip? Don’t rush. Let the process be as sweet as the treats themselves.
Variations & Adaptations
The classic creamy chocolate peanut butter Easter eggs are tough to beat, but a few tweaks can make them fit just about any taste (or dietary need):
- Nut-Free: Swap peanut butter for sunflower seed butter or soynut butter. Use allergy-friendly chocolate for the coating.
- Vegan: Use dairy-free butter, vegan chocolate, and plant-based powdered sugar. The flavor is just as rich!
- Low-Sugar: Substitute powdered erythritol or monk fruit sweetener for the powdered sugar. The texture stays dreamy but the sweetness drops.
- Flavor Swaps: Try almond butter or cashew butter for a twist. Add a hint of cinnamon or espresso powder for grown-up flair.
- Cooking Method: If you don’t have a microwave, a double boiler works for melting chocolate. For hand-shaped eggs, flatten slightly for “egg patties” (kids love these).
- Seasonal Additions: In fall, mix a little pumpkin puree into the filling and use dark chocolate. At Christmas, add peppermint extract and crushed candy canes.
One personal favorite: swirl a bit of raspberry jam into the peanut butter before shaping. It’s tart, sweet, and downright addictive! Feel free to experiment—half the fun is making these treats your own.
Serving & Storage Suggestions
Creamy chocolate peanut butter Easter eggs are best served chilled or at cool room temperature. I love piling them on a pastel platter for brunch, or nestling them in Easter baskets—kids go wild for the pretty presentation!
Pair with fresh strawberries, hot coffee, or a glass of cold milk for that classic combo. If you’re serving a crowd, arrange eggs with other homemade candies or cookies for a festive dessert board.
To store, layer eggs between sheets of parchment in an airtight container. They’ll keep for up to 1 week in the refrigerator. For longer storage, freeze for up to 2 months—just thaw in the fridge overnight before serving.
For reheating, let eggs sit at room temp for 15-20 minutes before eating (don’t microwave or the chocolate will melt). The flavors actually develop over time—the peanut butter gets creamier and the chocolate shell stays snappy. Honestly, they’re just as good on day three as they are fresh.
Nutritional Information & Benefits
Each creamy chocolate peanut butter Easter egg (about 35g) contains roughly:
- Calories: 170
- Fat: 11g
- Carbohydrates: 14g
- Sugar: 11g
- Protein: 4g
Peanut butter is a great source of healthy fats and plant-based protein, while chocolate adds antioxidants and a bit of mood-boosting magic. If you use dark chocolate, you get even more heart-friendly benefits. The recipe is naturally gluten-free, and can be made vegan or nut-free with simple swaps.
Potential allergens: peanuts, dairy, soy (in chocolate), and some sprinkles. Always check labels if you’re serving guests with allergies. From a wellness perspective, homemade treats let you control ingredients and portion size—so you can indulge with confidence!
Conclusion
If you’re searching for a homemade holiday treat that brings pure joy (and doesn’t require a pastry degree), creamy chocolate peanut butter Easter eggs are the answer. They’re easy, nostalgic, and customizable—just the kind of recipe you’ll want to make every spring (or honestly, any time you need a chocolate fix).
Try swapping in your favorite nut butter, adding festive toppings, or just making the classic version for your family. I love this recipe because it’s impossible not to smile when you taste the first bite. It’s the kind of treat that brings everyone together—whether you’re baking with kids, gifting to friends, or sneaking one after dinner (no shame in that).
If you give these creamy chocolate peanut butter Easter eggs a go, drop a comment or share your own twist—I’d love to hear about your kitchen adventures! Bookmark this recipe, pin it, or pass it along to your fellow candy-lovers. Happy Easter, happy baking, and may your chocolate always be creamy and your peanut butter always dreamy!
Frequently Asked Questions
Can I make creamy chocolate peanut butter Easter eggs ahead of time?
Absolutely! You can make them up to 3 days in advance and store them in an airtight container in the fridge. They taste just as good (maybe even better) after a day or two.
Do I need special molds to shape the eggs?
Nope! Molds help with uniform shapes, but you can hand-shape the filling into ovals and flatten slightly. They’ll look rustic but taste amazing.
Can I use crunchy peanut butter?
You sure can. Crunchy peanut butter adds texture, but the filling won’t be quite as smooth. If you want the classic creamy bite, stick with smooth peanut butter.
How do I prevent the chocolate shell from cracking?
Make sure your eggs are cold but not frozen solid before dipping. If chocolate cracks, let eggs sit at room temp for a few minutes before coating again.
Are these eggs gluten-free and dairy-free?
The basic recipe is gluten-free. For dairy-free, use plant-based butter and vegan chocolate chips—easy substitutions make this treat friendly for most diets.
Pin This Recipe!

Creamy Chocolate Peanut Butter Easter Eggs

These homemade Easter eggs feature a velvety peanut butter filling wrapped in a rich, glossy chocolate shell. Perfect for holiday celebrations, gifting, or a nostalgic treat, they’re quick to make and loved by kids and adults alike.
- Prep Time: 15 minutes
- Cook Time: 5 minutes
- Total Time: 40 minutes
- Yield: 16-18 eggs 1x
- Category: Dessert
- Cuisine: American
Ingredients
- 1 cup creamy peanut butter (unsweetened or lightly sweetened)
- 1/2 cup unsalted butter, softened
- 2 cups powdered sugar
- 1 teaspoon vanilla extract
- Pinch of salt
- 2 cups semisweet chocolate chips or melting wafers
- 2 tablespoons coconut oil or vegetable shortening
- Optional: pastel sprinkles, sea salt flakes, chopped peanuts for topping
Instructions
- In a large mixing bowl, combine peanut butter and softened butter. Beat with a hand mixer on medium speed until smooth and fluffy (about 2 minutes).
- Add powdered sugar, vanilla extract, and a pinch of salt. Mix on low until just combined, then increase speed to medium until the mixture is light and creamy (another 2 minutes). If too sticky, add 1-2 tablespoons more powdered sugar.
- Scoop out heaping tablespoons of filling (about 30g each). Roll into ovals and gently flatten into egg shapes. Place on a parchment-lined baking sheet, or press into Easter egg molds if available.
- Chill shaped eggs in the refrigerator for 30 minutes (or freezer for 10-15 minutes, but do not freeze solid).
- Place chocolate chips and coconut oil in a microwave-safe bowl. Heat in 30-second bursts, stirring after each, until melted and smooth (about 1-2 minutes). Alternatively, melt gently over simmering water in a double boiler.
- Using two forks, gently lower each chilled egg into the melted chocolate. Turn to coat, then lift out and let excess chocolate drip off. Place back on the parchment-lined sheet.
- While chocolate is still wet, sprinkle with desired toppings (sprinkles, chopped peanuts, sea salt flakes).
- Refrigerate dipped eggs for 20-30 minutes, until chocolate is firm.
- Serve chilled or at cool room temperature. Store in an airtight container in the refrigerator for up to 1 week, or freeze for up to 2 months.
Notes
For vegan or nut-free adaptations, use plant-based butter and chocolate, and swap peanut butter for sunflower seed butter. Chill eggs well before dipping to prevent cracking. Double dip for a thicker chocolate shell. Store eggs in layers separated by parchment paper. If chocolate blooms, it’s safe to eat but keep eggs away from heat for best appearance.
Nutrition
- Serving Size: 1 egg (about 35g)
- Calories: 170
- Sugar: 11
- Sodium: 60
- Fat: 11
- Saturated Fat: 4
- Carbohydrates: 14
- Fiber: 2
- Protein: 4
Keywords: Easter eggs, chocolate peanut butter eggs, homemade candy, holiday treat, gluten-free dessert, spring recipes, kid-friendly, easy dessert


