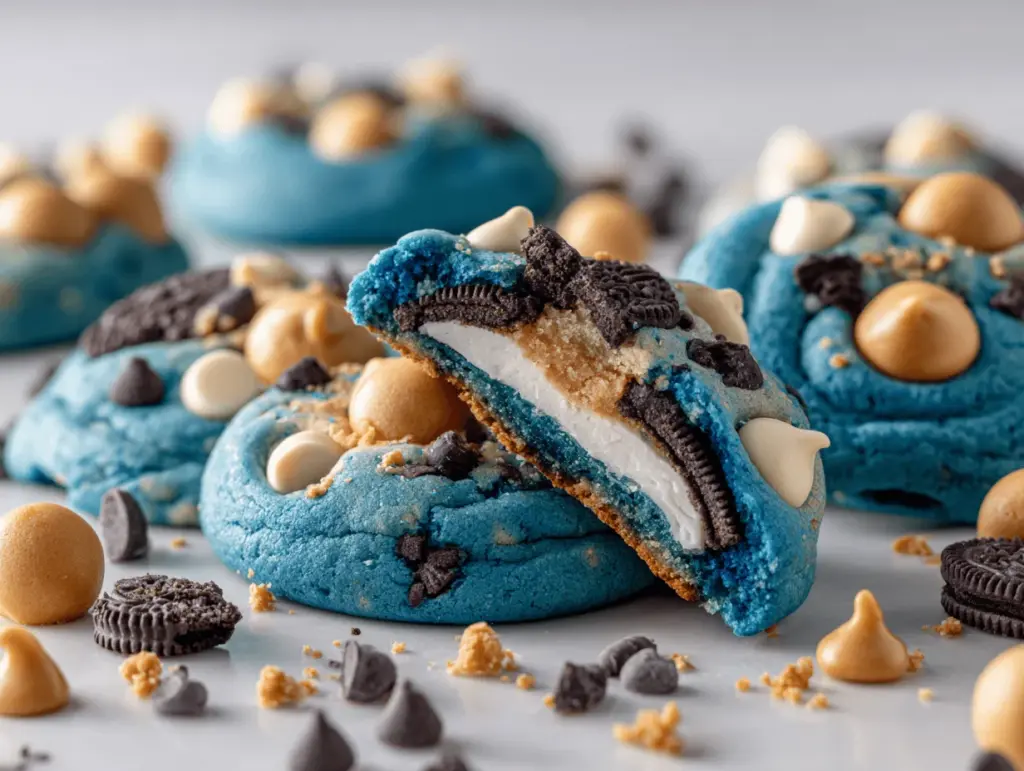
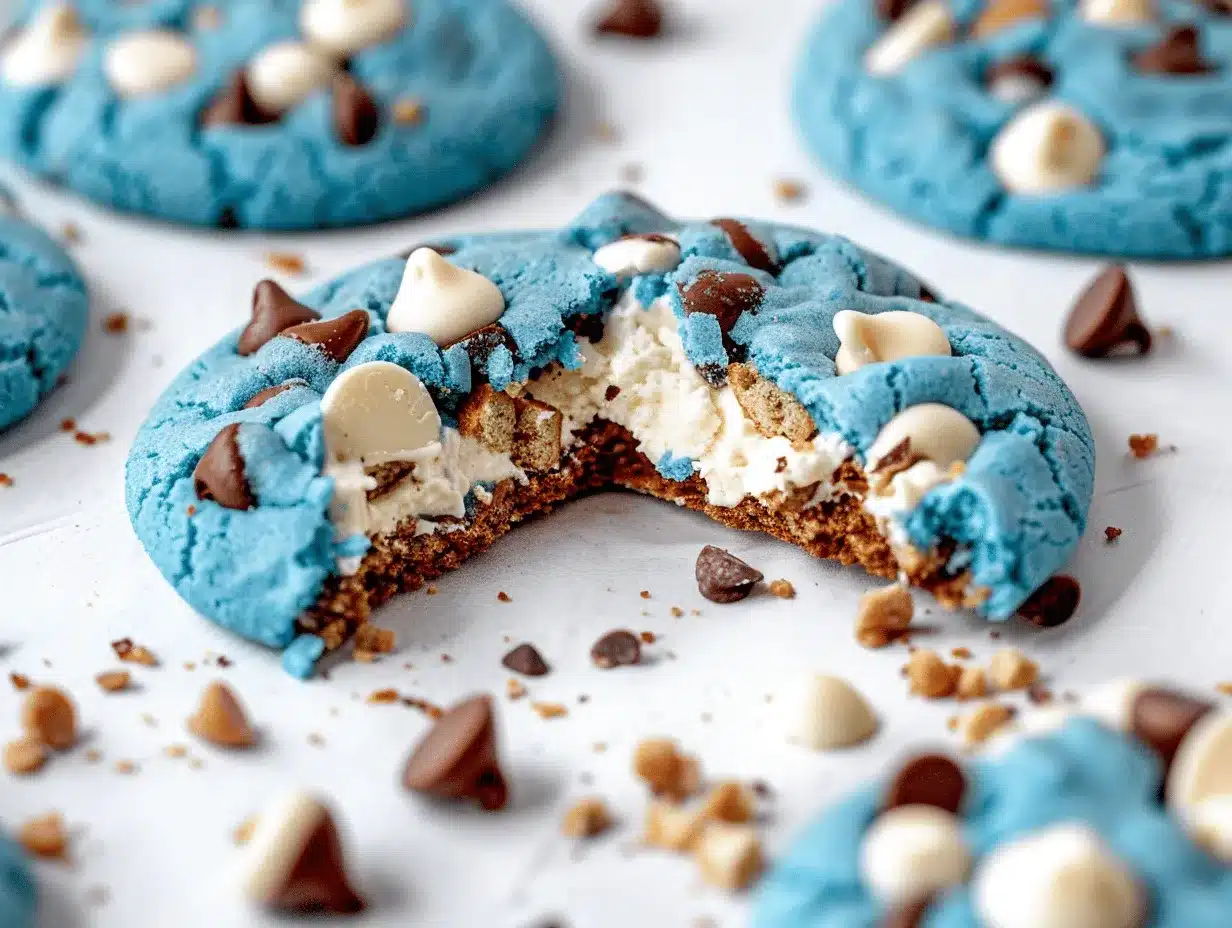
The first time I pulled a tray of Cookie Monster cookies out of the oven, the kitchen exploded with color and laughter. Imagine bright blue, gooey, chocolate-studded cookies, each one bursting with chunks of Chips Ahoy, Oreo pieces, and melty chocolate chips. They’re not just a treat—they’re a full-on experience. Whether you’re planning a kids’ birthday party or just want to surprise your family with something fun, these Cookie Monster cookies will do the trick (and then some!).
I stumbled onto this recipe during a late-night Pinterest scroll. Honestly, I just wanted something playful to make with my kids, and the Cookie Monster cookies caught my eye. I’ve baked them for bake sales, birthdays, and even for adults who “don’t eat sweets”—and, you know what? Everyone loves them. They’re soft and chewy, with a wild blue color and a wild mix of textures. Trust me, these cookies have a way of making everyone smile—kids, grown-ups, and even the family dog (who, by the way, is always on crumb patrol under the table).
So, why this recipe? Because it’s more than just cute. These Cookie Monster cookies are all about bringing a little fun (and a lot of yum) into your kitchen. They’re easy to make, super customizable, and perfect for any occasion. After testing and tweaking the recipe more times than I can count, I can promise you: this is the ultimate version. If you’re ready for chewy, bakery-style cookies that look as bold as they taste, you’re in the right place. Let’s get baking!
Why You’ll Love This Cookie Monster Cookies Recipe
- Quick & Easy: You’ll have a batch ready in just over 30 minutes, including prep and baking time—no chilling required.
- Simple Ingredients: Nothing fancy here. The ingredients are pantry staples, plus some fun add-ins you probably already have on hand (or can grab at any grocery store).
- Perfect for Parties: These cookies steal the show at birthday parties, bake sales, or family gatherings. The blue color and cookie chunks are total crowd-pleasers.
- Crowd-Pleaser: I have yet to meet a kid—or adult—who doesn’t break into a grin when they see these. My own kids fight over the biggest cookie every time.
- Unbelievably Delicious: The dough is soft and chewy, while the mix-ins add crunch and extra chocolatey goodness. Honestly, it’s the best of every cookie world.
What sets these apart? The secret is in the combination of textures. You get creamy, melty chocolate chips, crunchy cookie pieces, and a perfectly chewy blue dough. Plus, we’re not just tossing in some blue food coloring—this dough is vibrant, even after baking. I’ve tested different amounts of coloring and add-ins, so you get cookies that look great and taste even better.
And let’s face it, these are a little bit magical. They’re fun to make with kids, easy for beginners, and “wow” enough for seasoned bakers. They’re the cookies you’ll want to bring to every party, just to see everyone’s faces light up. If you love classic chocolate chip cookies, but want to mix things up and make memories, this Cookie Monster cookies recipe is the way to go.
What Ingredients You Will Need
This Cookie Monster cookies recipe uses simple, easy-to-find ingredients to create a fun and flavorful treat. Most are pantry staples, with a few playful extras for texture and color. Here’s what you’ll need:
- All-purpose flour (2 1/4 cups / 280g) – The backbone of your cookie dough. I usually use King Arthur or Gold Medal for reliable results.
- Baking soda (1 teaspoon / 5g) – Helps with spreading and gives the cookies a soft, chewy texture.
- Cornstarch (2 teaspoons / 7g) – This is my secret for extra softness—highly recommend!
- Salt (1/2 teaspoon / 3g) – Balances the sweetness and brings out the chocolate flavor.
- Unsalted butter, softened (1 cup / 227g) – For rich flavor and the perfect chewy bite. I let mine sit at room temp for about 30 minutes before starting.
- Granulated sugar (1/2 cup / 100g) – Adds sweetness and helps with spreading.
- Light brown sugar, packed (1 cup / 200g) – For deeper flavor and irresistibly chewy texture.
- Large eggs (2, room temperature) – Bind everything together and add moisture.
- Pure vanilla extract (2 teaspoons / 10ml) – I love using Nielsen-Massey for extra richness, but any pure extract works.
- Blue gel food coloring (about 1 teaspoon, or as needed) – Gel gives the brightest, most vivid color. Avoid liquid coloring, as it can water down the dough.
- Semi-sweet chocolate chips (3/4 cup / 130g) – For melty chocolate pockets in every bite.
- Mini Chips Ahoy cookies (1 cup / 75g, roughly chopped) – Adds crunch and a nod to classic chocolate chip cookies.
- Mini Oreo cookies (1 cup / 90g, roughly chopped) – For that classic Cookie Monster flair and a hint of chocolatey creaminess.
- White chocolate chips (1/2 cup / 85g, optional) – Adds a creamy, sweet contrast. Sometimes I swap these for butterscotch chips when I’m feeling adventurous.
Ingredient Notes & Substitutions:
- Flour: For a gluten-free version, I’ve had success with Bob’s Red Mill 1-to-1 Baking Flour.
- Butter: Swap in vegan butter for a dairy-free batch (Earth Balance is my go-to here).
- Eggs: If you’re egg-free, try using flax eggs (2 tablespoons flaxseed meal + 5 tablespoons water, mixed and rested for 10 minutes).
- Cookies: Don’t have mini versions? Just chop up regular Oreos and Chips Ahoy into small pieces. If you’re feeling wild, throw in some mini M&Ms or sprinkles.
- Food Coloring: Gel is key for that classic Cookie Monster blue. AmeriColor and Wilton both work great.
Equipment Needed
- Mixing bowls – I like to use a medium bowl for dry ingredients and a large one for the dough. Stainless steel or glass both work well.
- Electric hand mixer or stand mixer – Makes creaming the butter and sugars a breeze, but you can mix by hand if you’re feeling strong (or want to burn some calories!).
- Measuring cups and spoons – Accuracy matters for cookies, so I stick to the scoop-and-level method for flour.
- Kitchen scale – Optional, but I swear by mine for consistent results, especially if you bake a lot.
- Silicone spatula or wooden spoon – For folding in all those delicious mix-ins without overworking the dough.
- Baking sheets – I use rimmed, heavy-duty ones for even baking. Lining them with parchment paper saves on cleanup.
- Parchment paper or silicone baking mats – Prevents sticking and makes transferring cookies a breeze.
- Cookie scoop (medium, about 2 tablespoons) – For evenly sized cookies. You can use a spoon, but a scoop gives bakery-style results.
- Wire cooling rack – Helps cookies cool quickly and stay soft. I got mine at Target, nothing fancy.
If you don’t have a cookie scoop, two spoons work just fine—just try to keep the dough mounds even for consistent baking. And if you’re using a hand mixer, scrape down the bowl often to make sure everything’s fully mixed. Parchment paper is my go-to for easy cleanup, but silicone mats are reusable and great for the environment. I wash mine with warm, soapy water and let them air dry—super simple!
How to Make Soft & Chewy Cookie Monster Cookies
-
Prep your baking sheets and ingredients:
Line two baking sheets with parchment paper or silicone mats. Preheat your oven to 350°F (175°C). Set out all your ingredients, and let the butter and eggs come to room temperature. Chop the mini Oreos and Chips Ahoy into small pieces (about the size of a dime—don’t worry about being perfect). -
Mix dry ingredients:
In a medium bowl, whisk together 2 1/4 cups (280g) all-purpose flour, 1 teaspoon (5g) baking soda, 2 teaspoons (7g) cornstarch, and 1/2 teaspoon (3g) salt. Set aside. -
Cream the butter and sugars:
In a large bowl, beat 1 cup (227g) unsalted butter, 1 cup (200g) packed light brown sugar, and 1/2 cup (100g) granulated sugar on medium speed for 2-3 minutes, until light and fluffy. If it looks grainy, keep mixing. Scrape down the bowl. -
Add eggs and vanilla:
Beat in 2 large eggs, one at a time, until fully incorporated. Add 2 teaspoons (10ml) pure vanilla extract. Mix until smooth and a little glossy. -
Add blue food coloring:
Start with 1/2 teaspoon blue gel food coloring. Mix well and add more as needed until you get a bright Cookie Monster blue (usually about 1 teaspoon total). Remember, the color will lighten a bit as it bakes. If it looks almost too blue, you’re probably right on track! -
Combine wet and dry ingredients:
Gradually add the dry mixture to the wet, mixing on low or by hand with a spatula. Stop as soon as you don’t see streaks of flour—overmixing can make the cookies tough. -
Fold in mix-ins:
Gently fold in 3/4 cup (130g) semi-sweet chocolate chips, 1/2 cup (85g) white chocolate chips (if using), 1 cup (75g) chopped mini Chips Ahoy, and 1 cup (90g) chopped mini Oreos. Save a few pieces of each to press on top later—they’ll look bakery-fancy. -
Scoop and shape the cookies:
Use a medium cookie scoop (about 2 tablespoons) to portion dough onto prepared sheets, spacing them about 2 inches apart. If you want that signature Cookie Monster look, press a couple of extra cookie pieces and chocolate chips on top of each mound. -
Bake:
Bake one sheet at a time in the center of the oven for 10-12 minutes. Cookies should look puffed and just set at the edges but still soft in the middle—they’ll firm up as they cool. (If you overbake, they’ll lose that chewy magic!) -
Cool and enjoy:
Let cookies cool on the sheet for 5 minutes, then transfer to a wire rack. The blue color will deepen as they cool. Enjoy warm for gooey chocolate, or let them cool completely for maximum chewiness.
Troubleshooting Notes: If your cookies spread too much, double-check your flour measurement (a little extra goes a long way). If the dough is sticky, chill it for 15 minutes before scooping. And don’t worry if the dough looks super blue—it bakes up perfectly!
Professional Tips & Techniques for Cookie Monster Cookies
- Use gel food coloring: Liquid coloring can water down your dough, making it spread too much. Gel gives you that super-bright blue without messing with the texture.
- Don’t overmix: Once you add the flour, mix just until combined. Overmixing can lead to tough cookies—trust me, I’ve made that mistake more than once.
- Cool on the tray first: Those 5 minutes on the hot tray help the cookies finish baking and stay chewy. Move them too soon and they might break (been there, done that!).
- Press extra toppings on top: For that bakery-style, “Instagrammable” look, press a few extra cookie pieces and chips onto each dough ball before baking.
- Rotate your tray: Halfway through baking, rotate your baking sheet 180 degrees for even color and texture. Every oven has hot spots, even mine.
- Batch baking hack: If you’re making a double batch, keep the extra dough in the fridge between oven loads. Cooler dough = thicker, chewier cookies.
- Freeze for later: Scoop dough onto a tray, freeze until solid, then transfer to a zip-top bag. Bake from frozen, just adding 2-3 extra minutes to the baking time. Perfect for surprise guests or cookie emergencies!
I’ll admit, I once forgot to rotate my tray and ended up with half-soft, half-crispy cookies—not the end of the world, but not what you want for ultimate chewiness. Little tricks like these really make a difference!
Variations & Adaptations
- Gluten-Free Cookie Monster Cookies: Swap the all-purpose flour for a gluten-free 1-to-1 blend. Make sure your mix-ins (Oreos and Chips Ahoy) are also gluten-free. I’ve tried this, and the results were just as chewy and fun!
- Dairy-Free Option: Use vegan butter and dairy-free chocolate chips. For the cookies, look for dairy-free brands or use extra add-ins like chopped nuts or mini marshmallows.
- Seasonal Twist: At Halloween, swap the blue food coloring for orange and use crushed Halloween Oreos. Near Christmas, add red and green M&Ms for a festive look.
- Flavor Boost: Add a pinch of espresso powder for deeper chocolate flavor, or a teaspoon of coconut extract for a tropical spin.
- Nutty Crunch: Mix in 1/2 cup (60g) chopped pecans or walnuts for a little extra crunch—just keep an eye out for nut allergies.
- Personal Favorite: Sometimes I use butterscotch chips instead of white chocolate, and it’s a game-changer. Sweet, salty, and a little unexpected!
For air fryer fans, you can bake small batches at 325°F (163°C) for about 7-8 minutes—just watch the color, as air fryers can bake a little faster. And honestly, there’s no wrong way to make these your own. Swap, add, or mix—Cookie Monster would approve!
Serving & Storage Suggestions
Serving: These Cookie Monster cookies are best served slightly warm, when the chocolate is soft and the cookie is chewy. Pile them up on a big, colorful platter, or arrange in treat bags for parties. They’re a hit with a cold glass of milk or a mug of hot cocoa (my kids’ favorite combo!).
Pairings: Try serving with a scoop of vanilla ice cream on top, or sandwich two cookies around a marshmallow for a Cookie Monster s’more. If you’re hosting a party, a big bowl of fruit salad balances the sweetness nicely.
Storage: Store cookies in an airtight container at room temperature for up to 5 days. If you want them extra soft, add a slice of bread to the container—it keeps them chewy. For longer storage, freeze baked cookies (layered with parchment) in a freezer-safe bag for up to 2 months. Thaw at room temp or re-warm in the microwave for 10-15 seconds for that “just-baked” feel.
Honestly, the flavors get even better after a day—the cookies stay soft, and the mix-ins settle in. If you’re making ahead, they’re perfect for school lunches or snacks on the go!
Nutritional Information & Benefits
Each Cookie Monster cookie (based on a batch of 24) has approximately:
- Calories: 220
- Fat: 10g
- Carbohydrates: 30g
- Sugar: 17g
- Protein: 2g
Health Benefits: While these cookies are definitely a treat, they do offer some perks—like mood-boosting dark chocolate and a touch of protein from the eggs. You can make them gluten-free or dairy-free with easy swaps, and there are no artificial preservatives.
Allergens: Contains wheat, dairy, eggs, soy, and may contain traces of nuts if you add them or use mix-ins processed in shared facilities. Always check your packaged ingredients if allergies are a concern.
From a wellness perspective, I’m a big believer in enjoying treats mindfully—and these Cookie Monster cookies are perfect for sharing, celebrating, and making memories together. One cookie is just the right amount of sweetness to brighten anyone’s day!
Conclusion
If you’re looking for a cookie recipe that’s as fun to make as it is to eat, these Cookie Monster cookies are where it’s at. They’re soft, chewy, eye-catching, and packed with chocolatey goodness—seriously, what’s not to love? Whether you’re baking for a crowd or just want to add some color to your cookie jar, this recipe will be your new go-to.
Don’t be afraid to get creative—switch up the mix-ins, play with the colors, or add your own favorite treats. Part of the joy is making these cookies your own. Personally, I love seeing the look on my kids’ faces when they see that bright blue dough—it’s an instant mood-booster!
Ready to bake? Give these Cookie Monster cookies a try, and let me know how it goes! Drop a comment below, share your photos, or tell me about your wildest mix-in combos. Happy baking—and remember, sometimes the messiest cookies make the best memories!
Frequently Asked Questions (FAQs)
How do I get the Cookie Monster blue color?
Use gel food coloring, not liquid. Start with 1/2 teaspoon and add more as needed until the dough looks bold—it will lighten a bit as it bakes.
Can I make Cookie Monster cookies ahead of time?
Absolutely! The dough can be made ahead and chilled for up to 2 days, or frozen in scoops for up to 2 months. Baked cookies also freeze well—just thaw and enjoy.
What can I use instead of Oreos or Chips Ahoy?
Try chopped graham crackers, vanilla wafers, or mini M&Ms for a different twist. You can also use gluten-free or dairy-free cookie brands to fit your needs.
Why did my cookies spread too much?
This usually happens if too little flour is used or the butter was too soft. Make sure to measure flour accurately and chill the dough if it seems sticky.
How do I keep Cookie Monster cookies soft?
Store them in an airtight container with a slice of bread—it keeps them chewy for days. You can also reheat briefly in the microwave to refresh that just-baked softness.
Pin This Recipe!

Cookie Monster Cookies

These Cookie Monster Cookies are soft, chewy, and bursting with bright blue color, chocolate chips, and cookie chunks. Perfect for parties or a fun family treat, they’re easy to make and guaranteed to bring smiles to kids and adults alike.
- Prep Time: 15 minutes
- Cook Time: 12 minutes
- Total Time: 27 minutes
- Yield: 24 cookies 1x
- Category: Dessert
- Cuisine: American
Ingredients
- 2 1/4 cups all-purpose flour (280g)
- 1 teaspoon baking soda (5g)
- 2 teaspoons cornstarch (7g)
- 1/2 teaspoon salt (3g)
- 1 cup unsalted butter, softened (227g)
- 1/2 cup granulated sugar (100g)
- 1 cup light brown sugar, packed (200g)
- 2 large eggs, room temperature
- 2 teaspoons pure vanilla extract (10ml)
- 1 teaspoon blue gel food coloring (or as needed)
- 3/4 cup semi-sweet chocolate chips (130g)
- 1 cup mini Chips Ahoy cookies, roughly chopped (75g)
- 1 cup mini Oreo cookies, roughly chopped (90g)
- 1/2 cup white chocolate chips, optional (85g)
Instructions
- Line two baking sheets with parchment paper or silicone mats. Preheat oven to 350°F (175°C). Let butter and eggs come to room temperature. Chop mini Oreos and Chips Ahoy into small pieces.
- In a medium bowl, whisk together flour, baking soda, cornstarch, and salt. Set aside.
- In a large bowl, beat butter, brown sugar, and granulated sugar on medium speed for 2-3 minutes until light and fluffy. Scrape down the bowl as needed.
- Beat in eggs, one at a time, until fully incorporated. Add vanilla extract and mix until smooth.
- Add blue gel food coloring, starting with 1/2 teaspoon and adding more as needed until you reach a bright blue color.
- Gradually add the dry ingredients to the wet mixture, mixing on low or by hand with a spatula until just combined. Do not overmix.
- Gently fold in semi-sweet chocolate chips, white chocolate chips (if using), chopped Chips Ahoy, and chopped Oreos. Reserve a few pieces of each for topping.
- Use a medium cookie scoop (about 2 tablespoons) to portion dough onto prepared sheets, spacing about 2 inches apart. Press extra cookie pieces and chips on top for decoration.
- Bake one sheet at a time in the center of the oven for 10-12 minutes, until cookies are puffed and just set at the edges but still soft in the middle.
- Let cookies cool on the baking sheet for 5 minutes, then transfer to a wire rack to cool completely. Enjoy warm or at room temperature.
Notes
For best color, use gel food coloring. Do not overmix the dough after adding flour. Press extra cookie pieces and chips on top before baking for a bakery-style look. If dough is sticky, chill for 15 minutes before scooping. Cookies can be made gluten-free or dairy-free with appropriate substitutions. Store in an airtight container with a slice of bread to keep cookies soft.
Nutrition
- Serving Size: 1 cookie
- Calories: 220
- Sugar: 17
- Sodium: 120
- Fat: 10
- Saturated Fat: 6
- Carbohydrates: 30
- Fiber: 1
- Protein: 2
Keywords: cookie monster cookies, blue cookies, kids party cookies, chewy cookies, chocolate chip cookies, oreo cookies, chips ahoy cookies, fun cookies, easy cookie recipe


