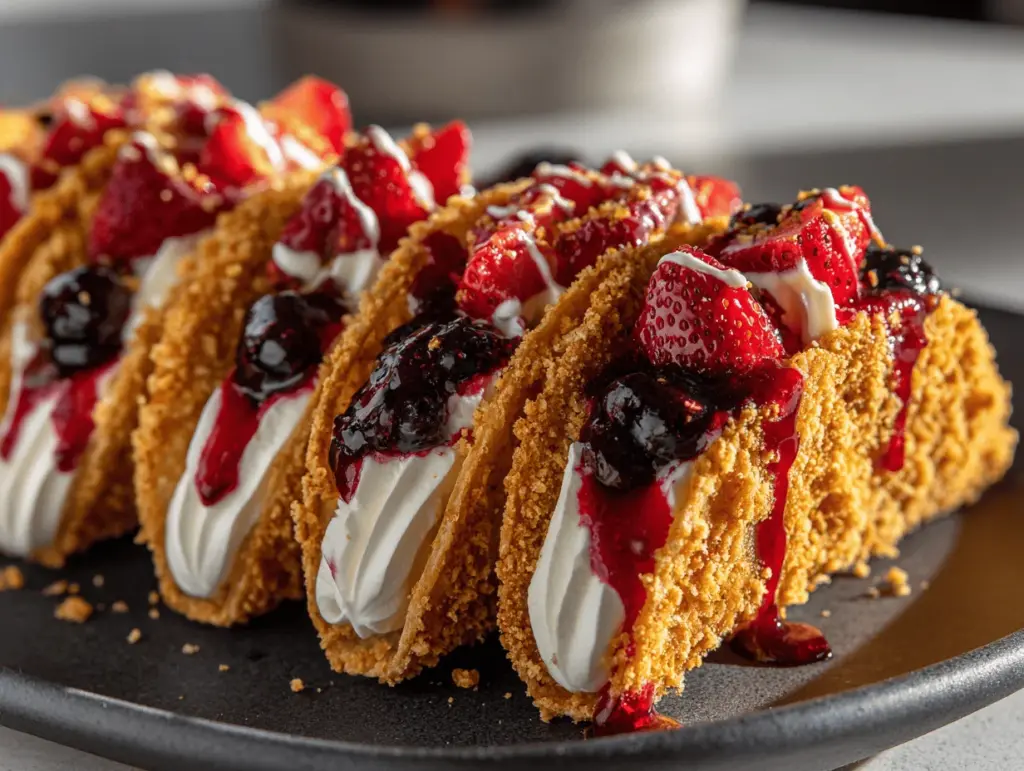
That first bite—crunchy, cinnamon-sugar shell, silky cheesecake filling, and a burst of juicy berries—gets me every time. If you’ve never tried cheesecake tacos, you’re in for a sweet little surprise! These playful hand-held treats are basically everything I crave at a party: simple to make, impossible to resist, and so much fun to serve. I started making cheesecake tacos for my annual girls’ night, and now they’re the most-requested dessert for every family get-together. Honestly, there’s no going back to plain old cheesecake after this.
The idea for cheesecake tacos came to me when I was brainstorming easy, make-ahead desserts that wouldn’t melt or get messy on the buffet table. I wanted something that tasted just as dreamy as classic cheesecake but with a fun twist—something you could eat with your hands, no fork required. These sweet taco desserts fit the bill perfectly. They look fancy but are secretly so simple, and the flavor combo is just unbeatable. Whether you’re hosting a birthday bash, a holiday party, or just craving a little celebration at home, cheesecake tacos bring the wow factor and the smiles—every single time.
As a recipe developer who’s tested more than my fair share of desserts, I can say with confidence: this cheesecake tacos recipe is a keeper. I’ve tweaked the filling for just the right creaminess, experimented with different shell options, and even made gluten-free versions for friends. The best part? You can prep everything ahead, so you get to enjoy the party, too. Let’s make your next gathering extra sweet!
Why You’ll Love This Cheesecake Tacos Recipe
- Quick and Easy: You can have these cheesecake tacos prepped and ready in under 30 minutes. Perfect for last-minute parties or surprise guests (trust me, I’ve been there!).
- Simple Ingredients: No need to hunt down anything fancy. Most of these are pantry staples, and you can even use store-bought shortcuts for the shells if you want.
- Perfect for Parties: These sweet taco desserts are ideal for birthdays, potlucks, baby showers, or just a fun night in. They’re easy to serve, easy to hold, and way less messy than a traditional cheesecake slice.
- Crowd-Pleaser: Kids, teens, and grownups all go wild over these. I’ve never had leftovers—people always ask for seconds!
- Unbelievably Delicious: The combo of crisp shell, creamy cheesecake, and juicy fruit is just so good. It reminds me of those state fair desserts but with a homemade, love-filled touch.
What really sets my cheesecake tacos recipe apart is the way the cream cheese filling gets whipped until it’s extra light—almost mousse-like. I also brush the taco shells with melted butter and cinnamon sugar for an irresistible crunch and flavor. You can use fresh berries, pie filling, or even chocolate chips for the topping. The shells stay crisp for hours, and the filling holds up beautifully (no sogginess, even if you prep ahead!).
Honestly, these are more than just a sweet treat—they’re a conversation starter. People light up when they see dessert tacos on the table! And because you can swap in your favorite fillings and toppings, they work for every season and taste. I love recipes that make people smile, and this one never fails—whether I’m sharing them with my kids or friends from work. If you want a dessert that’s as fun to make as it is to eat, cheesecake tacos are the way to go.
What Ingredients You Will Need
This cheesecake tacos recipe uses simple, wholesome ingredients to deliver that classic cheesecake flavor in a fun, party-ready package. Most items are probably already in your pantry or fridge, and there’s lots of room to swap things in and out depending on what you have on hand.
- For the Taco Shells:
- Flour tortillas (8 small/mini size, about 5-inch/12.5cm rounds – you can use regular or gluten-free)
- Unsalted butter, melted (1/4 cup / 60g – for brushing the shells)
- Granulated sugar (1/3 cup / 67g – for rolling the shells)
- Ground cinnamon (1 tablespoon / 8g – mixed with sugar for that churro vibe)
- For the Cheesecake Filling:
- Cream cheese, softened (8 oz / 225g – I love Philadelphia for the smoothest texture)
- Powdered sugar (2/3 cup / 80g – for sweetness and smoothness)
- Heavy whipping cream (1/2 cup / 120ml – makes the filling fluffy and light)
- Vanilla extract (1 teaspoon / 5ml – use real vanilla if you can, it’s worth it)
- Lemon zest (optional, 1/2 teaspoon / 1g – brightens the flavor)
- For the Topping:
- Fresh mixed berries (1 cup / 125g – strawberries, blueberries, raspberries, blackberries, or your favorites)
- Or canned pie filling (about 1 cup / 250g – cherry or blueberry is classic for parties!)
- Crushed graham crackers or cookies (optional, for a crunchy finish)
- Mini chocolate chips or caramel drizzle (totally optional, but so fun for extra indulgence)
Ingredient tips: If you want gluten-free cheesecake tacos, just use gluten-free tortillas. For a lighter version, I’ve swapped some cream cheese for Greek yogurt—works great. Out of heavy cream? You can use store-bought whipped topping in a pinch, though homemade is fluffier and less sweet. Don’t have berries? Sliced bananas, mango, or even just a sprinkle of cinnamon sugar will do the trick. I’ve even made these with cinnamon pita bread when tortillas ran out—still amazing!
Equipment Needed
- Hand mixer or stand mixer: For whipping the cheesecake filling. A sturdy whisk and some elbow grease work if you’re feeling old-school, but it takes longer.
- Baking sheet: For crisping the taco shells in the oven. Lined with parchment for easy cleanup.
- Small bowls: For mixing cinnamon sugar and melting butter.
- Tongs or spatula: To handle the hot shells safely.
- Muffin tin (optional): Helps hold the shells upright while they cool and set their taco shape. You can also use a cooling rack with the shells draped over the bars (a little hack I learned after running out of muffin tins at a party!).
- Piping bag or zip-top bag: For a neat, bakery-style filling—just snip off a corner. A spoon works too but is a bit messier (and honestly, sometimes I just go for it anyway).
- Measuring cups and spoons: For accuracy—especially important with the filling.
If you don’t have a mixer, try softening your cream cheese even more and beat by hand. For budget-friendly options, Aldi’s hand mixers and sheet pans have worked just fine in my kitchen. Clean your mixer beaters right after use—the filling can get sticky if left to dry. I’ve learned that the hard way (scraping dried cheesecake off metal is not my idea of fun!).
How to Make Cheesecake Tacos
- Prep the Taco Shells:
Preheat your oven to 400°F (200°C). Use a round cookie cutter or rim of a glass to cut 8 small circles (about 5-inch/12.5cm each) from your flour tortillas. If using store-bought mini tortillas, you’re ahead of the game.
Melt 1/4 cup (60g) butter in a small bowl. In another bowl, mix 1/3 cup (67g) granulated sugar with 1 tablespoon (8g) cinnamon.
Brush both sides of each tortilla circle with melted butter, then coat each side generously in the cinnamon sugar. (Tip: Dip and press so it sticks—we want lots of flavor!) - Shape and Bake the Shells:
Flip a standard muffin tin upside-down and drape each coated tortilla over two muffin cups to form a taco shape. This helps them hold their curve while baking.
Bake in preheated oven for 8–10 minutes, until golden brown and crisp. Watch closely after 7 minutes—sugar can burn fast!
Remove shells from oven and let them cool on the pan for a few minutes before gently transferring to a wire rack. They’ll crisp up more as they cool. (If they lose their shape, just nudge them back while still warm.) - Make the Cheesecake Filling:
In a large bowl, beat 8 oz (225g) softened cream cheese with 2/3 cup (80g) powdered sugar using a hand or stand mixer. Beat for 2–3 minutes until completely smooth—no lumps!
Pour in 1/2 cup (120ml) heavy whipping cream and 1 teaspoon (5ml) vanilla extract. Beat on medium-high speed for another 2–3 minutes, or until the mixture turns light and fluffy. If using, add 1/2 teaspoon (1g) lemon zest for extra zing.
If the filling seems too soft, pop it in the fridge for 10 minutes to firm up. Don’t skip this if your kitchen is warm—it’ll pipe more easily. - Fill the Taco Shells:
Spoon the cheesecake filling into a piping bag or zip-top bag (snip off a corner). Pipe a generous line of filling into each cooled taco shell. If you don’t have a piping bag, use a spoon, but try to keep the filling close to the center so toppings won’t spill out.
Fill the shells just before serving if you want the ultimate crunch, or up to 2 hours ahead if you’re prepping for a party. - Add Toppings:
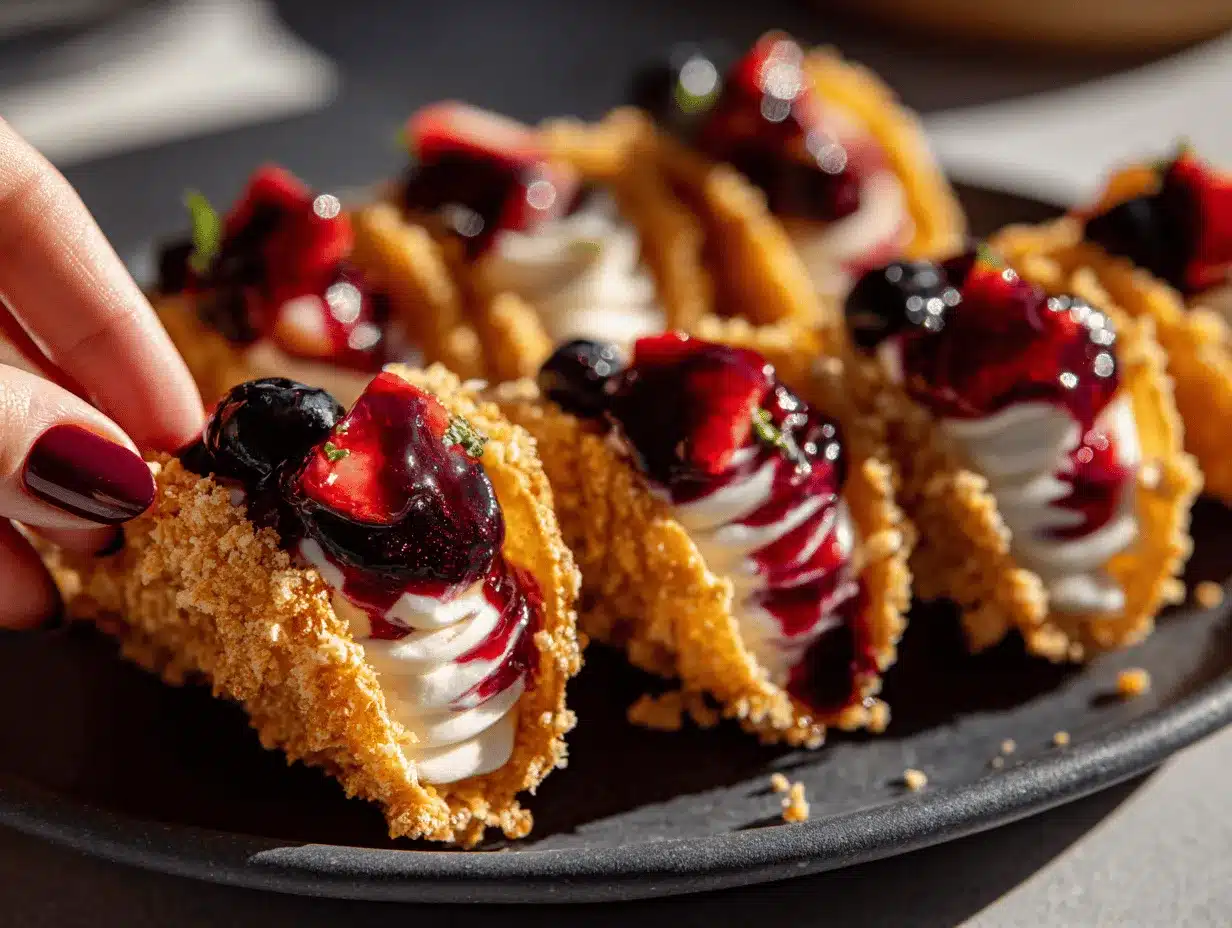
Top each cheesecake taco with fresh berries, a spoonful of pie filling, or your favorite toppings. Sprinkle with crushed graham crackers, mini chocolate chips, or a drizzle of caramel for extra flair.
Serve right away, or chill for up to 2 hours if you want them extra cold and creamy.
Troubleshooting tips: If your shells aren’t crisping, they may need a couple more minutes in the oven. If the filling is runny, chill it longer or beat in a little more powdered sugar. I’ve made these on humid days, and a quick stint in the fridge always helps firm things up. Sometimes the shells crack a little when shaping—don’t stress, just patch with a bit of butter and sugar. They’ll still taste awesome!
Cooking Tips & Techniques
- Don’t Overbake the Shells: The cinnamon-sugar coating can brown fast. Watch closely and pull them as soon as the edges turn golden. Burnt sugar is a bummer!
- Cool Shells Completely: Warm shells can melt your cheesecake filling (and that’s a messy situation). Give them 10–15 minutes to cool and crisp before filling.
- Whip the Filling Well: For the dreamiest texture, beat the cream cheese and powdered sugar until totally smooth, then add the cream and whip until fluffy. Undermixing leaves lumps; overmixing can make it too runny.
- Use Fresh Berries (If Possible): They add brightness and a juicy pop! But canned pie filling is a lifesaver when berries are out of season.
- Prep Ahead, Assemble Last Minute: Shells and filling can be made ahead, but fill tacos just before serving for the crispiest shells. If you must assemble in advance, a quick 5-minute bake at 350°F (175°C) can crisp up soft shells (just watch the filling doesn’t get too warm).
Honestly, I once tried assembling these the night before a party… woke up to soggy shells. Lesson learned! Now, I always keep the shells, filling, and toppings separate until an hour before guests arrive. It also makes it more interactive—everyone can build their own, which is a total hit with kids. For multitasking, I start the filling while the shells are in the oven. If you’re making a big batch, keep the finished shells in a low oven (200°F/90°C) to stay crisp. Consistency is all about keeping ingredients chilled and shells dry—easy peasy once you get the flow!
Variations & Adaptations
- Gluten-Free: Use gluten-free tortillas or even gluten-free pita rounds for the shells. I’ve made these for a friend with celiac, and they turned out just as crispy and delicious.
- Chocolate Lover’s: Add 2 tablespoons (12g) cocoa powder to the cinnamon sugar for chocolate taco shells, and fold mini chocolate chips into the cheesecake filling. Top with chocolate syrup for the ultimate treat.
- Fruit Swirl: Swirl a couple of tablespoons of strawberry or blueberry jam into the cheesecake filling before piping. Gives a beautiful marbled look and fruity flavor throughout.
- Dairy-Free: Swap cream cheese and heavy cream for dairy-free alternatives (like Kite Hill cream cheese and coconut cream). The filling will be slightly softer but still super tasty.
- Autumn Twist: Top with apple pie filling and a sprinkle of cinnamon for a cozy, fall-inspired version. This is a favorite at our Thanksgiving dessert table!
One of my personal favorite twists? S’mores cheesecake tacos: swap berries for mini marshmallows and crushed graham crackers, then torch the tops for a gooey finish. It’s the kind of treat that makes you feel like a kid again. Feel free to riff on the base recipe—add nuts, use different pie fillings, or drizzle with flavored syrups. The possibilities are endless and totally up to your crowd’s cravings!
Serving & Storage Suggestions
Cheesecake tacos are best served cold or at cool room temperature. I love arranging them on a big platter, lined up like a taco bar, with extra toppings in little bowls—makes it easy for guests to customize. They pair perfectly with fresh lemonade, a cold brew coffee, or even a glass of bubbly if you’re going fancy!
If you have leftovers (rare, but it happens!), store the shells and filling separately in airtight containers. The shells stay crisp for up to 2 days at room temp, and the filling keeps in the fridge for 3–4 days. If you’ve already assembled them, store in the fridge for up to 4 hours, but note the shells will soften a bit.
To re-crisp soft shells, pop them in a 350°F (175°C) oven for 3–5 minutes, then cool and refill. The flavors meld and get even better after a little fridge time, so don’t be afraid to make the filling ahead. These are also fun as a make-your-own dessert station—everyone gets to build their dream taco!
Nutritional Information & Benefits
Each cheesecake taco (with berries) contains approximately:
- Calories: 220
- Fat: 13g
- Carbs: 23g
- Protein: 4g
- Fiber: 1g
With fresh berries and a cream cheese base, you get a little protein and some calcium in every bite. Using reduced-fat cream cheese lowers the fat content, and gluten-free shells make these accessible for more guests. Watch out for dairy and gluten if you have sensitivities—easy swaps are listed above. I love that you can keep these lighter or more decadent depending on your mood. Dessert doesn’t have to be all-or-nothing—sometimes a sweet treat with a little fruit just feels right!
Conclusion
Cheesecake tacos are more than just a dessert—they’re a celebration in every bite! They’re fun, customizable, and always the first thing to disappear at any party. I love how easy they are to make ahead, how you can mix up the flavors, and how much joy they bring to the table. Whether you stick to the classic recipe or try one of the many variations, I promise these sweet taco desserts will become a new favorite.
If you give this cheesecake tacos recipe a try, let me know how you made them your own. Did you use a special topping? Try a gluten-free version? Leave a comment below, share a photo, or tag me on your favorite social channel. I can’t wait to see your delicious creations! Remember—life’s too short for boring dessert. Treat yourself and your loved ones to something truly irresistible!
FAQs About Cheesecake Tacos
Can I make cheesecake tacos ahead of time?
Yes! You can prep the shells and filling up to 2 days in advance. Just keep them separate and assemble right before serving for the crispiest results.
What can I use instead of tortillas for the shells?
You can use pita bread, gluten-free wraps, or even waffle cones as a fun alternative. Just follow the same coating and baking steps for best crunch.
How do I store leftover cheesecake tacos?
Store the shells and filling separately in airtight containers. If already assembled, refrigerate and eat within 4 hours for best texture. Re-crisp shells in the oven if needed.
Can I freeze these cheesecake tacos?
I don’t recommend freezing assembled tacos, as the shells lose their crunch. You can freeze the filling alone for up to a month, then thaw and fill fresh shells when ready.
What toppings work best for parties?
Fresh berries, pie fillings, mini chocolate chips, caramel drizzle, and crushed cookies are all crowd-pleasers. Set up a toppings bar so everyone can make their perfect dessert taco!
PrintCheesecake Tacos

Cheesecake tacos are a fun, hand-held dessert featuring crisp cinnamon-sugar shells filled with fluffy cheesecake filling and topped with fresh berries or your favorite sweet toppings. Perfect for parties, these treats are easy to make ahead and always a crowd-pleaser.
- Prep Time: 15 minutes
- Cook Time: 10 minutes
- Total Time: 25 minutes
- Yield: 8 tacos 1x
- Category: Dessert
- Cuisine: American
Ingredients
- 8 small (5-inch) flour tortillas (regular or gluten-free)
- 1/4 cup unsalted butter, melted
- 1/3 cup granulated sugar
- 1 tablespoon ground cinnamon
- 8 oz cream cheese, softened
- 2/3 cup powdered sugar
- 1/2 cup heavy whipping cream
- 1 teaspoon vanilla extract
- 1/2 teaspoon lemon zest (optional)
- 1 cup fresh mixed berries (strawberries, blueberries, raspberries, blackberries, or your favorites)
- OR 1 cup canned pie filling (cherry or blueberry)
- Crushed graham crackers or cookies (optional)
- Mini chocolate chips or caramel drizzle (optional)
Instructions
- Preheat oven to 400°F (200°C). Use a round cookie cutter or glass to cut 8 small circles (about 5-inch each) from flour tortillas.
- Melt butter in a small bowl. In another bowl, mix granulated sugar and cinnamon.
- Brush both sides of each tortilla circle with melted butter, then coat each side generously in the cinnamon sugar mixture.
- Flip a standard muffin tin upside-down and drape each coated tortilla over two muffin cups to form a taco shape.
- Bake in preheated oven for 8–10 minutes, until golden brown and crisp. Watch closely after 7 minutes to prevent burning.
- Remove shells from oven and let cool on the pan for a few minutes before transferring to a wire rack to cool completely.
- In a large bowl, beat softened cream cheese with powdered sugar using a hand or stand mixer for 2–3 minutes until smooth.
- Add heavy whipping cream and vanilla extract. Beat on medium-high speed for another 2–3 minutes until light and fluffy. Add lemon zest if using.
- If filling is too soft, chill in the fridge for 10 minutes to firm up.
- Spoon cheesecake filling into a piping bag or zip-top bag (snip off a corner). Pipe a generous line of filling into each cooled taco shell.
- Top each cheesecake taco with fresh berries, pie filling, or your favorite toppings. Sprinkle with crushed graham crackers, mini chocolate chips, or drizzle with caramel if desired.
- Serve immediately, or chill for up to 2 hours before serving.
Notes
For gluten-free, use gluten-free tortillas. For a lighter version, substitute some cream cheese with Greek yogurt. Assemble tacos just before serving for the crispiest shells. If shells soften, re-crisp in a 350°F oven for 3–5 minutes. Filling and shells can be made ahead and stored separately.
Nutrition
- Serving Size: 1 taco
- Calories: 220
- Sugar: 12
- Sodium: 180
- Fat: 13
- Saturated Fat: 7
- Carbohydrates: 23
- Fiber: 1
- Protein: 4
Keywords: cheesecake tacos, dessert tacos, party dessert, easy cheesecake, cinnamon sugar shells, hand-held dessert, make ahead dessert, berries, taco bar, sweet tacos


