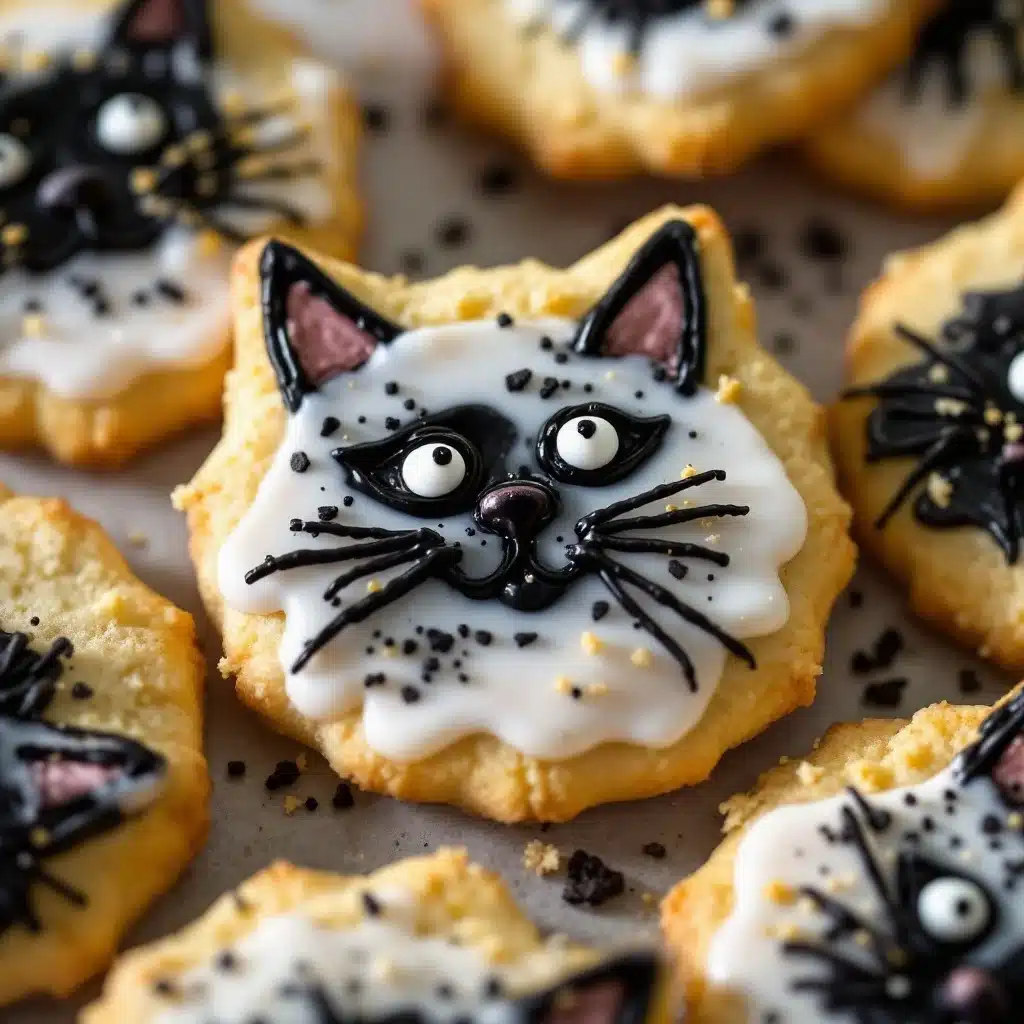
I figured black cat Halloween cookies would be cute but finicky — the kind of thing you spend hours on and then accidentally smudge one eye and the whole face looks cursed. It took about ten minutes of piping royal icing onto my first test batch for that assumption to fall apart completely. They were actually… easy? And I mean that in the most practical, non-blogger way possible. These adorable black cat Halloween sugar cookies with royal icing came together faster than I expected, and they looked genuinely charming — not like a Pinterest fail waiting to happen.
Honestly, I went into this thinking I’d need a projector, a steady hand I don’t possess, and maybe a small miracle. I had visions of lopsided whiskers and cats that looked more like grumpy potatoes. But here’s the thing — these cookies are designed for real people. The face is simple. The shape is forgiving. And the royal icing? It dries smooth and shiny, which covers a multitude of sins (not that you’ll have any). I tested this recipe on a Tuesday night after a long day, and by the time I was done, I had a whole tray of tiny black cats staring up at me with perfect little faces. That feeling? That’s why I keep coming back to the kitchen.
These cookies have become my go-to for Halloween parties, classroom treats, and even just a quiet night when I want to do something creative without the pressure of perfection. They’re the kind of cookie that makes people smile before they even take a bite. And once they do — well, let’s just say the buttery vanilla flavor does the rest. If you’ve ever wanted to make Halloween cookies that look impressive without making you want to pull your hair out, this is the one.
Why You’ll Love This Recipe
- Surprisingly Simple : The decorating looks intricate, but the technique is beginner-friendly. You only need two icing consistencies — outline and flood — and one piping tip. I’ve had friends who’ve never held a piping bag nail these on their first try.
- Perfect for Halloween : These are the star of any Halloween spread. They’re adorable enough for a kid’s class party but polished enough for an adult gathering. Plus, they’re a great activity to do with kids — let them pipe the flood icing while you handle the details.
- Make-Ahead Friendly : The cookies stay fresh for up to a week, and the royal icing hardens into a glossy, durable finish. You can bake and decorate over several days without any stress. I often bake the cookies one day and decorate the next.
- Naturally Crowd-Pleasing : The buttery sugar cookie base is a classic for a reason. It’s not too sweet, holds its shape perfectly, and pairs beautifully with the vanilla royal icing. I’ve brought these to multiple Halloween parties and they always disappear first.
- Endlessly Customizable : Once you master the basic black cat face, you can change the expression, add accessories like tiny pumpkins or witches’ hats, or even create a whole Halloween menagerie. I’ve made ghost and pumpkin variations using the same recipe.
What makes this recipe different from the dozens of others out there? It’s the balance between simplicity and impact. I tested six different sugar cookie recipes to find one that holds its shape without spreading, stays soft but not cakey, and tastes genuinely good — not just like a vehicle for icing. This is that recipe. The royal icing is also specifically formulated to dry hard and shiny, which means your cats will look polished and professional. No matte, dusty finishes here.
There’s something deeply satisfying about creating a whole little character from dough and icing. These cookies aren’t just food — they’re tiny edible art projects that happen to taste amazing. And honestly? The first time you see a perfect little cat face staring back at you, you’ll feel a little burst of pride. That’s the feeling I want you to have.
What Ingredients You Will Need
This recipe uses simple, pantry-friendly ingredients to create cookies that are both beautiful and delicious. I’ve tested every substitution and variation so you don’t have to guess.
For the Sugar Cookies
- Unsalted butter, softened (1 cup / 226g) — I prefer using European-style butter like Kerrygold for its higher fat content, which makes the cookies richer and helps them hold their shape better. Make sure it’s truly softened to room temperature, not melted.
- Granulated sugar (1 cup / 200g) — Standard white sugar works perfectly. Don’t substitute with brown sugar as it changes the texture and spread.
- Large egg (1, room temperature) — A room-temperature egg incorporates more evenly into the butter-sugar mixture, creating a smoother dough.
- Pure vanilla extract (1½ teaspoons) — Use real vanilla, not imitation. It makes a noticeable difference in flavor. I like Nielsen-Massey for baking.
- All-purpose flour (2½ cups / 315g) — Spoon and level your flour; don’t scoop directly from the bag. Too much flour makes cookies dry and crumbly.
- Baking powder (½ teaspoon) — This gives the cookies a slight lift without making them puff up and lose their shape.
- Salt (¼ teaspoon) — Fine sea salt is best. It balances the sweetness and enhances the buttery flavor.
For the Royal Icing

- Powdered sugar (4 cups / 480g) — Sift it before measuring to avoid lumps. I use C&H or Domino for consistent results.
- Meringue powder (3 tablespoons) — This is non-negotiable for royal icing that dries hard and shiny. Wilton brand is widely available and reliable. (If you can’t find it, you can use 3 pasteurized egg whites instead, but meringue powder is more stable.)
- Warm water (about 6-8 tablespoons) — The exact amount varies by humidity. Start with less and add more as needed.
- Black gel food coloring (1-2 teaspoons) — Use gel, not liquid. Liquid coloring will thin out your icing and affect the consistency. I like Americolor Super Black.
- White gel food coloring (for eyes and details) — Just a tiny bit for the eyes and whiskers. Americolor Bright White works well.
- Pink gel food coloring (optional, for noses and inner ears) — I use a tiny dot of Americolor Deep Pink for a subtle pink nose.
Equipment Needed
You don’t need a professional bakery setup for these cookies, but a few key tools make the process much smoother. Here’s what I use:
- Cat-shaped cookie cutter (about 3-4 inches) — I found mine on Amazon for under $10. Look for one with a simple, clean silhouette — the more detailed the cutter, the harder it is to decorate. A basic sitting cat shape works best.
- Baking sheets (2-3, preferably light-colored) — Dark sheets can cause cookies to brown too quickly on the bottom. I use Nordic Ware half-sheet pans.
- Parchment paper or silicone baking mats — Silpat mats are my favorite for even baking and easy cleanup.
- Rolling pin with thickness rings (¼ inch thick) — Consistent thickness is crucial for even baking. If you don’t have rings, use two wooden dowels or even popsicle sticks taped to your rolling pin.
- Stand mixer or hand mixer — A stand mixer with the paddle attachment is ideal, but a hand mixer works perfectly fine.
- Piping bags (disposable or reusable) — I prefer disposable 12-inch bags for easy cleanup. Wilton brand is my go-to.
- Small round piping tips (Wilton #2 for outlines, #3 for flooding) — The #2 tip gives you precision for faces, while the #3 is perfect for filling larger areas.
- Small bowls and spoons — For mixing and thinning icing. I use ramekins for small amounts of colored icing.
- Toothpicks — Essential for popping air bubbles, spreading icing into corners, and fixing mistakes.
- Damp paper towel — To cover your icing bowls and prevent them from drying out while you work.
- Cooling rack — For cooling cookies completely before decorating. I use a simple wire rack from IKEA.
Budget-friendly tip: If you don’t want to invest in piping tips right away, you can snip a tiny corner off a disposable piping bag. It won’t be as precise, but it works in a pinch. I started that way and only upgraded after my third batch.
Preparation Method
Step 1: Make the Cookie Dough (15 minutes + 1 hour chilling)
In the bowl of a stand mixer fitted with the paddle attachment, cream together the softened butter and granulated sugar on medium speed until light and fluffy — about 3 minutes. The mixture should look pale and almost doubled in volume. Scrape down the sides of the bowl, then add the egg and vanilla extract. Mix on low until just combined — don’t overmix here, or your cookies will be tough.
In a separate bowl, whisk together the flour, baking powder, and salt. With the mixer on low, gradually add the dry ingredients to the wet mixture. Mix until the dough just comes together — it will look crumbly at first, then form a cohesive ball. Don’t keep mixing once it’s combined. Overworked dough leads to tough cookies.
Turn the dough out onto a lightly floured surface and divide it in half. Shape each half into a flat disc (about 1 inch thick), wrap tightly in plastic wrap, and refrigerate for at least 1 hour. Chilling is crucial — it prevents the cookies from spreading during baking and makes the dough much easier to roll out. You can chill it overnight if you’re planning ahead.
Step 2: Roll and Cut the Cookies (20 minutes + 10 minutes chilling)
Preheat your oven to 350°F (175°C). Line two baking sheets with parchment paper or silicone mats.
Remove one disc of dough from the refrigerator. On a lightly floured surface, roll it out to ¼-inch thickness. I use a rolling pin with thickness rings for consistency, but if you’re eyeballing it, aim for an even thickness throughout. The dough should be cold but pliable — if it cracks at the edges, let it sit at room temperature for 5 minutes.
Dip your cat-shaped cutter in flour to prevent sticking, then cut out as many cats as you can. Press straight down without twisting the cutter — twisting seals the edges and prevents clean shapes. Transfer the cut cookies to your prepared baking sheets, spacing them about 2 inches apart. Gather the scraps, re-roll, and cut again. You should get about 24-30 cookies depending on the size of your cutter.
Here’s a tip I learned the hard way: after cutting, pop the baking sheets into the refrigerator for 10 minutes before baking. This re-chills the dough and ensures the cookies hold their shape perfectly. I forgot this step once and ended up with cats that looked like they’d melted in the sun.
Step 3: Bake the Cookies (10-12 minutes)
Bake the chilled cookies for 10-12 minutes, rotating the baking sheets halfway through. The cookies are done when the edges are just barely golden — the centers should look set but not brown. They’ll continue to firm up as they cool on the baking sheet.
Let the cookies rest on the baking sheet for 5 minutes, then transfer them to a wire cooling rack to cool completely. Do not decorate warm cookies — the icing will slide right off. I usually let mine cool for at least 30 minutes to be safe.
Step 4: Make the Royal Icing (10 minutes)
In the bowl of a stand mixer fitted with the paddle attachment (or using a hand mixer), combine the sifted powdered sugar and meringue powder. Add 6 tablespoons of warm water and mix on low until combined. Increase speed to medium-high and beat for 5-7 minutes, until the icing is thick, glossy, and forms stiff peaks. If it’s too thick, add water one teaspoon at a time. If it’s too thin, add more powdered sugar.
Divide the icing into bowls. Tint the majority black using black gel food coloring — start with 1 teaspoon and add more until you reach the desired darkness. Leave a small amount white for eyes and details. If you want pink noses, tint a tiny amount pink. Keep each bowl covered with a damp paper towel to prevent drying.
Step 5: Prepare the Icing for Piping
This is the most important part — getting the right consistency. For the outline icing, you want it thick enough to hold a sharp line. It should be like toothpaste. For the flood icing (the filling), thin it with drops of water until it flows like honey — it should drizzle off a spoon in a smooth ribbon that disappears into the surface within 10 seconds.
Transfer the outline icing to a piping bag fitted with a #2 tip. Transfer the flood icing to a piping bag fitted with a #3 tip. If you only have one tip size, you can use the same bag — just be careful not to overfill.
Step 6: Decorate the Cookies (30-45 minutes per batch)
Start by piping the outline of each cat using the black outline icing. Follow the cookie’s shape, tracing just inside the edge. This creates a barrier that will hold the flood icing in place. Let the outlines dry for 5-10 minutes — they should be slightly firm to the touch but not completely dry.
Next, pipe the flood icing inside the outlines. Start at the edges and work your way in, using a toothpick to spread the icing into corners and pop any air bubbles. Fill each cookie completely, but don’t overfill — you want the icing to be level with the outline. Let the flood icing dry for at least 2 hours, or overnight for best results. The icing should be completely hard to the touch before you add details.
Once the base is dry, pipe the faces. For the eyes, use white outline icing to pipe two small circles. For the pupils, use black icing to pipe tiny dots in the center of the white circles. For the nose, use pink icing to pipe a tiny triangle or heart. For the whiskers, use white icing to pipe three thin lines on each side of the nose. For the ears, use pink icing to fill in the inner ear area.
Cooking Tips & Techniques
I’ve made these cookies at least a dozen times, and I’ve made every mistake in the book. Here’s what I’ve learned so you don’t have to:
Temperature is everything. If your butter is too warm, the dough will spread in the oven. If your cookies are warm when you ice them, the icing will slide off. If your kitchen is humid, the icing will take forever to dry. I know it’s annoying, but these small details matter. I keep my kitchen at a consistent 68-70°F when I’m decorating, and I use a dehumidifier if it’s rainy.
Don’t skip the chill. I once thought I could skip the second chill before baking to save time. The result was cats with no defined shape — they looked like amorphous blobs with ears. It was not cute. The 10-minute chill is non-negotiable.
Practice your piping on parchment first. Before you touch a cookie, pipe a few test lines on a piece of parchment paper. This helps you get a feel for the pressure and consistency. I still do this every time, even after years of practice.
Work in batches. Don’t try to decorate all 30 cookies at once. I do 6-8 at a time, letting them dry completely before moving on. This prevents smudging and gives you time to fix mistakes. If you mess up a face, you can gently scrape off the wet icing with a toothpick and try again.
Use a scribe tool or toothpick for details. For tiny details like pupils and whiskers, a toothpick gives you more control than a piping bag. I dip the tip in icing and dot it onto the cookie. It’s slower but much more precise.
Store properly. Once decorated, let the cookies dry uncovered for at least 12 hours before stacking or storing. Then layer them between sheets of parchment paper in an airtight container. They’ll stay fresh for up to a week at room temperature.
Variations & Adaptations
One of the best things about this recipe is how customizable it is. Here are some variations I’ve tried and loved:
Gluten-Free Version: Substitute the all-purpose flour with a 1:1 gluten-free baking flour blend (I like King Arthur Measure for Measure). The dough will be slightly more delicate, so handle it gently and chill it well. The cookies won’t be quite as tender, but they’re still delicious.
Vegan Version: Use vegan butter (I recommend Miyoko’s or Earth Balance), a flax egg (1 tablespoon ground flaxseed + 3 tablespoons water), and replace the meringue powder with aquafaba (the liquid from a can of chickpeas). Whip the aquafaba until frothy before adding the powdered sugar. The texture is slightly different, but it works.
Flavor Variations: Add 1 teaspoon of almond extract along with the vanilla for a subtle nutty flavor. Or add 1 tablespoon of cocoa powder to the dough for chocolate cats. I’ve also made lemon cats by adding the zest of one lemon to the dough — they’re surprisingly good with the sweet icing.
Different Shapes: Use the same recipe and technique with different Halloween cookie cutters — ghosts, pumpkins, bats, and moons all work beautifully. My crispy skillet cornbread might be my go-to for fall dinners, but these cookies are my Halloween party staple.
No-Icing Version: If royal icing feels intimidating, you can skip it entirely. Add ¼ cup of cocoa powder to the dough for chocolate cats, then use a toothpick to draw simple faces after baking. They won’t be as polished, but they’ll still be cute and delicious.
Spiced Version: Add 1 teaspoon of pumpkin pie spice to the dough for a fall twist. The spice pairs beautifully with the vanilla icing and makes the cookies feel extra seasonal. I made these for a Halloween potluck and they were gone in minutes.
Serving & Storage Suggestions
These cookies are best served at room temperature. The royal icing should be completely hard and glossy — a sign that it’s fully set. I usually let them dry overnight before serving or packaging.
For a Halloween party: Arrange the cookies on a cake stand or platter, alternating with other Halloween treats like pumpkin dinner rolls or mini cupcakes. The black cats make a striking visual statement against a white or orange tablecloth. I like to add a few candy corn or chocolate spiders around the platter for extra Halloween flair.
For gifting: Place the cookies in a clear cellophane bag tied with a orange or black ribbon. Add a small tag with the recipe name and a note. They make wonderful hostess gifts for Halloween parties or Thanksgiving gatherings. I’ve also sent them in care packages — just make sure to pack them carefully with bubble wrap or crumpled parchment paper.
Storage: Store undecorated cookies in an airtight container at room temperature for up to 2 weeks. Decorated cookies will keep for up to a week at room temperature. Do not refrigerate — the humidity will cause the icing to become sticky and lose its shine. If you need to store them longer, freeze the undecorated cookies for up to 3 months, then thaw and decorate.
Reheating: These cookies are meant to be eaten at room temperature, but if you prefer a slightly warm cookie, pop one in the microwave for 5-10 seconds. The icing will soften slightly but won’t melt completely.
Flavor development: The cookies actually taste better the day after baking. The flavors meld together, and the texture becomes perfectly tender. I often bake them a day or two ahead of time and decorate the day before serving.
Nutritional Information & Benefits
These are definitely a treat, not a health food, but here’s the breakdown so you know what you’re working with. Per cookie (based on 30 cookies):
- Calories: 165
- Fat: 7g
- Carbohydrates: 25g
- Sugar: 16g
- Protein: 2g
- Fiber: 0.5g
Dietary considerations: These cookies contain dairy (butter), eggs, and gluten. For dairy-free, use vegan butter. For egg-free, use a flax egg in the cookie dough and aquafaba in the royal icing. For gluten-free, use a 1:1 gluten-free flour blend. The royal icing is naturally fat-free and dairy-free.
Health benefits: While these aren’t exactly a superfood, the butter provides a small amount of vitamin A and healthy fats. The cookies are also free from artificial preservatives and high-fructose corn syrup — which is more than you can say for most store-bought Halloween treats. I feel better about serving these to kids because I know exactly what’s in them.
My perspective: I believe in balance. These cookies are a celebration treat, not an everyday snack. They’re meant to be enjoyed in moderation, shared with loved ones, and savored. The joy they bring — both in making and eating them — is a form of nourishment too.
Conclusion
These adorable black cat Halloween sugar cookies with royal icing are more than just a recipe — they’re a little project that brings joy from start to finish. The dough comes together in minutes, the decorating is surprisingly forgiving, and the result is a batch of cookies that look like they came from a bakery. But the best part? You made them yourself.
I love that these cookies let me be creative without the pressure of perfection. Each cat has its own little personality — some look grumpy, some look surprised, some look like they’re plotting world domination. And that’s exactly how it should be. They’re not meant to be identical; they’re meant to be charming.
If you’re intimidated by royal icing, I get it. I was too. But I promise you, once you pipe that first cat face and see it come together, you’ll feel a little thrill. And when you bite into one and taste that buttery, vanilla-sweet goodness? You’ll wonder why you didn’t try this sooner.
So go ahead — preheat that oven, roll out that dough, and make some magic. And when you do, I’d love to hear about it. Drop a comment below and tell me how your cats turned out. Did you add any fun variations? Did your kids help decorate? Share your photos and tag me — I can’t wait to see your adorable black cats!
Frequently Asked Questions
Why did my cookies spread in the oven?
The most common reason is that the dough wasn’t chilled enough. Make sure you refrigerate the dough for at least 1 hour before rolling, and chill the cut cookies for 10 minutes before baking. Also, check that your butter was properly softened — if it was too warm, the dough will spread. If your kitchen is warm, you can even chill the baking sheet between batches.
Can I freeze the cookie dough?
Absolutely! Wrap the dough discs tightly in plastic wrap, then place them in a freezer bag. They’ll keep for up to 3 months. When you’re ready to bake, thaw the dough in the refrigerator overnight, then roll and cut as directed. You can also freeze the baked, undecorated cookies for up to 3 months — just thaw at room temperature before decorating.
How do I get the royal icing to dry faster?
Royal icing dries best in a dry, cool environment. If your kitchen is humid, it can take much longer. You can use a fan to circulate air around the cookies, or place them in a warm (not hot) oven with the door slightly ajar. I’ve also had success using a food dehydrator on the lowest setting for about 30 minutes. Just be careful not to overheat the cookies — you don’t want the icing to melt.
My royal icing is too thick/thin. How do I fix it?
If it’s too thick, add water one drop at a time and stir until it reaches the right consistency. If it’s too thin, add more sifted powdered sugar, one tablespoon at a time. The key is to go slowly — you can always add more, but you can’t take it away. For outline icing, it should be like toothpaste. For flood icing, it should flow like honey.
Can I use liquid food coloring instead of gel?
I don’t recommend it. Liquid food coloring will thin out your royal icing and affect its consistency, making it harder to pipe and slower to dry. Gel food coloring is much more concentrated, so you need less of it, and it won’t change the icing’s texture. Americolor and Wilton both make excellent gel colors that are widely available online and in craft stores.
Pin This Recipe!

Adorable Black Cat Halloween Sugar Cookies Recipe

These adorable black cat Halloween sugar cookies with royal icing come together faster than expected and look genuinely charming. The buttery vanilla sugar cookie base pairs beautifully with glossy royal icing for a treat that’s surprisingly simple to decorate.
- Prep Time: 1 hour 45 minutes
- Cook Time: 12 minutes
- Total Time: 2 hours 30 minutes
- Yield: 24-30 cookies 1x
- Category: Dessert
- Cuisine: American
Ingredients
- 1 cup (226g) unsalted butter, softened
- 1 cup (200g) granulated sugar
- 1 large egg, room temperature
- 1½ teaspoons pure vanilla extract
- 2½ cups (315g) all-purpose flour
- ½ teaspoon baking powder
- ¼ teaspoon fine sea salt
- 4 cups (480g) powdered sugar, sifted
- 3 tablespoons meringue powder
- 6–8 tablespoons warm water
- 1–2 teaspoons black gel food coloring
- White gel food coloring (for eyes and details)
- Pink gel food coloring (optional, for noses and inner ears)
Instructions
- Make the cookie dough: In a stand mixer with paddle attachment, cream softened butter and granulated sugar on medium speed until light and fluffy, about 3 minutes. Scrape down sides, add egg and vanilla, mix on low until combined.
- In a separate bowl, whisk together flour, baking powder, and salt. With mixer on low, gradually add dry ingredients to wet mixture until dough just comes together.
- Turn dough onto lightly floured surface, divide in half, shape into flat discs, wrap in plastic wrap, and refrigerate for at least 1 hour.
- Preheat oven to 350°F (175°C). Line baking sheets with parchment paper or silicone mats.
- Roll out one disc of dough to ¼-inch thickness on lightly floured surface. Cut with cat-shaped cookie cutter dipped in flour. Transfer to prepared baking sheets, spacing 2 inches apart. Re-roll scraps and cut again.
- Chill cut cookies on baking sheets for 10 minutes before baking.
- Bake chilled cookies for 10-12 minutes, rotating sheets halfway through, until edges are just barely golden. Let rest on baking sheet for 5 minutes, then transfer to wire rack to cool completely.
- Make royal icing: In stand mixer with paddle attachment, combine sifted powdered sugar and meringue powder. Add 6 tablespoons warm water, mix on low until combined, then beat on medium-high for 5-7 minutes until thick, glossy, and forms stiff peaks. Adjust consistency with water or powdered sugar as needed.
- Divide icing into bowls. Tint majority black with gel food coloring. Leave some white for eyes/details. Optionally tint small amount pink for noses. Keep bowls covered with damp paper towel.
- Prepare icing for piping: For outline icing, keep thick like toothpaste. For flood icing, thin with drops of water until it flows like honey (drizzles off spoon in smooth ribbon that disappears within 10 seconds).
- Transfer outline icing to piping bag with #2 tip. Transfer flood icing to piping bag with #3 tip.
- Pipe outline of each cat using black outline icing, tracing just inside edge. Let outlines dry 5-10 minutes until slightly firm.
- Pipe flood icing inside outlines, starting at edges and working inward. Use toothpick to spread into corners and pop air bubbles. Let dry at least 2 hours or overnight until completely hard.
- Once base is dry, pipe faces: Use white outline icing for eyes (two small circles), black icing for pupils (tiny dots in center), pink icing for nose (tiny triangle or heart), white icing for whiskers (three thin lines each side), and pink icing for inner ears.
Notes
Temperature is crucial: butter must be properly softened, cookies must be chilled before baking, and cookies must be completely cool before decorating. Don’t skip the second chill before baking to prevent spreading. Practice piping on parchment first. Work in batches of 6-8 cookies. Use a toothpick for tiny details. Let decorated cookies dry uncovered for at least 12 hours before stacking or storing. Store in airtight container at room temperature for up to a week. Do not refrigerate as humidity will make icing sticky.
Nutrition
- Serving Size: 1 cookie
- Calories: 165
- Sugar: 16
- Sodium: 55
- Fat: 7
- Saturated Fat: 4
- Carbohydrates: 25
- Fiber: 0.5
- Protein: 2
Keywords: Halloween cookies, black cat cookies, sugar cookies, royal icing cookies, Halloween baking, decorated cookies, cat cookies