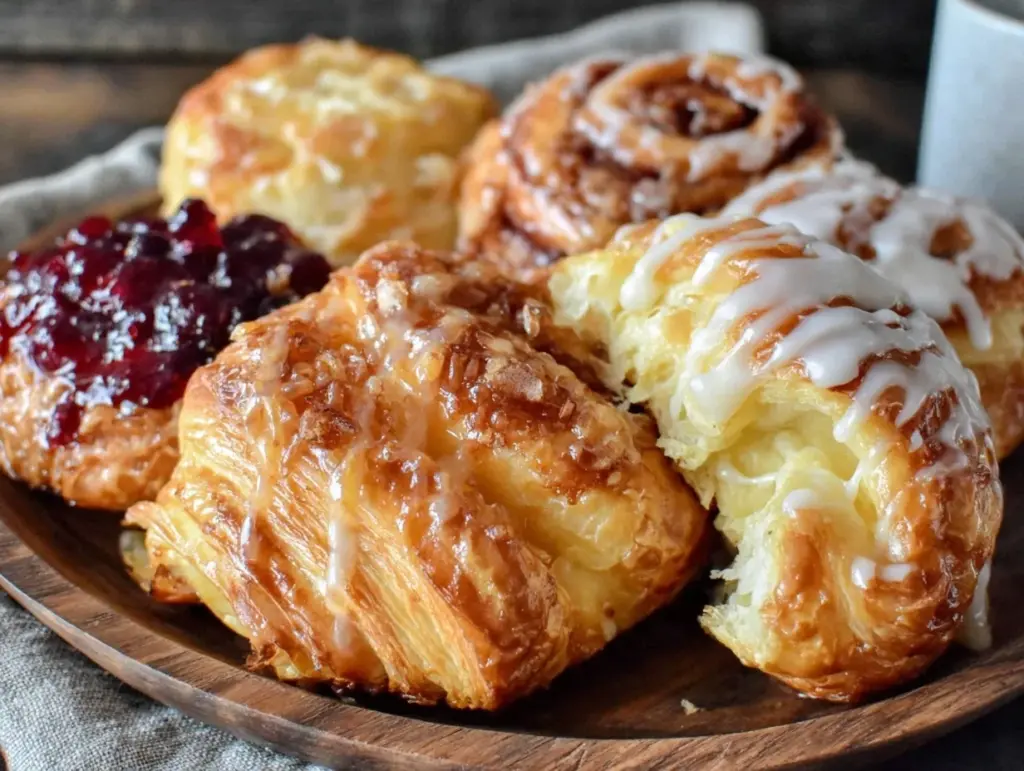
Let me tell you, the scent of buttery, flaky breakfast pastries wafting from my oven is enough to make anyone’s mouth water (and honestly, it’s one of the best ways to wake up). The first time I baked these flaky breakfast pastries with irresistible layers and fillings, I was instantly hooked—the kind of moment where you pause, take a deep breath, and just smile because you know you’re onto something truly special. Years ago, when I was knee-high to a grasshopper, my grandma used to make morning treats that melted in your mouth and warmed your soul. This recipe taps into that nostalgic comfort, but with a modern twist that’s dangerously easy to pull off.
You know what’s funny? My family couldn’t stop sneaking them off the cooling rack (and I can’t really blame them). Whether it was a lazy weekend brunch or a quick grab-and-go snack, these pastries became a staple for family gatherings and gifting (in the name of research, of course). Let’s face it—flaky, layered pastries with a surprise filling are the kind of breakfast that feels like a warm hug, and you’re going to want to bookmark this one for potlucks, cozy mornings, or brightening up your Pinterest cookie board.
Why You’ll Love This Recipe
After testing this flaky breakfast pastries recipe multiple times (because, well, someone’s gotta do it), here’s what makes it stand out and a must-have in your baking arsenal:
- Quick & Easy: Comes together in under 45 minutes, perfect for busy weeknights or last-minute brunch ideas.
- Simple Ingredients: No fancy grocery trips needed; you likely already have everything in your kitchen pantry.
- Perfect for Breakfast or Brunch: A crowd-pleaser that works beautifully for weekend mornings, holiday spreads, or casual get-togethers.
- Crowd-Pleaser: Kids and adults alike rave about the buttery layers and the surprise of the fillings inside.
- Unbelievably Delicious: The texture—flaky, tender, with just the right amount of crisp—is next-level comfort food.
This isn’t just another pastry recipe. The secret lies in the layering technique that creates those irresistible flaky pockets, combined with thoughtfully balanced fillings that aren’t overly sweet or heavy. Whether you’re swapping in cream cheese and jam or savory ham and cheese, this recipe gives you the best version of homemade pastries. Honestly, it’s the kind of comfort food that makes you close your eyes after the first bite. It turns a simple morning into a memorable one without stressing you out in the kitchen.
What Ingredients You Will Need
This recipe uses simple, wholesome ingredients to deliver bold flavor and satisfying texture without the fuss. Most of these are pantry staples, and a few you might want to pick up fresh to get the best results.
- For the Pastry Dough:
- All-purpose flour – 2 ½ cups (320 g), sifted for lightness
- Unsalted butter – 1 cup (226 g), cold and cubed (I recommend Kerrygold for rich flavor)
- Cold water – ½ cup (120 ml), iced to keep dough flaky
- Granulated sugar – 2 tablespoons (adds just a hint of sweetness)
- Salt – 1 teaspoon
- For the Fillings (choose your favorite or mix):
- Cream cheese – ½ cup (115 g), softened (use Philadelphia brand for smooth results)
- Strawberry jam – ¼ cup (60 ml), or your favorite preserves (fresh berry jam works beautifully in summer)
- Sharp cheddar cheese – 1 cup (100 g), shredded (for savory options)
- Deli ham – ½ cup (50 g), thinly sliced (optional, for savory pastries)
- Brown sugar – 2 tablespoons (optional, for a caramelized touch)
- Cinnamon – 1 teaspoon (great paired with cream cheese and fruit fillings)
- For the Egg Wash:
- Large egg – 1, beaten (for that golden, glossy finish)
- Water – 1 tablespoon (to lighten the egg wash)
If you need gluten-free options, swapping the all-purpose flour for a gluten-free blend works well, though the texture may be slightly denser. For dairy-free, use vegan butter and coconut-based cream cheese alternatives, and you’re good to go.
Equipment Needed
- Mixing Bowls: A large bowl for dough and smaller ones for fillings keep things organized.
- Pastry Cutter or Food Processor: To cut cold butter into flour; a food processor speeds this up, but a sturdy pastry cutter works just fine.
- Rolling Pin: Essential for creating those perfect thin layers—mine’s a simple wooden one, inexpensive but reliable.
- Baking Sheet: A rimmed baking sheet lined with parchment paper prevents sticking and mess.
- Pastry Brush: For applying egg wash evenly over your pastries.
- Sharp Knife or Pizza Cutter: To cut your dough into neat shapes.
If you don’t have a food processor, no worries—just keep your butter cold and use quick, steady motions with the pastry cutter. Keeping everything chilled is the key to flaky layers, so a good refrigerator and freezer space help a lot. For budget-friendly options, many of these tools can be found at your local dollar store or thrift shops and still do the job beautifully.
Preparation Method

- Mix the Dry Ingredients: In a large bowl, whisk together 2 ½ cups (320 g) sifted all-purpose flour, 2 tablespoons granulated sugar, and 1 teaspoon salt. This ensures even distribution and avoids salty spots in your dough. (About 3 minutes)
- Cut in the Butter: Add the cold, cubed 1 cup (226 g) unsalted butter into the dry mix. Using a pastry cutter or your fingers, quickly work the butter into the flour until the mixture resembles coarse crumbs with pea-sized bits of butter remaining. The tiny chunks melt during baking, creating those flaky layers. (5-7 minutes)
- Add Cold Water: Slowly pour in ½ cup (120 ml) iced water, stirring gently until the dough just comes together. Be careful not to overwork—it should hold when pressed but still be slightly crumbly. (2 minutes)
- Chill the Dough: Shape dough into a disk, wrap in plastic wrap, and refrigerate for at least 30 minutes. This step firms up the butter and relaxes gluten for tender layers. (30+ minutes)
- Prepare Fillings: While chilling, mix cream cheese with cinnamon and brown sugar if using, or shred cheese and slice ham for savory options. If you like fruit fillings, have your jam ready. (10 minutes)
- Roll Out the Dough: On a lightly floured surface, roll the chilled dough into a 12×16 inch (30×40 cm) rectangle. Fold into thirds like a letter (this is the basic lamination step), then roll out again to the same size. Repeat folding once more for extra layers. (10-15 minutes)
- Cut and Fill Pastries: Slice dough into 3×4 inch (7.5×10 cm) rectangles. Place a spoonful of your chosen filling in the center of each piece, then fold or roll to seal edges. Pinch well to avoid leaks. (15 minutes)
- Apply Egg Wash: Beat 1 large egg with 1 tablespoon water and brush over pastries for that golden finish. (2 minutes)
- Bake: Place pastries on a parchment-lined baking sheet, spaced 2 inches (5 cm) apart. Bake at 400°F (200°C) for 18-22 minutes or until puffed and golden brown. Rotate the pan halfway for even cooking. (20 minutes)
- Cool and Serve: Let pastries cool slightly on a wire rack before enjoying. They’re best warm but still scrumptious at room temp! (10 minutes)
Pro tip: If you notice dough getting too warm during rolling, pop it back in the fridge for 10 minutes. Keeping everything cool is the trick to flaky, layered perfection.
Cooking Tips & Techniques
When working with pastry dough, cold is your best friend. Butter melting too soon means less flaky layers—honestly, it’s a lesson I learned the hard way. Always chill your dough before rolling and don’t be afraid to take breaks if your kitchen gets warm. Use a light touch to avoid overworking the dough, which can make your pastries tough.
Getting the perfect fold is key. The “letter fold” method creates those irresistible layers by folding and rolling several times. It sounds fancy but once you get the hang of it, it’s straightforward and feels like a mini workout (bonus!).
Egg wash isn’t just for looks—it helps seal the edges and adds a shiny, golden crust that’s pure eye candy. Brush lightly to avoid sogginess. Also, preheating your oven thoroughly ensures the pastries puff up quickly for that delicate rise.
One mistake I often made was overfilling—too much filling leaks out and makes a mess. Less is more here; a teaspoon or so per pastry is just right. And don’t skip the parchment paper; it keeps your baking sheet clean and helps with even browning.
Variations & Adaptations
One of the best things about this flaky breakfast pastries recipe is how easy it is to customize. Here are a few fun twists you can try:
- Sweet Fruit & Nut: Swap cream cheese for mascarpone and add chopped toasted pecans or walnuts with your favorite berry jam for a crunchy-sweet combo.
- Savory Spin: Fill with sautéed mushrooms, caramelized onions, and gruyere cheese for a sophisticated brunch pastry. You can also add fresh herbs like thyme or chives for extra flavor.
- Gluten-Free Adaptation: Use a high-quality gluten-free all-purpose flour blend and reduce water slightly to get the right dough consistency. The texture won’t be quite as flaky but still delicious.
- Dairy-Free Version: Swap butter for vegan margarine and cream cheese for coconut or almond-based spreads. The layering still works beautifully.
I recently tried a pumpkin spice filling with cream cheese and a sprinkle of nutmeg—totally seasonal and got raving reviews from friends. The key is to keep fillings moist but not runny, so the layers stay intact and flaky.
Serving & Storage Suggestions
Serve these flaky breakfast pastries warm for maximum enjoyment. They pair wonderfully with a hot cup of coffee, tea, or fresh orange juice. For a brunch spread, add a side of mixed berries or a simple green salad to balance the richness.
Store leftovers in an airtight container at room temperature for up to 2 days, or refrigerate for 4-5 days. To keep that crunch, reheat in a toaster oven or conventional oven at 350°F (175°C) for 5-7 minutes rather than the microwave, which can make them soggy.
If you want to freeze them, pop the unbaked pastries on a baking sheet lined with parchment, freeze until solid, then transfer to a freezer bag. Bake straight from frozen, adding a few extra minutes to the baking time. Flavors actually deepen over time, so they taste even better the next day (if you can wait that long!).
Nutritional Information & Benefits
Each flaky breakfast pastry (depending on size and filling) is roughly 250-300 calories, making it a satisfying treat to start your day. The butter provides richness and satiety, while the flour offers energy-boosting carbs. Using cream cheese or fresh fruit fillings adds protein and vitamins.
This recipe can be adapted for dietary needs—gluten-free flours and dairy-free substitutes work well. If you’re watching sugar intake, opt for low-sugar fruit preserves or savory fillings. The homemade nature means you control the ingredients, avoiding preservatives and excess additives common in store-bought pastries.
I love how this recipe balances indulgence with simplicity, making it a feel-good option for breakfast or brunch that you can feel good about sharing with family and friends.
Conclusion
Honestly, flaky breakfast pastries with irresistible layers and fillings are the kind of recipe you wish you’d discovered years ago. They bring joy with every bite, whether you’re feeding a crowd or sneaking one with your morning coffee. The blend of buttery layers, simple ingredients, and versatile fillings makes this recipe a keeper.
Feel free to customize the fillings or try your hand at the folds until you find your perfect pastry style. I love hearing how others make this recipe their own, so don’t be shy—drop a comment, share your tips, or post photos of your flaky creations. This recipe is all about bringing a little extra warmth and happiness to your mornings.
Happy baking, and remember—sometimes the best recipes are the ones that bring family and friends together around the table (or just the kitchen counter!). You’re going to love these flaky breakfast pastries!
FAQs About Flaky Breakfast Pastries
Can I make the dough ahead of time?
Yes! The dough can be prepared and refrigerated for up to 24 hours before rolling and filling. Just keep it wrapped tightly in plastic to prevent drying out.
What’s the best way to keep the pastries flaky?
Keep all ingredients cold, handle the dough gently, and avoid overworking it. Chilling between folds helps create those perfect layers.
Can I use frozen fruit jam for the filling?
Absolutely! Just make sure it’s thawed and drained of excess liquid to avoid soggy pastries.
How do I know when the pastries are done baking?
Look for a deep golden color and puffed-up edges. They should feel light and crisp to the touch.
Can I freeze these pastries after baking?
Yes, let them cool completely, then freeze in an airtight container. Reheat in the oven at 350°F (175°C) until warmed through and crisp.
Pin This Recipe!

Flaky Breakfast Pastries

Buttery, flaky breakfast pastries with irresistible layers and customizable fillings, perfect for breakfast or brunch. Easy to make with simple ingredients and a layering technique that creates tender, crisp pockets.
- Prep Time: 20 minutes
- Cook Time: 20 minutes
- Total Time: 45 minutes
- Yield: 12 pastries 1x
- Category: Breakfast
- Cuisine: American
Ingredients
- 2 ½ cups (320 g) all-purpose flour, sifted
- 1 cup (226 g) unsalted butter, cold and cubed
- ½ cup (120 ml) cold water, iced
- 2 tablespoons granulated sugar
- 1 teaspoon salt
- ½ cup (115 g) cream cheese, softened
- ¼ cup (60 ml) strawberry jam or favorite preserves
- 1 cup (100 g) sharp cheddar cheese, shredded
- ½ cup (50 g) deli ham, thinly sliced (optional)
- 2 tablespoons brown sugar (optional)
- 1 teaspoon cinnamon
- 1 large egg, beaten
- 1 tablespoon water
Instructions
- In a large bowl, whisk together sifted all-purpose flour, granulated sugar, and salt.
- Add cold, cubed unsalted butter and cut into the flour mixture using a pastry cutter or fingers until mixture resembles coarse crumbs with pea-sized butter bits.
- Slowly pour in iced cold water, stirring gently until dough just comes together; avoid overworking.
- Shape dough into a disk, wrap in plastic wrap, and refrigerate for at least 30 minutes.
- Prepare fillings by mixing cream cheese with cinnamon and brown sugar if using, or shred cheese and slice ham for savory options; have jam ready for fruit fillings.
- On a lightly floured surface, roll chilled dough into a 12×16 inch rectangle. Fold into thirds like a letter, then roll out again to the same size. Repeat folding once more for extra layers.
- Cut dough into 3×4 inch rectangles. Place a spoonful of chosen filling in the center of each piece, then fold or roll to seal edges. Pinch well to avoid leaks.
- Beat egg with water and brush over pastries for a golden finish.
- Place pastries on a parchment-lined baking sheet spaced 2 inches apart. Bake at 400°F (200°C) for 18-22 minutes or until puffed and golden brown, rotating pan halfway through baking.
- Let pastries cool slightly on a wire rack before serving.
Notes
Keep all ingredients cold to ensure flaky layers. Chill dough between folds and if it warms during rolling, refrigerate for 10 minutes. Use a light touch to avoid overworking dough. Use parchment paper to prevent sticking and ensure even browning. Avoid overfilling to prevent leaks. Preheat oven thoroughly for best puff.
Nutrition
- Serving Size: 1 pastry
- Calories: 275
- Sugar: 5
- Sodium: 210
- Fat: 18
- Saturated Fat: 11
- Carbohydrates: 22
- Fiber: 1
- Protein: 5
Keywords: flaky breakfast pastries, homemade pastries, breakfast recipe, brunch pastries, layered pastries, easy pastry recipe, buttery pastries