
Let me tell you, the moment I opened the fridge and saw that luscious, velvety red velvet icebox cake waiting for me was nothing short of magical. The scent of cocoa mingled with a hint of tangy cream cheese, teasing my senses and urging me to dive right in. The first time I made this Creamy Red Velvet Icebox Cake with Mascarpone Frosting, I was instantly hooked—the kind of moment where you pause, take a deep breath, and just smile because you know you’re onto something truly special. Years ago, when I was knee-high to a grasshopper, I’d only dreamt of desserts like this—cakes that don’t just satisfy your sweet tooth but feel like a warm, nostalgic hug.
This recipe came to me on a rainy weekend when I was craving something decadent yet dangerously easy. My family couldn’t stop sneaking slices off the cooling rack (and honestly, I can’t really blame them). It’s perfect for potlucks, a sweet treat for your kids, or just to brighten up your Pinterest cookie board with a pop of vibrant color and creamy texture. You know what? I’ve tested this recipe more times than I can count—in the name of research, of course—and it’s become a staple for family gatherings and gifting. Honestly, if you’re looking for a dessert that feels like a celebration every time, you’re going to want to bookmark this one.
Why You’ll Love This Recipe
After countless trials and happy taste testers, here’s why this Creamy Red Velvet Icebox Cake with Mascarpone Frosting stands apart:
- Quick & Easy: Comes together in under 30 minutes (excluding chill time), perfect for busy weeknights or last-minute dessert emergencies.
- Simple Ingredients: No fancy grocery trips needed; you likely already have everything in your kitchen pantry.
- Perfect for Any Occasion: Whether it’s brunch, holiday mornings, or cozy dinners, this cake fits right in.
- Crowd-Pleaser: Always gets rave reviews from kids and adults alike—trust me, it flies off the plate.
- Unbelievably Delicious: The perfect balance between smooth mascarpone frosting and moist, tender red velvet layers hits that next-level comfort food spot.
What makes this recipe different? It’s all about that mascarpone frosting—blended until ultra-smooth with just the right touch of sweetness and vanilla, it’s creamier than your usual cream cheese frostings. Plus, the layering technique lets those velvety cake wafers soak up the frosting overnight in the fridge, turning each bite into a melt-in-your-mouth dream. This isn’t just good—it’s the kind of dessert that makes you close your eyes after the first bite and savor every moment.
What Ingredients You Will Need
This recipe uses simple, wholesome ingredients to deliver bold flavor and satisfying texture without the fuss. Most are pantry staples, and a few fresh items bring everything together beautifully.
- For the Cake Layers:
- Red velvet wafer cookies (about 12 ounces / 340 grams) – I recommend Nabisco wafers for the best texture
- Unsweetened cocoa powder (2 tablespoons / 15 grams)
- For the Mascarpone Frosting:
- Mascarpone cheese (1 cup / 240 grams), softened – look for full-fat for richness
- Heavy cream (1 cup / 240 ml), cold
- Powdered sugar (3/4 cup / 90 grams), sifted
- Vanilla extract (1 teaspoon)
- Pinch of salt (just a pinch to balance sweetness)
- Optional Garnishes:
- White chocolate shavings
- Fresh raspberries or strawberries for a pop of color
- Edible red glitter or sprinkles for a festive touch
If you want a dairy-free version, swap mascarpone for a coconut cream-based alternative, and use dairy-free whipped topping in place of heavy cream. For a gluten-free twist, try gluten-free red velvet wafer cookies or thinly sliced gluten-free cake layers.
Equipment Needed
- 9×9 inch (23×23 cm) square baking dish or a similar sized glass container – I like Pyrex for even chilling and easy serving
- Electric mixer or stand mixer with a whisk attachment – it whips the mascarpone frosting to the perfect airy texture
- Mixing bowls (medium and large)
- Rubber spatula for folding and spreading
- Measuring cups and spoons – precise measurements keep your layers consistent
- Fine mesh sieve (optional) for sifting powdered sugar and cocoa powder
If you don’t have an electric mixer, a sturdy whisk and some arm strength will do the trick, although it might take a bit longer. For budget-friendly options, hand mixers from brands like Hamilton Beach work great without breaking the bank. Proper maintenance of your mixer’s beaters (cleaning immediately after use) will keep it running smoothly for your next dessert adventure.
Preparation Method
- Prepare the Frosting (10 minutes): In a large mixing bowl, combine the softened mascarpone cheese and powdered sugar. Beat on medium speed until smooth and creamy, about 2 minutes. Add the vanilla extract and a pinch of salt. Slowly pour in the cold heavy cream while continuing to whisk on high speed until soft peaks form (about 3-4 minutes). Be careful not to overwhip—stop as soon as the frosting holds shape but is still creamy.
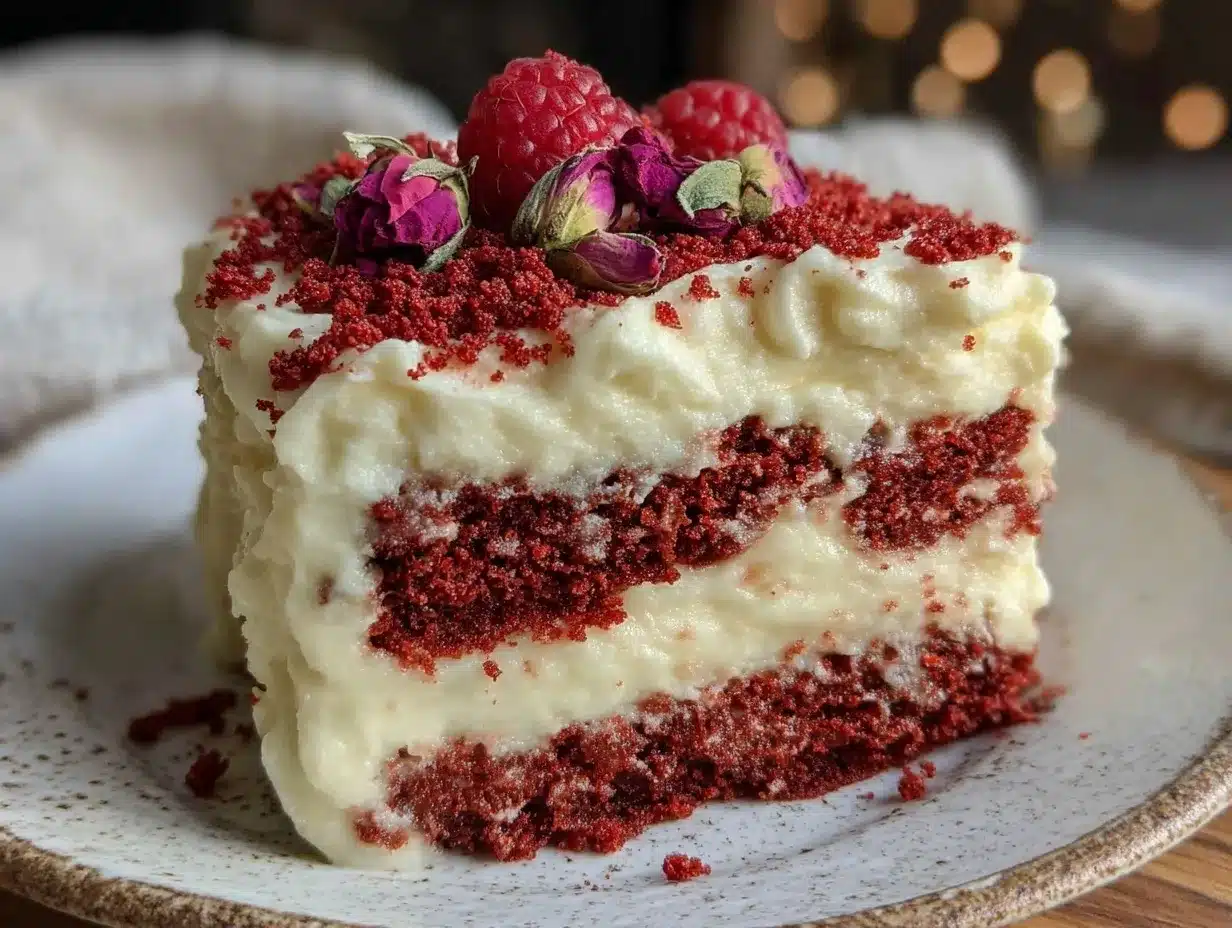
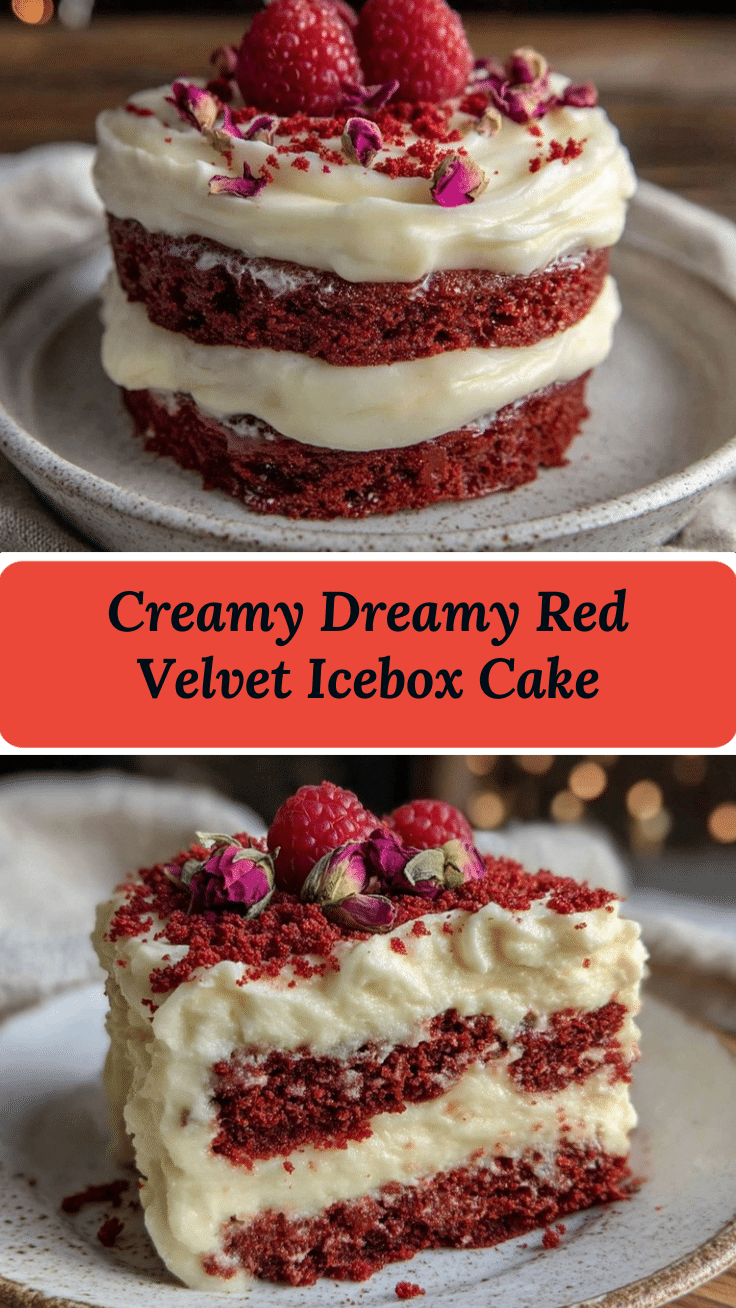
- Layer the Cake (15 minutes): Lightly grease your 9×9 inch dish. Start with a thin layer of mascarpone frosting to prevent sticking. Arrange a single layer of red velvet wafer cookies, fitting them snugly but not overlapping. Spread about 1/3 of the frosting evenly over the cookies, smoothing with a spatula. Repeat layering cookies and frosting two more times, finishing with a frosting layer on top.
- Chill Overnight (at least 6 hours): Cover the dish tightly with plastic wrap and refrigerate. This step is crucial—overnight chilling lets the wafers soften and absorb the creamy frosting, transforming the cake into a luscious, sliceable dessert. If you’re short on time, 4 hours works, but trust me, longer is better.
- Garnish and Serve (5 minutes): Before serving, top with your choice of white chocolate shavings, fresh berries, or edible glitter. Use a sharp serrated knife to slice neatly. Serve chilled for that perfect creamy texture.
- Troubleshooting Tips: If your frosting seems too runny, chill it for 15 minutes before layering. Cookies that are too thick can make the cake dense—opt for wafer-thin red velvet cookies. If the cake is too firm after chilling, let it sit at room temperature for 10 minutes before slicing.
Cooking Tips & Techniques
Whipping mascarpone can be tricky—it’s easy to overbeat and end up with a grainy texture or even butter. Always start at a medium speed and watch closely. Chill your mixing bowl and beaters beforehand for a fluffier whip. When layering, gently press cookies into the frosting but don’t smash them flat; you want them to soak but still keep some structure.
Let’s face it, the key to a dreamy icebox cake is patience. Resist the urge to cut into it too soon! Overnight chilling allows flavors to meld and textures to soften perfectly. If multitasking, prepare the frosting the night before, then assemble the next day to save time.
Another tip: use a serrated knife dipped in hot water for clean slices—wipe the blade between cuts for neat presentation. If the frosting starts to separate or look watery, give it a gentle whisk to bring it back before serving.
Variations & Adaptations
- Chocolate Lovers’ Twist: Add a layer of chocolate ganache or sprinkle mini chocolate chips between layers for extra decadence.
- Fruit-Infused Version: Swap out the optional berries for thinly sliced kiwi or mango for a tropical flair that contrasts beautifully with the creamy frosting.
- Vegan Adaptation: Use vegan cream cheese and coconut whip cream, along with gluten-free vegan wafer cookies to make this indulgence plant-based and allergy-friendly.
- Spiced Red Velvet: Add a pinch of cinnamon or nutmeg to the mascarpone frosting for a cozy, warm flavor—especially nice during the fall and winter months.
- Personal Favorite: I once tried layering crushed peppermint candies in the frosting for a festive holiday version—unexpected but absolutely delightful!
Serving & Storage Suggestions
This Creamy Red Velvet Icebox Cake is best served chilled but let it sit out for 10 minutes at room temp before slicing—this softens the frosting just enough for easy cutting. For presentation, a simple dusting of cocoa powder or a handful of fresh berries adds a lovely touch.
Pair it with a cup of rich coffee or a glass of cold milk to balance the sweetness. It’s also a showstopper alongside fresh whipped cream or vanilla bean ice cream.
Store leftovers covered tightly in the refrigerator for up to 3 days. Freeze in an airtight container for up to 2 weeks; thaw overnight in the fridge before serving. Keep in mind that freezing may slightly change the texture of the mascarpone frosting, but it still tastes fantastic.
Flavors actually develop and deepen after a day, so if you can wait, this is one dessert that tastes better the next day—perfect for prepping ahead for parties or special occasions.
Nutritional Information & Benefits
This dessert clocks in at approximately 320 calories per serving (based on 9 servings), with a decent amount of protein from the mascarpone cheese and moderate fat content from the cream and cheese. The red velvet wafers add sweetness and a touch of cocoa antioxidants.
Mascarpone cheese provides calcium and vitamin A, while the heavy cream offers some vitamin D. For those watching sugar intake, you can reduce powdered sugar slightly or opt for powdered erythritol as a substitute.
This recipe fits well into a balanced diet when enjoyed in moderation and can be adapted for gluten-free and dairy-free diets with simple ingredient swaps. I always appreciate that it brings a touch of indulgence without feeling overly heavy or complicated.
Conclusion
If you’re hunting for a dessert that’s creamy, colorful, and downright irresistible, this Creamy Red Velvet Icebox Cake with Mascarpone Frosting should be your go-to. It’s simple enough for a weeknight treat yet elegant enough for celebrations, and the flavors hit that perfect balance of sweet, tangy, and rich.
Feel free to customize it—try different garnishes, experiment with frosting flavors, or swap cookies to suit your taste. Personally, I love how this recipe brings a smile to everyone’s face, whether it’s a casual family dinner or a festive gathering.
Give it a try and let me know how your version turns out! Comments, shares, or your own creative twists are always welcome. Here’s to many delicious moments ahead with this dangerously easy yet stunning dessert!
Frequently Asked Questions
Can I make this icebox cake ahead of time?
Absolutely! In fact, it tastes even better after chilling overnight or up to 24 hours. Just cover tightly and refrigerate.
What can I use if I can’t find red velvet wafer cookies?
You can substitute with thin red velvet cake slices or chocolate wafer cookies, though the texture might be a bit different but still delicious.
Is mascarpone cheese necessary for the frosting?
Mascarpone gives this frosting its signature creamy texture, but you can substitute with cream cheese for a tangier flavor or use a vegan cream cheese for dairy-free options.
How do I slice the cake neatly?
Use a serrated knife dipped in hot water and wiped clean between cuts. Let the cake sit at room temperature for 10 minutes before slicing for easier cutting.
Can I freeze leftover icebox cake?
Yes, freeze in an airtight container for up to 2 weeks. Thaw in the fridge overnight before serving. Texture may change slightly but still tastes great.
Pin This Recipe!
Creamy Red Velvet Icebox Cake Recipe Easy Homemade Mascarpone Frosting

A luscious and velvety red velvet icebox cake layered with ultra-smooth mascarpone frosting, perfect for any occasion and easy to prepare.
- Prep Time: 25 minutes
- Cook Time: 0 minutes
- Total Time: 6 hours 25 minutes
- Yield: 9 servings
- Category: Dessert
- Cuisine: American
Ingredients
- Red velvet wafer cookies (about 12 ounces / 340 grams)
- Unsweetened cocoa powder (2 tablespoons / 15 grams)
- Mascarpone cheese (1 cup / 240 grams), softened
- Heavy cream (1 cup / 240 ml), cold
- Powdered sugar (3/4 cup / 90 grams), sifted
- Vanilla extract (1 teaspoon)
- Pinch of salt
- Optional garnishes: white chocolate shavings, fresh raspberries or strawberries, edible red glitter or sprinkles
Instructions
- Prepare the Frosting (10 minutes): In a large mixing bowl, combine the softened mascarpone cheese and powdered sugar. Beat on medium speed until smooth and creamy, about 2 minutes. Add the vanilla extract and a pinch of salt. Slowly pour in the cold heavy cream while continuing to whisk on high speed until soft peaks form (about 3-4 minutes). Be careful not to overwhip.
- Layer the Cake (15 minutes): Lightly grease a 9×9 inch (23×23 cm) dish. Start with a thin layer of mascarpone frosting to prevent sticking. Arrange a single layer of red velvet wafer cookies, fitting them snugly but not overlapping. Spread about 1/3 of the frosting evenly over the cookies. Repeat layering cookies and frosting two more times, finishing with a frosting layer on top.
- Chill Overnight (at least 6 hours): Cover the dish tightly with plastic wrap and refrigerate. Overnight chilling lets the wafers soften and absorb the creamy frosting, transforming the cake into a luscious, sliceable dessert.
- Garnish and Serve (5 minutes): Before serving, top with your choice of white chocolate shavings, fresh berries, or edible glitter. Use a sharp serrated knife dipped in hot water to slice neatly. Serve chilled.
- Troubleshooting Tips: If frosting is too runny, chill for 15 minutes before layering. Use wafer-thin cookies to avoid density. Let cake sit at room temperature for 10 minutes before slicing if too firm.
Notes
Do not overwhip mascarpone frosting to avoid grainy texture or butter formation. Chill mixing bowl and beaters beforehand for fluffier frosting. Use a serrated knife dipped in hot water for clean slices. Let cake sit at room temperature for 10 minutes before slicing for easier cutting. Overnight chilling is crucial for best texture and flavor. Can be frozen up to 2 weeks; thaw overnight in fridge before serving.
Nutrition
- Serving Size: 1 slice (1/9 of cake
- Calories: 320
- Sugar: 18
- Sodium: 150
- Fat: 22
- Saturated Fat: 14
- Carbohydrates: 25
- Fiber: 1
- Protein: 5
Keywords: red velvet, icebox cake, mascarpone frosting, easy dessert, no bake, layered cake, creamy dessert


