Let me tell you, the scent of buttery dough mingling with sweet jam wafting from my oven is enough to make anyone’s mouth water. The first time I baked these homemade thumbprint cookies with jam, I was instantly hooked—the kind of moment where you pause, take a deep breath, and just smile because you know you’re onto something truly special. It was a rainy Saturday afternoon years ago when I stumbled upon this cozy treat, trying to recreate a memory from my grandma’s kitchen when I was knee-high to a grasshopper.
Honestly, these cookies feel like pure, nostalgic comfort wrapped up in a simple bite. My family couldn’t stop sneaking them off the cooling rack (and I can’t really blame them!). You know, there’s something dangerously easy about this recipe that makes it perfect for brightening up your Pinterest cookie board or serving as a sweet treat for your kids after school. Whether it’s for a potluck or a quiet evening with a cup of tea, these homemade thumbprint cookies with jam have become a staple for family gatherings and gifting — tested multiple times in the name of research, of course. If you haven’t tried making these yet, you’re going to want to bookmark this one.
Why You’ll Love This Recipe
After countless batches and tweaks, I can say this homemade thumbprint cookies with jam recipe stands out for so many reasons. Here’s why it might just become your new favorite:
- Quick & Easy: Comes together in under 45 minutes, perfect for busy weeknights or last-minute cravings.
- Simple Ingredients: No fancy grocery trips needed; you likely already have everything in your kitchen pantry.
- Perfect for Cozy Moments: Ideal for holiday mornings, afternoon tea, or to warm up a chilly day.
- Crowd-Pleaser: Always gets rave reviews from kids and adults alike (trust me, they vanish fast!).
- Unbelievably Delicious: The combination of tender, buttery cookie with a burst of fruity jam is pure magic.
This recipe isn’t just another jam cookie. The secret? A perfectly balanced buttery dough that melts in your mouth paired with just the right amount of jam filling. Plus, I’ve tested different jams and found that slightly thicker preserves work best to keep that classic thumbprint look without running over the edges. Honestly, it’s comfort food that feels homemade but looks bakery-worthy. Whether you’re impressing guests without the fuss or just treating yourself, these cookies deliver every single time.
What Ingredients You Will Need
This recipe uses simple, wholesome ingredients to deliver bold flavor and satisfying texture without any fuss. Most are pantry staples, and substitutions are easy if needed.
- Unsalted Butter, softened (adds richness and tenderness; I prefer Land O Lakes for consistent results)
- Granulated Sugar (for sweetness and slight crispness)
- Large Egg Yolk, room temperature (helps bind dough and adds richness)
- Pure Vanilla Extract (for that warm, inviting flavor)
- All-Purpose Flour (the base of the cookie; use King Arthur for best texture)
- Salt, just a pinch (balances sweetness and enhances flavor)
- Jam or Fruit Preserves (about ½ cup total; try raspberry, strawberry, or apricot for a classic touch)
Optional:
- Almond Extract — add ¼ teaspoon for a subtle nutty twist
- Powdered Sugar — for dusting after baking if you want a delicate finish
If you’re gluten-free, swapping the all-purpose flour for a 1:1 gluten-free baking blend works nicely. For a dairy-free option, use vegan butter and substitute the egg yolk with a flax egg (1 tablespoon ground flaxseed mixed with 3 tablespoons water, chilled).
Equipment Needed
To make these homemade thumbprint cookies with jam, you’ll want a few key kitchen tools:
- Mixing Bowls: A medium bowl for dough mixing; glass or stainless steel works great.
- Hand Mixer or Stand Mixer: Makes creaming butter and sugar a breeze, but you can also mix by hand with a wooden spoon.
- Baking Sheet: A rimmed cookie sheet is ideal to keep cookies from sliding off.
- Parchment Paper or Silicone Baking Mat: Prevents sticking and helps even baking.
- Measuring Cups and Spoons: Accuracy is key, especially for flour and sugar.
- Spoon or Small Cookie Scoop: For portioning dough evenly.
- Teaspoon or Your Thumb: To create the indentations (yes, your thumb works perfectly!)
Optional but handy:
- Cooling Rack: Helps cookies cool evenly and prevents sogginess.
I’ve tried this recipe with various mixers, and honestly, a stand mixer cuts down your prep time, but a trusty hand mixer does just fine if that’s what you have. Just be sure your butter is softened to room temp to avoid extra effort. And if you’re on a budget, parchment paper is a great investment since it saves cleanup time and keeps your pans in better shape.
Preparation Method

- Preheat your oven to 350°F (175°C). Line a baking sheet with parchment paper or a silicone baking mat to prevent sticking. This step makes cleanup a breeze and helps cookies bake evenly.
- Cream the butter and sugar: In a medium bowl, beat 1 cup (227g) softened unsalted butter and ½ cup (100g) granulated sugar together until light and fluffy, about 3-4 minutes using a hand or stand mixer on medium speed. The mixture should look pale and creamy—this is key for tender cookies.
- Add the egg yolk and vanilla: Mix in 1 large egg yolk and 1 teaspoon pure vanilla extract until combined. If you’re feeling adventurous, add ¼ teaspoon almond extract here for a subtle nutty note.
- Combine dry ingredients: In a separate bowl, whisk together 2 cups (250g) all-purpose flour and ¼ teaspoon salt. Gradually add this to the butter mixture, mixing on low until just combined. Don’t overmix—stop when the dough looks uniform but still soft.
- Shape the dough: Scoop about 1 tablespoon (15g) of dough per cookie and roll into balls. Place them 2 inches apart on your baking sheet. This spacing helps cookies bake without merging.
- Create the thumbprint indentations: Use your thumb or the back of a teaspoon to gently press into the center of each dough ball, making a small well about ½ inch (1.25 cm) deep. This little crater will hold your jam and keep it from spilling over.
- Fill with jam: Spoon about ½ teaspoon of your favorite jam or preserves into each indentation. I like raspberry or apricot preserves because they hold their shape nicely.
- Bake: Place the tray in the oven and bake for 12-15 minutes, or until the edges are just turning golden. Keep an eye on them—overbaking dries them out.
- Cool: Let the cookies cool on the baking sheet for 5 minutes before transferring them to a wire rack to cool completely. This helps them firm up without breaking.
- Optional finishing touch: After cooling, dust with powdered sugar for a pretty, delicate finish. It makes them look extra festive!
Pro tip: If your dough feels too sticky after mixing, pop it in the fridge for 15 minutes before shaping. It’ll be much easier to handle. Also, if your jam is too runny, heat it slightly to thicken or use a thicker preserve to avoid spreading.
Cooking Tips & Techniques
Making these thumbprint cookies with jam is honestly straightforward, but a few tricks from my kitchen help keep them perfect every time. First, always use room temperature butter—you don’t want cold chunks messing up the dough’s texture. I’ve learned the hard way that too soft or melted butter can make the cookies spread too much.
When creating the thumbprint indentations, be gentle but firm. Pressing too hard can flatten the cookie; too soft and the jam won’t nestle in properly. I like to press once, then check if the dough springs back a bit—if it does, press a little more. Also, scooping dough with a cookie scoop ensures uniform size and baking consistency.
Baking time can vary slightly depending on your oven, so start checking at 12 minutes. The edges should be lightly golden but the centers soft—not browned. Overbaked cookies lose that tender, melt-in-your-mouth feel. Cooling on the pan first helps them set without breaking, which is especially important if you’re gifting or stacking for storage.
One last tip: don’t skip the vanilla! It’s subtle but adds a cozy depth that makes these cookies taste homemade rather than bland.
Variations & Adaptations
Want to mix things up? Here are some fun variations to try with this homemade thumbprint cookies with jam recipe:
- Nutty Delight: Add ½ cup finely chopped pecans or walnuts to the dough for extra crunch and flavor. Toast them lightly first for a richer taste.
- Chocolate Lover’s: Swap ¼ cup (30g) of flour for unsweetened cocoa powder to make chocolate thumbprint cookies. Fill with raspberry jam for a classic chocolate-raspberry combo.
- Gluten-Free Version: Use a 1:1 gluten-free baking flour blend instead of all-purpose flour. The texture stays tender and the jam filling remains the star.
- Seasonal Fruit Twist: During summer, try fresh berry preserves or even a dollop of lemon curd for a bright, tangy surprise.
- Vegan Adaptation: Replace butter with vegan margarine, and egg yolk with a flax egg (1 tbsp ground flaxseed mixed with 3 tbsp water). Use dairy-free jam to keep it fully plant-based.
Personally, I tried adding a pinch of cinnamon to the dough once, and it added a lovely warm spice that complemented the jam beautifully—definitely worth experimenting with!
Serving & Storage Suggestions
These homemade thumbprint cookies with jam are best served at room temperature, allowing the buttery dough and fruity jam to shine. They make a charming addition to tea parties, holiday cookie trays, or a simple afternoon snack. Pair them with a hot cup of coffee, herbal tea, or even a glass of cold milk for a cozy treat.
For storing, keep the cookies in an airtight container at room temperature for up to 4 days. If you want to keep them longer, they freeze beautifully—just place them in a single layer on a baking sheet to freeze, then transfer to a freezer-safe container or bag for up to 3 months. When ready to enjoy, let them thaw at room temperature for about 30 minutes.
Reheating isn’t usually necessary, but if you like them slightly warm, pop a couple in the oven at 300°F (150°C) for 5 minutes. The jam softens delightfully, and the cookie warms just right without drying out.
Fun fact: The flavors deepen the day after baking, so sometimes I make them a day ahead to let the jam and dough marry perfectly. It’s like a little secret bonus treat!
Nutritional Information & Benefits
Each homemade thumbprint cookie with jam (assuming a batch of 24) contains approximately:
| Calories | Fat | Carbohydrates | Protein |
|---|---|---|---|
| 90 kcal | 5g | 11g | 1g |
Key ingredients like butter provide satisfying fats that help keep you full, while the jam adds a touch of natural fruit sweetness. Using high-quality real fruit preserves means less processed sugars compared to commercial cookies. Plus, you control what goes in, so you can avoid artificial additives.
If you use gluten-free flour or vegan substitutes, this recipe fits nicely into many dietary needs. Just be mindful of potential allergens like nuts if you add variations. Overall, this treat offers a balanced, home-crafted cookie experience—perfect for indulging without guilt.
Conclusion
If you’re looking for a cozy, nostalgic cookie recipe that’s easy to make and always a hit, these homemade thumbprint cookies with jam are worth every minute. They bring together simple ingredients, classic flavors, and that irresistible homemade charm you’ll want to share—and keep all to yourself!
Feel free to customize with your favorite jams or mix-ins to make the recipe your own. Honestly, every batch I’ve made feels like a warm hug wrapped in sugar and fruit. So why not give this recipe a try and see for yourself?
Don’t forget to leave a comment sharing your favorite jam flavor or any fun twists you’ve tried. And if you loved this recipe, please share it with your friends to spread the cozy cookie joy!
Happy baking and even happier snacking!
FAQs
Can I use store-bought jam or should I make my own?
You can definitely use store-bought jam or preserves. Just choose thicker jams that won’t run too much during baking for the best results.
How do I prevent the jam from spilling over the cookies?
Press a well-defined indentation with your thumb or a spoon and use a small amount of jam (about ½ teaspoon). Thicker preserves also help keep the jam in place.
Can I make these cookies ahead of time?
Absolutely! You can prepare the dough and shape the cookies, then refrigerate them for up to 24 hours before baking. This can improve flavor and make baking day easier.
What’s the best way to store leftover cookies?
Store in an airtight container at room temperature for up to 4 days or freeze for up to 3 months. Thaw before serving for the best texture.
Can I substitute the butter with margarine or coconut oil?
Butter gives the best flavor and texture, but margarine can work in a pinch. Coconut oil changes the taste and texture, so use it only if you enjoy a subtle coconut flavor.
Pin This Recipe!

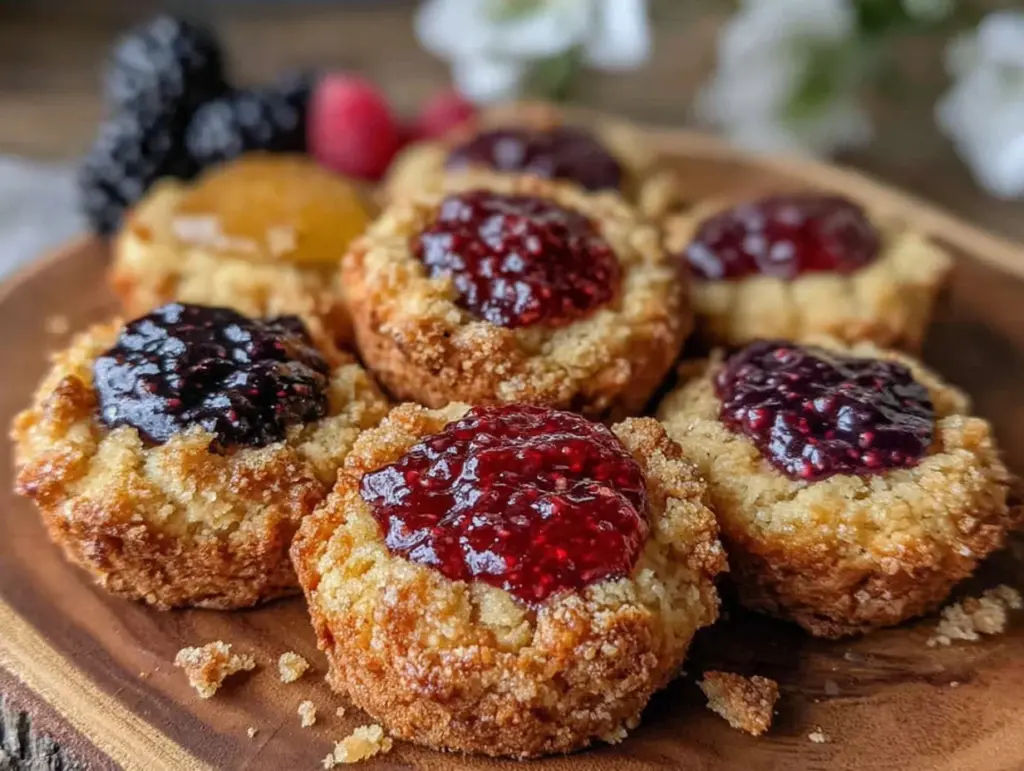
Homemade Thumbprint Cookies with Jam

These homemade thumbprint cookies with jam are buttery, tender, and filled with a burst of fruity jam, perfect for cozy moments and family gatherings.
- Prep Time: 15 minutes
- Cook Time: 15 minutes
- Total Time: 30 minutes
- Yield: 24 cookies 1x
- Category: Dessert
- Cuisine: American
Ingredients
- 1 cup (227g) unsalted butter, softened
- 1/2 cup (100g) granulated sugar
- 1 large egg yolk, room temperature
- 1 teaspoon pure vanilla extract
- 2 cups (250g) all-purpose flour
- 1/4 teaspoon salt
- About 1/2 cup jam or fruit preserves (raspberry, strawberry, or apricot recommended)
- Optional: 1/4 teaspoon almond extract
- Optional: powdered sugar for dusting
Instructions
- Preheat your oven to 350°F (175°C). Line a baking sheet with parchment paper or a silicone baking mat.
- In a medium bowl, beat 1 cup softened unsalted butter and 1/2 cup granulated sugar together until light and fluffy, about 3-4 minutes using a hand or stand mixer on medium speed.
- Mix in 1 large egg yolk and 1 teaspoon pure vanilla extract until combined. Optionally add 1/4 teaspoon almond extract.
- In a separate bowl, whisk together 2 cups all-purpose flour and 1/4 teaspoon salt. Gradually add this to the butter mixture, mixing on low until just combined. Do not overmix.
- Scoop about 1 tablespoon (15g) of dough per cookie and roll into balls. Place them 2 inches apart on the baking sheet.
- Use your thumb or the back of a teaspoon to gently press into the center of each dough ball, making a small well about 1/2 inch (1.25 cm) deep.
- Spoon about 1/2 teaspoon of jam or preserves into each indentation.
- Bake for 12-15 minutes, or until the edges are just turning golden. Watch carefully to avoid overbaking.
- Let the cookies cool on the baking sheet for 5 minutes before transferring to a wire rack to cool completely.
- Optionally dust with powdered sugar after cooling.
Notes
Use room temperature butter for best texture. If dough is too sticky, chill for 15 minutes before shaping. Use thicker jams or heat runny jam slightly to prevent spilling. Press thumbprint gently but firmly. Baking time may vary by oven; check at 12 minutes. Cookies cool on baking sheet first to set without breaking. Optional almond extract adds a subtle nutty flavor. Powdered sugar dusting adds a festive touch.
Nutrition
- Serving Size: 1 cookie
- Calories: 90
- Fat: 5
- Carbohydrates: 11
- Protein: 1
Keywords: thumbprint cookies, jam cookies, homemade cookies, buttery cookies, easy cookie recipe, family treats, holiday cookies


