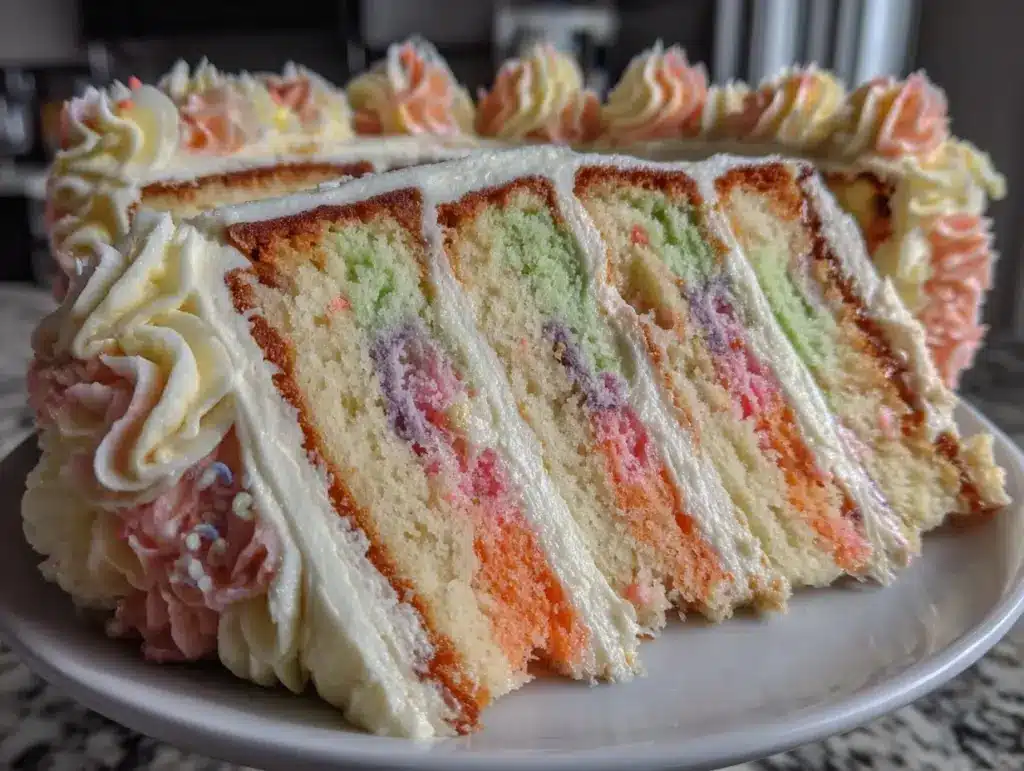
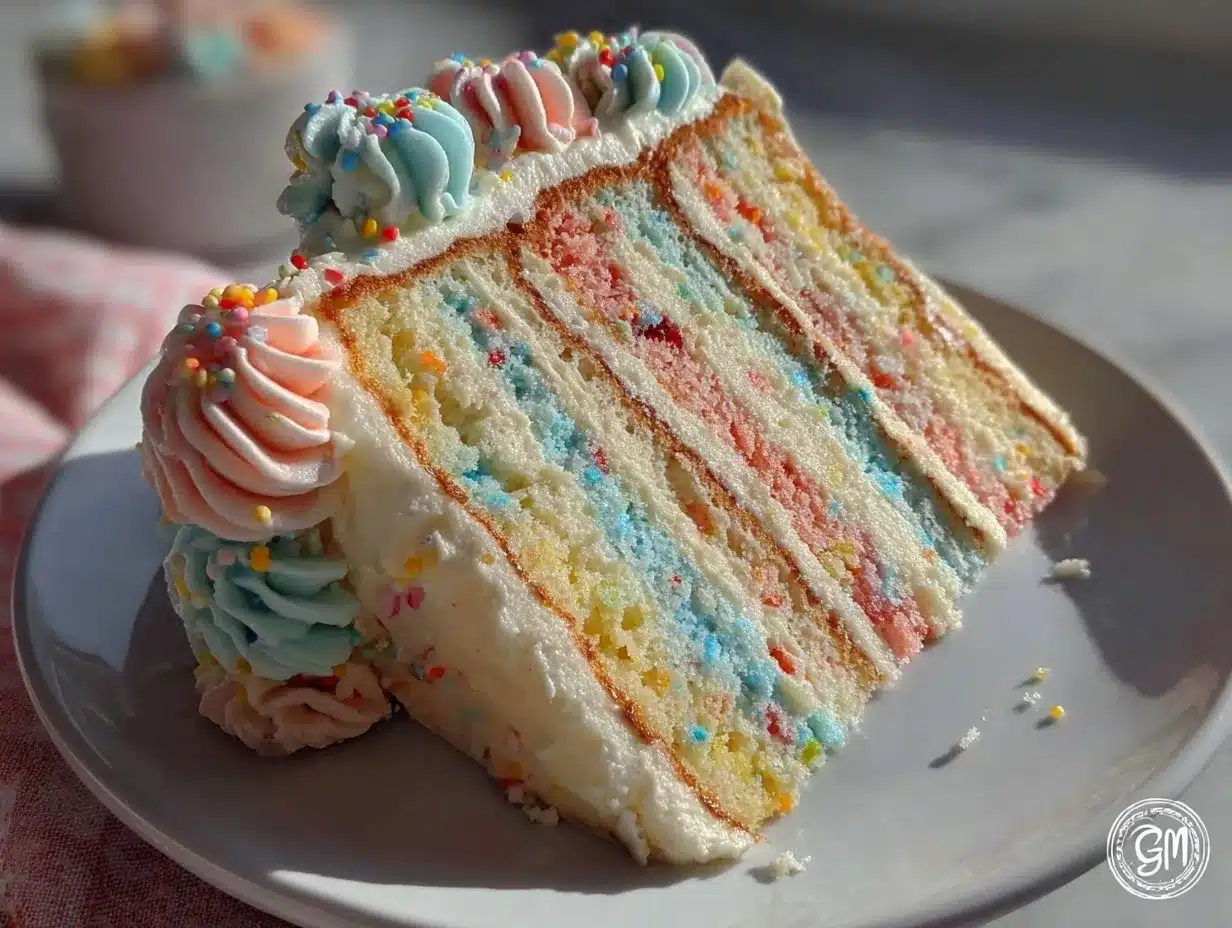
Picture this: the intoxicating aroma of vanilla cake wafting through your kitchen, the gentle hum of an oven, and that moment when you slice into a sky-high cake to reveal layers of soft pinks, blues, greens, and yellows. Honestly, when I made my first pastel rainbow layer cake, it felt like magic—like I’d finally cracked the code to those dreamy Pinterest cakes you see everywhere. The colors were so gentle, so inviting, and each layer was impossibly fluffy. I’ll never forget that moment when my kids’ eyes went wide, their mouths agape, and even my husband (who claims he isn’t a “cake person”) couldn’t resist a second slice. It’s the kind of recipe that makes you pause and just soak in the happiness, you know?
I wish I’d found this cake years ago, back when I was knee-high to a grasshopper and obsessed with baking during rainy weekends. My grandma used to say, “A good cake brings good company,” and she wasn’t wrong. Now, this pastel rainbow layer cake is a staple for every family birthday, baby shower, and yes—even random Tuesday celebrations. The recipe is dangerously easy (in the best possible way), but the results are pure, nostalgic comfort. It’s perfect for potlucks, photo-worthy dessert tables, or just brightening up your Pinterest board with a showstopper that looks as good as it tastes. Trust me, my family can’t stop sneaking slices off the cooling rack, and honestly, I can’t really blame them.
After testing this recipe more times than I care to admit (in the name of research, of course), I can say without a doubt: it’s foolproof. It feels like a warm hug wrapped in clouds of pastel frosting. So, bookmark this one, because once you make this pastel rainbow layer cake, it’ll become your go-to for every celebration—big or small.
Why You’ll Love This Recipe
Let’s face it—there’s a lot of layer cakes out there, but the perfect pastel rainbow layer cake truly stands out. I’ve made my fair share of cakes over the years, but this one always gets rave reviews, whether it’s at a family gathering or a school bake sale. Here’s why you’re going to love it:
- Quick & Easy: Comes together in about 90 minutes, making it perfect for busy schedules or last-minute party plans.
- Simple Ingredients: No need for fancy ingredients or specialty stores. You probably have everything on hand right now.
- Perfect for Special Celebrations: Whether it’s birthdays, baby showers, or graduation parties, this cake is guaranteed to steal the show.
- Crowd-Pleaser: Both kids and adults can’t resist its soft, tender crumb and sweet, pastel layers. One bite and everyone’s hooked.
- Unbelievably Delicious: The combination of light vanilla cake and creamy, not-too-sweet buttercream is pure comfort food.
What makes this recipe different? The secret is in the technique—each pastel layer is baked separately, ensuring they’re all equally fluffy and vibrant. I use gel food colors for the softest shades and a whipped vanilla buttercream that’s silky but sturdy enough to stack. Honestly, I’ve tried every method under the sun, and this is the one that delivers consistent results (without the stress).
More than just a cake, it’s a memory-maker. There’s something magical about watching someone’s face light up when they see those pastel layers. It’s comfort food with a playful twist, and it’s just so fun to assemble. Whether you’re impressing guests or making an ordinary day extraordinary, this pastel rainbow layer cake is your ticket to sweet success.
What Ingredients You Will Need
This pastel rainbow layer cake uses simple, wholesome ingredients to deliver bold flavor and a cloud-like texture—no tricky additives or rare finds needed. Most of these are pantry staples, and the food coloring can be easily adjusted to your favorite hues. Here’s what you’ll need:
- For the Cake Layers:
- 3 cups (360g) all-purpose flour (unbleached is best for a tender crumb)
- 2 cups (400g) granulated sugar (I like using organic cane sugar)
- 1 cup (225g) unsalted butter, softened (adds richness and flavor)
- 1 cup (240ml) whole milk, room temperature (can substitute with almond milk for dairy-free)
- 6 large eggs, room temperature (egg size matters—large is key for structure)
- 2 teaspoons vanilla extract (use pure vanilla for the best flavor)
- 2 teaspoons baking powder
- 1/2 teaspoon baking soda
- 1/2 teaspoon salt
- Pastel gel food coloring (pink, blue, yellow, green, lavender—Wilton and AmeriColor are my go-tos for vivid but soft shades)
- For the Whipped Vanilla Buttercream:
- 2 cups (450g) unsalted butter, softened (room temperature for easy whipping)
- 6 cups (720g) powdered sugar (sifted for smoothness)
- 1/4 cup (60ml) heavy cream (or whole milk for a lighter texture)
- 2 teaspoons vanilla extract
- Pinch of salt
- Optional: 1-2 teaspoons lemon juice (for a subtle, fresh zing)
- For Decorating:
- Pastel sprinkles or edible glitter (for extra flair—think birthday party vibes)
- Fresh berries (optional, for a pop of color and tartness)
Substitution notes: You can swap the flour for a gluten-free blend if needed (I’ve had good luck with Bob’s Red Mill 1-to-1). For a vegan version, use plant-based butter and milk, and replace eggs with flaxseed or applesauce (results are slightly denser, but still tasty). For food coloring, liquid works in a pinch, but gels are best for pastel tones without thinning the batter.
Pro tip: Always use room temperature ingredients for the fluffiest layers. If you want to mix up your colors, try peach, mint, or even a touch of soft gray for a modern twist. You can even add a spoonful of yogurt for extra moisture—just reduce the milk a bit.
Equipment Needed
You don’t need a professional bakery setup to make this pastel rainbow layer cake, but a few trusty tools make all the difference (trust me, I’ve baked with everything from hand-me-down pans to thrifted spatulas). Here’s what you’ll need:
- Five 8-inch (20cm) round cake pans (or bake in batches if you only have two—just keep the batter covered)
- Stand mixer or hand mixer (either works—just make sure your butter is soft!)
- Mixing bowls (at least two, but more makes coloring easier)
- Offset spatula (for frosting and smooth layering)
- Parchment paper (to line pans—prevents sticking and guarantees easy release)
- Cooling racks (for faster cooling and no soggy bottoms)
- Gel food coloring (again, Wilton or AmeriColor for consistent results)
- Bench scraper or cake turntable (optional, but makes frosting a breeze)
If you don’t have five cake pans, just bake the layers in batches—wrap the extra batter tightly with plastic wrap while the first batch bakes. For mixing, I’ve used both a stand mixer and a cheap hand mixer; both get the job done. Offset spatulas and bench scrapers can be found at most grocery stores (nothing fancy needed!). After each use, I rinse my pans with warm, soapy water and dry them thoroughly to keep them non-stick. If you’re on a budget, dollar store mixing bowls and spatulas work just fine. The only thing you truly need is a bit of patience and a love for colorful cakes!
Preparation Method
- Preheat and Prep: Preheat your oven to 350°F (175°C). Grease five 8-inch (20cm) round cake pans and line the bottoms with parchment paper. This step is a lifesaver for easy removal—don’t skip it!
- Mix the Dry Ingredients: In a large bowl, whisk together 3 cups (360g) flour, 2 teaspoons baking powder, 1/2 teaspoon baking soda, and 1/2 teaspoon salt. Set aside.
- Cream the Butter and Sugar: In a stand mixer (or large bowl with hand mixer), beat 1 cup (225g) butter until light and fluffy—about 2 minutes. Gradually add 2 cups (400g) sugar and continue beating until pale and creamy, another 2-3 minutes.
- Add Eggs and Vanilla: Beat in 6 large eggs, one at a time, scraping down the sides as needed. Add 2 teaspoons vanilla extract. The mixture should be thick and glossy.
- Combine Wet and Dry: Add the flour mixture to the butter mixture in three parts, alternating with 1 cup (240ml) milk. Begin and end with flour. Mix on low just until combined—don’t overmix, or the cake can get tough.
- Divide and Color: Evenly divide the batter into five bowls (about 1 1/2 cups per bowl). Add a tiny drop of pastel gel food coloring to each bowl, mixing just until you get soft, dreamy shades of pink, blue, yellow, green, and lavender. If the batter looks streaky, mix gently with a spatula. (Tip: Start with a toothpick’s worth of color—pastel cakes are meant to be subtle!)
- Bake the Layers: Pour each colored batter into its prepared pan, smoothing the tops. Bake for 18-22 minutes, or until a toothpick comes out clean and the edges pull away slightly. Rotate pans halfway for even baking. If you’re baking in batches, keep unused batter covered.
- Cool Completely: Let layers cool in pans for 10 minutes, then turn out onto wire racks to cool fully. Warm cakes will melt frosting, so patience here pays off.
- Make the Buttercream: In a clean bowl, whip 2 cups (450g) butter until light and creamy, about 3 minutes. Gradually add 6 cups (720g) powdered sugar, 1/4 cup (60ml) heavy cream, 2 teaspoons vanilla, and a pinch of salt. Beat until fluffy and smooth—if it’s too thick, add a splash more cream. For extra brightness, add 1-2 teaspoons lemon juice.
- Layer the Cake: Place the first pastel layer on your cake stand. Spread a thin layer of buttercream on top, then repeat with the remaining layers in rainbow order. Press gently to keep them level. (Tip: If layers dome too much, trim them with a serrated knife for stability.)
- Frost the Outside: Spread a thin crumb coat of buttercream over the whole cake. Chill for 15 minutes (this seals in crumbs). Apply a final generous layer of frosting, smoothing with a spatula or bench scraper for a polished look.
- Decorate: Finish with pastel sprinkles, edible glitter, or fresh berries as desired. Sometimes, I pipe little rosettes around the top—totally optional, but cute!
Preparation notes: If your cake layers crack, patch them with buttercream—no one will know! If the batter feels thick, add a tablespoon of milk. Always let cake cool fully before frosting. For clean slices, use a hot, dry knife. And if you run out of patience, remember: homemade cakes are meant to be perfectly imperfect!
Cooking Tips & Techniques
Here’s the thing about making a pastel rainbow layer cake—it looks complicated, but with a few tricks up your sleeve, it’s actually quite straightforward. Over the years, I’ve had my share of lopsided layers and runny buttercream, so let me share what I’ve learned:
- Even Layers: Weigh your batter for each pan if you want perfect layers (I do this for party cakes). Otherwise, eyeball it—imperfections are charming!
- Color Consistency: Use gel colors for pastels. Liquid food coloring can make your batter runny and the colors less vibrant. Start with a tiny amount and build up slowly.
- Fluffy Cake: Don’t overmix once you add the flour. Overmixing leads to tough layers. Mix just until incorporated, scraping down the bowl as needed.
- Buttercream Success: Sift powdered sugar for smooth frosting. If your buttercream is too thick, add an extra tablespoon of cream. Too runny? Pop it in the fridge for 10 minutes, then whip again.
- Stacking Layers: Chill your cake layers before stacking—they’re easier to handle and less likely to crumble. If your cakes dome, trim the tops with a serrated knife for stability.
- Multitasking: Bake two layers at a time if you only have a couple pans. While those bake, prep your next batch of colored batter. I always clean as I go to avoid a mountain of dishes.
- Personal Fails: I’ve had colors bleed because I added too much coloring—less is more for pastels! I also once tried to frost a warm cake (rookie mistake)—it melted everywhere. Always wait for complete cooling.
- Finishing Touches: Use an offset spatula for smooth frosting. For sharp edges, run a bench scraper around the sides while spinning the cake (cake turntable helps, but isn’t mandatory).
Stick to these tips, and you’ll have a pastel rainbow cake worthy of any celebration—Pinterest-perfect, but never fussy. Remember, it’s all about enjoying the process and sharing a cake that’s as joyful as it looks!
Variations & Adaptations
One of my favorite things about this pastel rainbow layer cake is how flexible it is. Whether you need to adjust for allergies, switch up the flavors, or tailor it to the season, here are some tried-and-true ways to make it your own:
- Dietary-Friendly: For gluten-free, swap all-purpose flour for a 1-to-1 gluten-free blend. For dairy-free, use plant-based milk and butter (Earth Balance works well). Eggs can be replaced with flaxseed “eggs” (1 tablespoon flaxseed meal + 3 tablespoons water per egg).
- Seasonal Twist: In summer, add lemon zest and fresh berries between layers. For fall, tint layers in warm tones (peach, soft orange, pale brown) and flavor with a touch of cinnamon.
- Flavor Boost: Mix in almond or coconut extract for a fun twist. I’ve made a strawberry version by adding freeze-dried strawberry powder to one layer—so good!
- Cooking Method: If you want cupcakes, use the same batter and bake in lined muffin tins for 18-20 minutes. For sheet cake, pour batters into a large rimmed pan, swirl colors, and bake as directed.
- Allergen Substitutions: Use oat milk for nut-free dairy alternatives. If sprinkles are a concern, choose naturally dyed or allergen-free brands.
- Personal Favorite: Once, I made a pastel rainbow cake with a citrus-infused buttercream and candied orange peel on top. It was a hit at Easter!
Don’t be afraid to play with colors and flavors—this cake is all about fun, and there’s no wrong way to make it yours. The pastel rainbow layer cake is a blank canvas for your creativity!
Serving & Storage Suggestions
This pastel rainbow layer cake is best served at room temperature, where the frosting is soft and the flavors shine. I like to slice generous wedges and serve them on pretty plates—perfect for parties or Instagram moments!
- Serving: For special occasions, garnish with pastel sprinkles, edible glitter, or berries. Pair with a cold glass of milk, bubbly lemonade, or even a light sparkling wine for grown-up celebrations.
- Storage: Store leftovers in an airtight container at room temperature for up to 2 days. For longer storage, refrigerate up to a week (let slices come to room temp before serving for best texture).
- Freezing: Individual cake layers (unfrosted) freeze beautifully for up to 3 months—just wrap tightly in plastic. Frosted cake can be frozen in slices, but wrap well to avoid freezer burn.
- Reheating: If chilled, let cake stand at room temperature for 45-60 minutes before serving. For extra freshness, microwave a slice for 5-10 seconds—just enough to soften the buttercream.
- Flavor Development: The flavors mellow and blend after a day or two, so if you can stand the wait, leftovers are even better!
Honestly, this cake rarely lasts more than two days in my house. The pastel colors stay vibrant, and the frosting keeps everything moist and delicious—no dry layers here!
Nutritional Information & Benefits
Here’s a quick look at the nutritional profile for one slice (1/16th of the cake):
- Calories: ~420
- Fat: ~22g
- Carbohydrates: ~54g
- Protein: ~5g
- Sugar: ~38g
Health Benefits: The pastel rainbow layer cake is made with real butter, eggs, and milk—wholesome ingredients that provide protein and essential fats. If you use gluten-free flour or dairy-free swaps, it’s easy to tailor for dietary needs. The absence of artificial flavors and the use of gel coloring mean you can control the ingredients.
Dietary Considerations: This recipe can be adapted for gluten-free, nut-free, and dairy-free diets. Just watch out for eggs and food coloring if you have allergies. For a lighter version, decrease the sugar or use a lower-fat milk.
From a wellness perspective, I always say: cakes like this are about celebration and joy. A slice is pure happiness—and that’s good for the soul!
Conclusion
So, why should you try this perfect pastel rainbow layer cake for your next celebration? It’s not just a cake—it’s a centerpiece, a conversation starter, and a memory-maker. The soft pastel layers bring instant cheer, while the fluffy frosting and simple ingredients make it approachable even for beginner bakers. You can customize the colors, swap in new flavors, and make it your own every time.
I keep coming back to this recipe because every slice feels like a celebration, whether it’s a birthday, a baby shower, or just a rainy afternoon. There’s nothing like the pride of sharing a cake that looks this stunning and tastes even better. If you make it, let me know in the comments—share your color combos, your party stories, or any clever twists you come up with!
Honestly, I hope this pastel rainbow layer cake brings as much joy to your kitchen as it has to mine. Happy baking, and may your celebrations always be sweet!
FAQs
Can I make the pastel rainbow layer cake ahead of time?
Absolutely! You can bake the cake layers up to three days ahead and store them wrapped in the fridge. Frost the cake the day of your event for the freshest flavor.
What if I only have two cake pans?
No problem—just bake the layers in batches. Keep the unused batter covered to prevent drying out while you bake the first round.
Can I use liquid food coloring instead of gel?
You can, but gel gives you softer pastel colors without thinning the batter. If you use liquid, add it sparingly and adjust the flour if needed.
How do I prevent cake layers from sticking?
Line the pans with parchment paper and grease them well. This guarantees easy release and picture-perfect layers every time!
Can I freeze leftover cake?
Yes! Wrap individual slices tightly in plastic wrap and freeze for up to a month. Thaw at room temperature before serving for best texture.
Pin This Recipe!
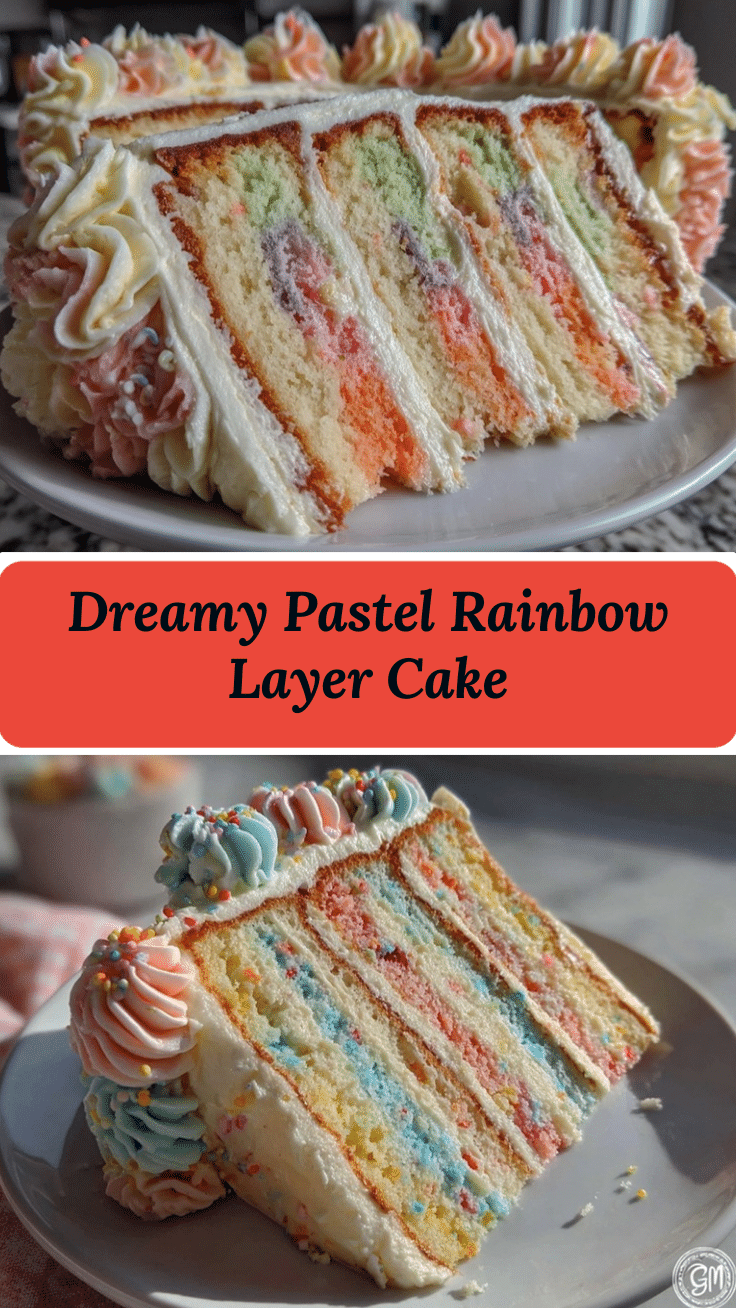
Perfect Pastel Rainbow Layer Cake

This pastel rainbow layer cake features five fluffy vanilla cake layers in soft, dreamy colors, stacked with silky whipped vanilla buttercream. It’s a showstopping centerpiece for birthdays, showers, or any celebration, and is surprisingly easy to make with simple pantry ingredients.
- Prep Time: 35 minutes
- Cook Time: 22 minutes
- Total Time: 90 minutes
- Yield: 16 servings 1x
- Category: Dessert
- Cuisine: American
Ingredients
- 3 cups all-purpose flour (unbleached preferred)
- 2 cups granulated sugar
- 1 cup unsalted butter, softened
- 1 cup whole milk, room temperature (or almond milk for dairy-free)
- 6 large eggs, room temperature
- 2 teaspoons vanilla extract
- 2 teaspoons baking powder
- 1/2 teaspoon baking soda
- 1/2 teaspoon salt
- Pastel gel food coloring (pink, blue, yellow, green, lavender)
- 2 cups unsalted butter, softened (for buttercream)
- 6 cups powdered sugar, sifted (for buttercream)
- 1/4 cup heavy cream (or whole milk for lighter texture, for buttercream)
- 2 teaspoons vanilla extract (for buttercream)
- Pinch of salt (for buttercream)
- Optional: 1-2 teaspoons lemon juice (for buttercream)
- Pastel sprinkles or edible glitter (for decorating)
- Fresh berries (optional, for decorating)
Instructions
- Preheat oven to 350°F (175°C). Grease five 8-inch round cake pans and line bottoms with parchment paper.
- In a large bowl, whisk together flour, baking powder, baking soda, and salt. Set aside.
- In a stand mixer or large bowl, beat butter until light and fluffy (about 2 minutes). Gradually add sugar and beat until pale and creamy (2-3 minutes).
- Beat in eggs one at a time, scraping down sides as needed. Add vanilla extract.
- Add flour mixture to butter mixture in three parts, alternating with milk. Begin and end with flour. Mix on low just until combined.
- Divide batter evenly into five bowls. Add a small amount of pastel gel food coloring to each bowl, mixing gently until you achieve soft pastel shades.
- Pour each colored batter into prepared pans, smoothing tops. Bake for 18-22 minutes, or until a toothpick comes out clean and edges pull away slightly. Rotate pans halfway for even baking.
- Let layers cool in pans for 10 minutes, then turn out onto wire racks to cool completely.
- For buttercream: In a clean bowl, whip butter until light and creamy (about 3 minutes). Gradually add powdered sugar, heavy cream, vanilla, and salt. Beat until fluffy and smooth. Add lemon juice if desired.
- Place first pastel layer on cake stand. Spread a thin layer of buttercream on top, then repeat with remaining layers in rainbow order. Press gently to keep layers level.
- Spread a thin crumb coat of buttercream over the whole cake. Chill for 15 minutes. Apply a final generous layer of frosting, smoothing with spatula or bench scraper.
- Decorate with pastel sprinkles, edible glitter, or fresh berries as desired.
Notes
For gluten-free, use a 1-to-1 gluten-free flour blend. For dairy-free, substitute plant-based milk and butter. Chill cake layers before stacking for easier assembly. Use gel food coloring for best pastel results. Sift powdered sugar for smooth buttercream. Store leftovers in an airtight container at room temperature for up to 2 days, or refrigerate for up to a week.
Nutrition
- Serving Size: 1 slice (1/16th of c
- Calories: 420
- Sugar: 38
- Sodium: 210
- Fat: 22
- Saturated Fat: 13
- Carbohydrates: 54
- Fiber: 1
- Protein: 5
Keywords: rainbow cake, pastel layer cake, birthday cake, party dessert, vanilla cake, buttercream, celebration cake, easy cake recipe, colorful cake, kid-friendly


