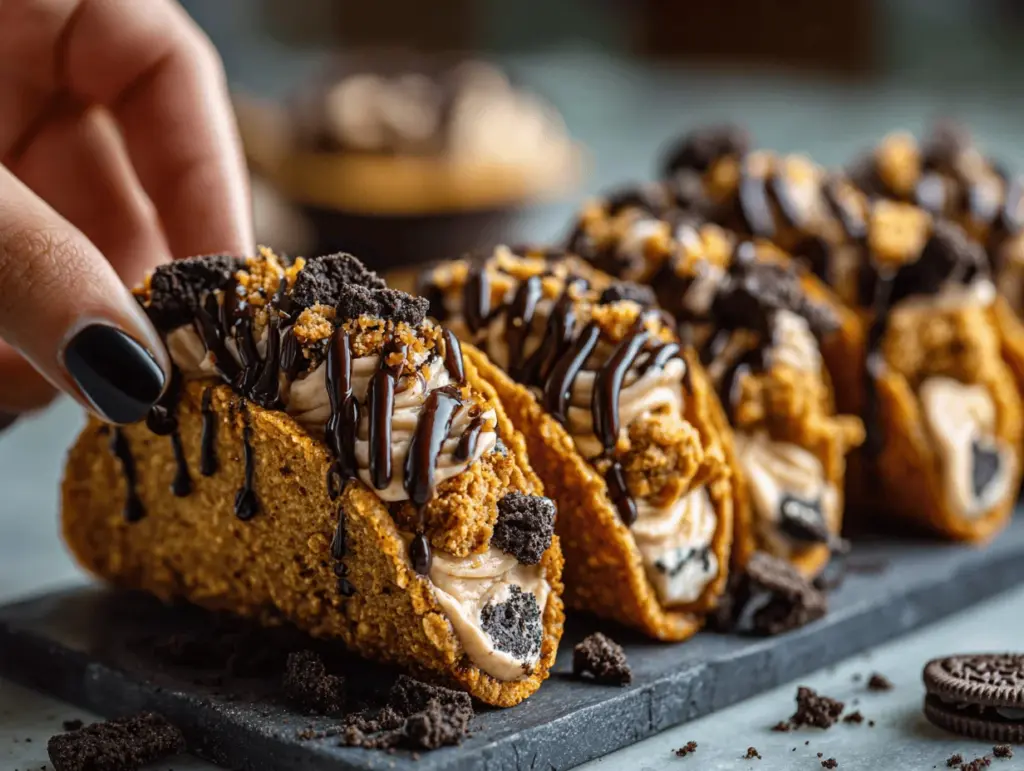
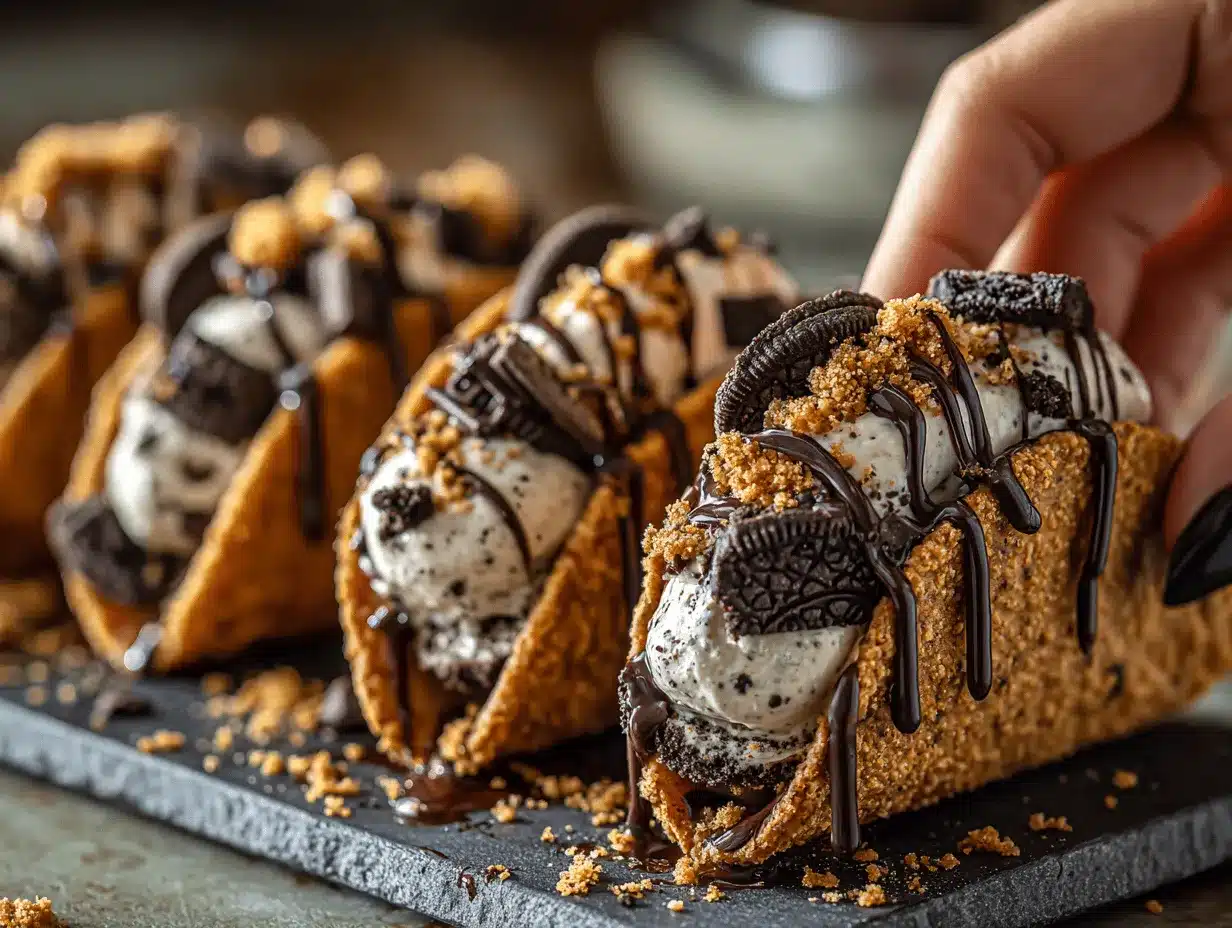
Imagine biting into a crispy taco shell, only to find it stuffed with velvety cheesecake filling, bits of edible cookie dough, and a shower of crushed Oreos. That’s exactly what you get with these Oreo Cookie Dough Cheesecake Tacos—my latest dessert obsession! The first time I made these, I was honestly just trying to use up a pack of Oreos and leftover cream cheese, but what came out of my kitchen was pure magic. These dessert tacos are outrageously fun, totally decadent, and kind of irresistible (seriously, don’t blame me if you eat more than one). If you’re looking for the ultimate sweet taco dessert, this is it. Whether you’re hosting a party, celebrating a birthday, or just want something over-the-top, this recipe is guaranteed to wow everyone—especially Oreo lovers and cookie dough fanatics like me. Plus, they’re easier than they look, and totally customizable for all your favorite toppings.
I’ve made these Oreo Cookie Dough Cheesecake Tacos for game nights, girls’ nights, and even a few “just because” Fridays. Each time, they vanish in minutes. As someone who’s tested dozens of cheesecake recipes (and more edible doughs than I can count), I can promise you—this combo is next-level. You get the creamy tang of cheesecake, the fudgy bite of cookie dough, and that classic Oreo crunch all in one bite. If you’re on the fence about making a full cheesecake or a pan of bars, trust me: these tacos are way more fun, and there’s no need to fuss with water baths or hour-long bakes. Perfect for busy bakers, sweet-toothed kids, and anyone who thinks dessert should be a little bit extra.
Why You’ll Love This Recipe
Let’s face it—sometimes, you just want dessert to be fun. These Oreo Cookie Dough Cheesecake Tacos bring together everything I love about playful baking: bold flavors, easy assembly, and serious wow-factor. Here’s why this recipe is always a hit in my kitchen:
- Quick & Easy: You can whip these up in under 45 minutes (no oven stress!). Perfect for last-minute celebrations or midnight cravings.
- Simple Ingredients: No weird specialty items—just Oreos, cream cheese, basic baking staples, and a few fun add-ins. You probably have most of it at home.
- Perfect for Parties: These sweet tacos make a killer centerpiece for birthdays, showers, or any get-together where you want people talking (and Instagramming).
- Crowd-Pleaser: My nieces and nephews lose their minds over these, but honestly, so do my adult friends. You’ll watch people’s eyes light up with the first bite.
- Unbelievably Delicious: The combo of creamy cheesecake, fudgy cookie dough, and Oreo crunch is just… wow. It’s rich but not heavy, sweet but not cloying.
This isn’t just another cheesecake recipe in a different shape. Blending the cookie dough right into the creamy filling adds texture and layers of flavor—every bite is a surprise. Rolling the shells in Oreo crumbs after frying? That’s my secret for extra crunch and flavor. And if you’ve ever tried (and failed) to make edible cookie dough, don’t worry—I’ve tested this version a dozen ways to get it just right. These Oreo Cookie Dough Cheesecake Tacos are the kind of dessert you’ll crave again and again, and they’re perfect for impressing without any fancy chef skills. Trust me: one bite and you’ll be hooked.
What Ingredients You Will Need
These tacos might look fancy, but they rely on familiar, easy-to-find ingredients. Each one plays a role in creating that indulgent, layered bite. Here’s what you’ll need for the ultimate Oreo Cookie Dough Cheesecake Tacos:
- For the Taco Shells:
- Flour tortillas (6-inch, soft taco size—these crisp up perfectly; use gluten-free if needed)
- Vegetable oil (for frying, or use coconut oil for a hint of sweetness)
- Granulated sugar (for dusting the shells)
- Crushed Oreo cookies (gives the shells that signature cookies-and-cream vibe)
- For the Cheesecake Filling:
- Cream cheese, softened (I prefer Philadelphia for the smoothest texture)
- Powdered sugar (for sweetness and smoothness)
- Heavy cream (adds lightness—don’t skip this or the filling can get too dense)
- Vanilla extract (for classic cheesecake flavor)
- For the Cookie Dough:
- Unsalted butter, softened
- Brown sugar (gives that classic cookie dough taste)
- Granulated sugar
- Vanilla extract
- Milk (just a splash to bring it together—use dairy-free for a vegan option)
- All-purpose flour, heat-treated (see tip below; this is for food safety!)
- Mini chocolate chips (I like Ghirardelli for meltiness)
- Pinch of salt (totally worth it—brings out the flavors)
- For Assembly & Topping:
- Extra crushed Oreos (for rolling and sprinkling over the top—this is not the time to skimp)
- Whipped cream (homemade or store-bought, for extra flair)
- Mini chocolate chips or rainbow sprinkles (totally optional but cute)
Ingredient Tips: For the best taco shells, look for tortillas that are soft and pliable (stale ones crack). Heat-treat your flour by microwaving it for a minute or baking at 350°F/175°C for 5 minutes to kill bacteria—this makes the cookie dough totally safe to eat raw. If you want to mix things up, swap in golden Oreos or use chocolate tortillas for a double-chocolate twist. I’ve tried lots of brands, but honestly, nothing beats classic Nabisco Oreos for that nostalgic taste.
Equipment Needed
You don’t need a ton of fancy tools to make these Oreo Cookie Dough Cheesecake Tacos. Here’s what helps the process run smoothly (plus a few budget swaps I’ve used in a pinch):
- Large skillet or deep frying pan (for crisping the tortilla shells)
- Tongs (to flip the shells safely—metal ones are best for frying)
- Paper towels (for draining excess oil)
- Hand mixer or stand mixer (for whipping up the cheesecake filling—hand mixing works if you don’t mind a workout!)
- Medium mixing bowls (one for each component—filling, cookie dough, toppings)
- Measuring cups and spoons (accuracy matters for the cookie dough)
- Fork or potato masher (to crush Oreos—kids love this job!)
- Piping bag or large zip-top bag (for neat filling, but you can always use a spoon)
- Baking sheet or plate (for assembling and serving the tacos)
If you don’t have a piping bag, snip a corner off a zip-top bag—it works just fine. For frying, any heavy-bottomed pan will do, but cast iron gives the most even heat. I always keep my tongs and paper towels close by to avoid oil splatters. Don’t forget to wipe down your mixer afterward—cream cheese can get everywhere (ask me how I know!).
How to Make Oreo Cookie Dough Cheesecake Tacos
-
Prep the Taco Shells (15 minutes)
Use a 6-inch round cookie cutter or glass to cut tortillas into circles. You’ll get about 2-3 from each tortilla. Heat 2 inches of oil in a skillet over medium-high (350°F/175°C). Using tongs, carefully fry each tortilla circle for 30-45 seconds per side, folding it gently in half with the tongs to form a taco shape. Fry until golden and crisp but not dark. Remove and drain on paper towels.
While still warm, sprinkle each shell with granulated sugar and roll in crushed Oreo crumbs. This sticks best while the shells are hot! If you’re nervous about frying, shallow-frying works too (just flip halfway).
-
Make the Cheesecake Filling (10 minutes)
In a medium bowl, beat 8 oz (225g) softened cream cheese until smooth. Add 1 cup (120g) powdered sugar and beat again until fluffy. Pour in 1/2 cup (120ml) heavy cream and 1 teaspoon vanilla. Whip until the mixture holds soft peaks—about 2-3 minutes with a mixer. Taste and adjust sugar if needed. Don’t overmix; you want it light and creamy, not runny.
-
Prepare the Edible Cookie Dough (10 minutes)
In a separate bowl, cream together 1/4 cup (56g) unsalted butter, 1/4 cup (50g) brown sugar, and 2 tablespoons (25g) granulated sugar until smooth. Stir in 1 tablespoon (15ml) milk and 1 teaspoon vanilla. Mix in 1/2 cup (60g) heat-treated all-purpose flour and a pinch of salt. Fold in 1/3 cup (60g) mini chocolate chips. The dough should be soft but not sticky—add an extra spoonful of flour if needed. Pinch off small pieces and chill if too soft (makes assembly easier).
Pro tip: Don’t skip heat-treating the flour for safety!
-
Assemble the Tacos (5-10 minutes)
Transfer cheesecake filling to a piping bag or zip-top bag (snip off the end). Pipe or spoon filling into each cooled taco shell, filling about 2/3 full. Gently press several cookie dough pieces into the cheesecake layer. Top with extra crushed Oreos, mini chocolate chips, or whipped cream if desired.
Don’t overfill or the shells might crack—learned that the hard way!
-
Serve and Enjoy!
Arrange tacos on a platter and serve immediately for the best crunch. If you need to make ahead, fill just before serving (see storage tips below).
Troubleshooting: If your shells aren’t crisping, the oil may not be hot enough. If your filling is runny, chill it for 10 minutes or add a spoonful more powdered sugar. If cookie dough seems too sticky, a little extra flour works wonders.
Cooking Tips & Techniques
- Frying the Shells: Keep the oil at a steady 350°F/175°C. Too hot and the tortillas burn, too cool and they get greasy. I always test with a scrap first—if it sizzles right away, you’re good.
- Don’t Overfill: I know it’s tempting to load up on filling, but too much and the shell will break or get soggy fast. A little restraint (and a steady hand) goes a long way.
- Chill for Best Texture: If you prep the filling ahead, chill for at least 30 minutes—this helps the flavors meld and makes piping easier. The cookie dough can be made a day ahead, too.
- Cookie Dough Safety: Always heat-treat flour and use pasteurized eggs (or skip eggs entirely like I do in this recipe) to keep things safe for everyone.
- Assembly Line: Set up your shells, filling, and toppings in an assembly line—it speeds things up, especially if little hands want to help.
- Batch Cooking: Fry all your shells at once, then fill just before serving so they stay crunchy.
- Personal Fail: I once tried baking the shells instead of frying—let’s just say they tasted like cardboard. Frying is worth the little mess, trust me!
Consistency is everything with these tacos. Use room temperature cream cheese for a smooth filling, and don’t skimp on the Oreo crumb coating—it makes every bite pop. If you’re multitasking, make the cookie dough and filling ahead, so all you have to do is fry and fill. And if something goes sideways? A little extra whipped cream covers a multitude of sins.
Variations & Adaptations
- Gluten-Free Option: Use gluten-free tortillas and certified gluten-free flour in the cookie dough. I’ve tried with Siete brand tortillas—they crisp up beautifully.
- Double Chocolate Dream: Swap in chocolate tortillas (yes, they exist at some specialty stores!) and add cocoa powder to the cookie dough for extra chocolate intensity.
- Fruity Twist: Add a layer of sliced strawberries or raspberries to the cheesecake filling before adding the cookie dough. The tartness is a nice contrast to the sweet richness.
- Vegan Adaptation: Use dairy-free cream cheese, plant-based milk, and vegan butter. Oreos are already vegan, so you’re mostly there!
- Peanut Butter Lovers: Stir in mini peanut butter cups or swirl a little peanut butter into the cheesecake layer—so good, especially with the Oreos.
I once made a birthday batch with rainbow sprinkles instead of extra Oreos on top—the kids went wild for the color. You can even experiment with different cookie bases (try Biscoff or graham crackers for the coating) if you’re out of Oreos. For a lighter version, use low-fat cream cheese and skip the extra cookie dough (but, honestly, where’s the fun in that?).
Serving & Storage Suggestions
These sweet tacos are best served fresh and crisp, but you’ve got options if you need to prep ahead. Here’s how to make them shine:
- Serving Temperature: Serve chilled or at room temp—just not hot, or the filling will melt (been there!).
- Presentation: Arrange tacos upright on a platter or in a taco holder. Sprinkle extra Oreo crumbs and pipe whipped cream on top for a bakery-worthy look.
- Pairings: Serve with cold milk, iced coffee, or a scoop of vanilla ice cream for the full “dessert taco party” experience.
- Storage: Unfilled shells keep for 2 days in an airtight container at room temperature. Once filled, store in the refrigerator for up to 24 hours—any longer and they start to soften.
- Freezing: You can freeze the cheesecake filling and cookie dough separately for up to a month. Thaw overnight in the fridge, then assemble fresh.
- Reheating: If shells lose their crunch, pop them in a 350°F (175°C) oven for 3-4 minutes. Don’t reheat filled tacos—the filling will melt.
Honestly, the flavors get even better after an hour in the fridge—if you can wait that long! These tacos are a killer make-ahead dessert for parties (just fill at the last minute for best crunch).
Nutritional Information & Benefits
Each Oreo Cookie Dough Cheesecake Taco (as written) contains approximately:
- Calories: 320
- Fat: 18g
- Carbohydrates: 36g
- Protein: 4g
- Sugar: 23g
Key ingredients like cream cheese offer a bit of protein and calcium, while Oreos and cookie dough…well, they feed the soul! If you need to trim the sugar, use reduced-sugar Oreos and swap in a sugar alternative for the filling. These are vegetarian, and easily adapted for gluten-free and vegan diets (see above). Allergens include wheat, dairy, and soy (in Oreos). I’m a big believer in balance—sometimes you just need a joyful, over-the-top dessert, and these tacos fit the bill perfectly.
Conclusion
If you’re searching for a show-stopping dessert that’s as fun to eat as it is to make, these Oreo Cookie Dough Cheesecake Tacos are it. They’re the kind of treat that turns a regular night into a celebration and a party into a memory. I love this recipe because it brings people together—everyone wants to try their own version, and there’s always laughter when someone takes their first bite.
Don’t be afraid to put your own spin on these—switch up the toppings, play with the fillings, or let the kids get creative. That’s the joy of dessert tacos! If you make this recipe, I’d love to see your creations—share your photos, leave a comment, or tell me your favorite twist. Give these a try, and you’ll see why they’ve become a staple in my kitchen. Happy baking, and enjoy every decadent, Oreo-filled bite!
Frequently Asked Questions
Can I make Oreo Cookie Dough Cheesecake Tacos ahead of time?
You can prepare the shells, cheesecake filling, and cookie dough up to a day ahead. Store the shells at room temperature and the fillings in the fridge. Assemble just before serving for the best crunch.
How do I make the edible cookie dough safe to eat?
Heat-treat the flour by microwaving it for one minute or baking at 350°F (175°C) for five minutes. This kills any harmful bacteria, making it safe to eat raw.
Can I bake the taco shells instead of frying?
You can, but frying gives the best crunch and flavor. If baking, brush tortillas with oil, drape over a baking rack, and bake at 400°F (200°C) for 8-10 minutes until crisp.
Are these tacos gluten-free or can they be adapted?
Yes! Use gluten-free tortillas and certified gluten-free flour in the cookie dough. Oreos now come in a gluten-free version, too.
What’s the best way to store leftovers?
Keep filled tacos in the fridge for up to 24 hours. The shells will soften over time, but they’ll still taste great. For the crispiest texture, store components separately and assemble right before serving.
Oreo Cookie Dough Cheesecake Tacos

These Oreo Cookie Dough Cheesecake Tacos feature crispy fried tortilla shells coated in Oreo crumbs, filled with creamy cheesecake and edible cookie dough, and topped with extra Oreos and whipped cream. They’re a fun, decadent dessert perfect for parties or any sweet occasion.
- Prep Time: 25 minutes
- Cook Time: 15 minutes
- Total Time: 40 minutes
- Yield: 8-10 tacos 1x
- Category: Dessert
- Cuisine: American
Ingredients
- 6-inch flour tortillas (soft taco size, about 8–10 tortillas)
- Vegetable oil (for frying, about 2 cups)
- 1/4 cup granulated sugar (for dusting shells)
- 1 cup crushed Oreo cookies (for coating shells and topping)
- 8 oz cream cheese, softened
- 1 cup powdered sugar
- 1/2 cup heavy cream
- 1 teaspoon vanilla extract (divided)
- 1/4 cup unsalted butter, softened
- 1/4 cup brown sugar
- 2 tablespoons granulated sugar
- 1 tablespoon milk
- 1/2 cup all-purpose flour, heat-treated
- 1/3 cup mini chocolate chips
- Pinch of salt
- Extra crushed Oreos (for topping)
- Whipped cream (for topping)
- Mini chocolate chips or rainbow sprinkles (optional, for topping)
Instructions
- Cut tortillas into 6-inch circles using a cookie cutter or glass. Heat 2 inches of oil in a skillet to 350°F (175°C).
- Fry each tortilla circle for 30-45 seconds per side, folding gently with tongs to form a taco shape. Fry until golden and crisp. Drain on paper towels.
- While warm, sprinkle each shell with granulated sugar and roll in crushed Oreo crumbs.
- In a medium bowl, beat softened cream cheese until smooth. Add powdered sugar and beat until fluffy. Add heavy cream and 1/2 teaspoon vanilla extract. Whip until soft peaks form.
- In a separate bowl, cream together butter, brown sugar, and 2 tablespoons granulated sugar until smooth. Stir in milk and 1/2 teaspoon vanilla extract. Mix in heat-treated flour and a pinch of salt. Fold in mini chocolate chips. Chill if too soft.
- Transfer cheesecake filling to a piping bag or zip-top bag. Pipe or spoon filling into each cooled taco shell, filling about 2/3 full.
- Press small pieces of cookie dough into the cheesecake layer. Top with extra crushed Oreos, mini chocolate chips, and whipped cream as desired.
- Serve immediately for best crunch. If making ahead, fill just before serving.
Notes
For best results, use room temperature cream cheese and heat-treat flour for cookie dough safety. Fry shells just before serving for maximum crunch. Gluten-free and vegan adaptations are possible with ingredient swaps. Do not overfill shells to prevent cracking.
Nutrition
- Serving Size: 1 taco
- Calories: 320
- Sugar: 23
- Sodium: 210
- Fat: 18
- Saturated Fat: 9
- Carbohydrates: 36
- Fiber: 1
- Protein: 4
Keywords: Oreo, cheesecake, cookie dough, dessert tacos, party dessert, easy dessert, fried dessert, sweet tacos, edible cookie dough, cream cheese, Oreo tacos


