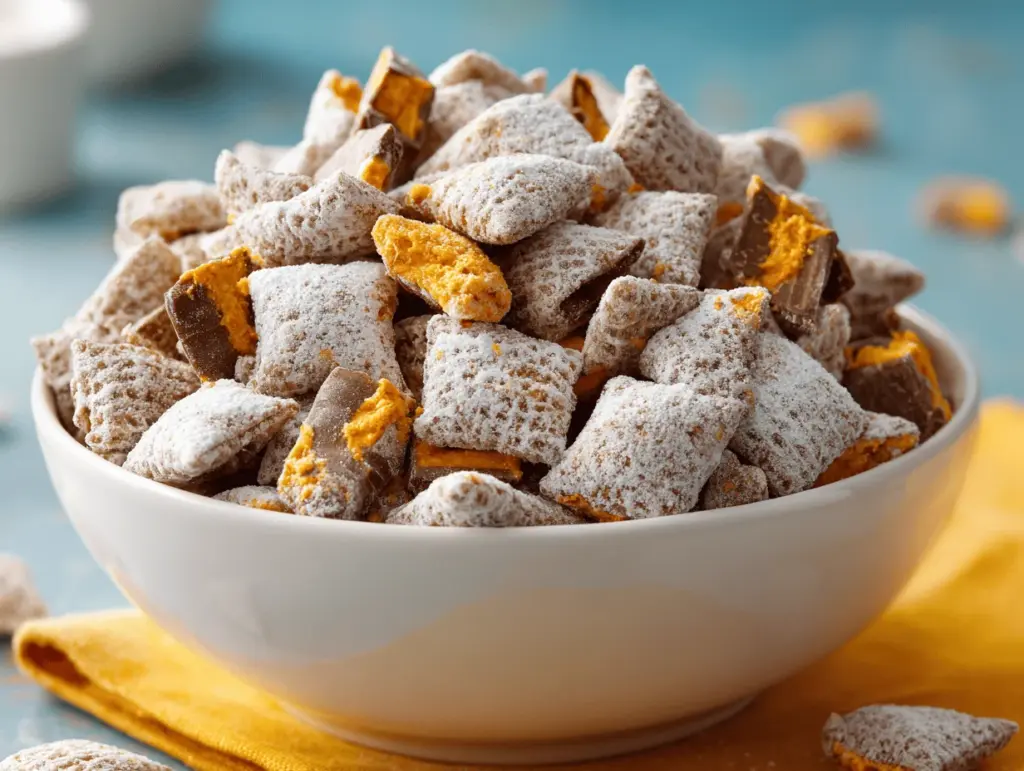
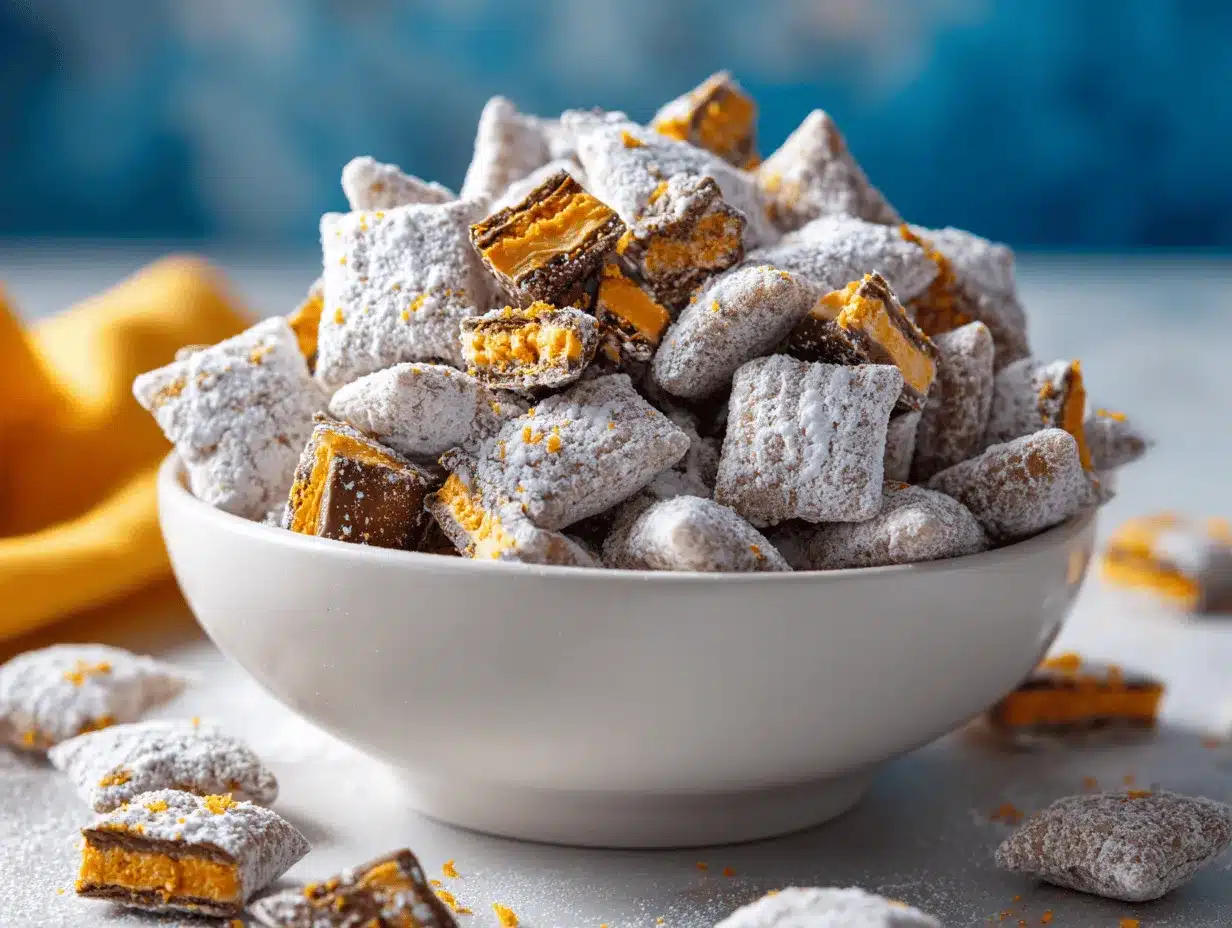
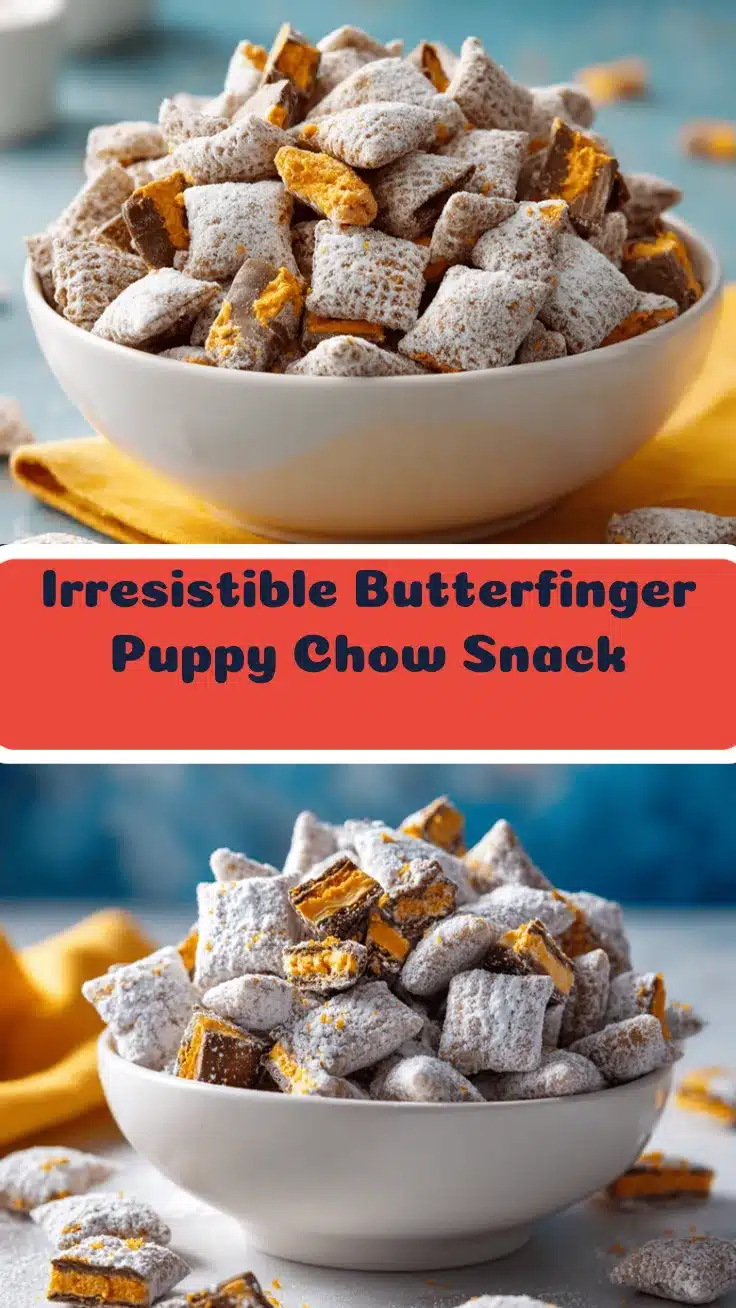
The crunch. The chocolate. That unmistakable Butterfinger flair. Picture grabbing a handful of sweet, chocolatey Butterfinger Puppy Chow—coated in powdered sugar, crispy, and packed with peanut buttery bites. The first time I tossed together this snack, I was honestly just trying to use up leftover candy bars from Halloween. But after one bite, I knew this would be my go-to whenever I needed a fun, shareable snack!
Let’s face it, I’ve made a lot of puppy chow over the years (from classic to birthday cake), but this Butterfinger Puppy Chow recipe is something special. It has that iconic crunch you expect, but each bite bursts with Butterfinger flavor—crispy, peanut-buttery, and just a little bit nostalgic. Whether you’re prepping for movie night, a birthday party, or just need a pick-me-up for after school, this snack delivers every time. My kids (and their friends!) have begged for this more times than I can count, and it’s honestly just as much fun for grown-ups.
What I love most is how quick it is—you’re looking at maybe 15 minutes, tops. I’ve tested this Butterfinger Puppy Chow recipe more times than I care to admit (all in the name of quality control, right?). Trust me, you’re getting my absolute best version here—crunchy, chocolatey, and with the perfect balance of sweet and salty. You’ll wind up with a bowlful of pure fun, and if you’re anything like me, you’ll find yourself sneaking little handfuls throughout the day. Let’s jump into why you need this recipe in your life!
Why You’ll Love This Butterfinger Puppy Chow Recipe
- Quick & Easy: In under 15 minutes, you’ll have a whole batch ready—perfect for last-minute cravings or unexpected guests.
- Simple Ingredients: Nothing fancy here. You probably already have most of what you need in your pantry, and Butterfinger bars are easy to find.
- Perfect for Every Occasion: Ideal for parties, after-school snacks, birthday celebrations, or as a fun treat for movie night. I’ve even packed it into little baggies for road trips!
- Crowd-Pleaser: This Butterfinger Puppy Chow disappears faster than you can say “snack time!” Kids and adults alike can’t resist grabbing handful after handful.
- Unbelievably Delicious: Crispy cereal covered in a rich chocolate-peanut butter coating, then tossed with real Butterfinger bits and powdered sugar—enough said.
What sets this Butterfinger Puppy Chow recipe apart? It’s not just regular puppy chow with some candy thrown in. By melting Butterfinger bars into the coating itself, you get that signature flavor in every bite—not just as an afterthought. I even pulse extra Butterfinger bits and sprinkle them over the top for that “wow” factor. The result? A snack that’s crunchy, sweet, a little salty, and totally addictive.
If you’re someone who loves the combo of chocolate and peanut butter, this recipe will hit the spot. It’s the kind of treat that makes you smile (and maybe hide the bowl so you don’t have to share). Whether you’re new to puppy chow or a lifelong fan, this twist will become your new favorite. There’s just something about the nostalgia of Butterfinger bars that takes me right back to childhood, but with a homemade, snackable spin. And honestly, you don’t even need a reason to make it—sometimes, fun snacks are reason enough!
What Ingredients You Will Need
This recipe uses simple, everyday ingredients to deliver bold Butterfinger flavor with minimal fuss. You won’t need anything outlandish—just a handful of pantry staples and a few Butterfinger bars. Here’s what you’ll need for the perfect batch of Butterfinger Puppy Chow:
- Chex Cereal (Rice or Corn, 6 cups/150g) – The classic base. I use rice Chex for a lighter crunch, but corn works too.
- Butterfinger Candy Bars (4 regular-size bars, about 2.1oz/60g each) – You’ll melt some into the coating and chop extra for topping. I like using fresh bars for maximum crunch (fun-size bars work in a pinch).
- Semi-Sweet Chocolate Chips (1 cup/175g) – Provides that rich, chocolatey coating. Milk chocolate chips can be swapped if you prefer a sweeter finish.
- Creamy Peanut Butter (1/2 cup/120g) – Brings the classic puppy chow taste and helps the coating stick. I recommend a no-stir peanut butter like Jif or Skippy for best results.
- Unsalted Butter (2 tablespoons/28g) – Adds silkiness and flavor to the chocolate mixture.
- Vanilla Extract (1 teaspoon/5ml) – For a touch of warmth and depth (optional, but I usually add it).
- Powdered Sugar (1.5 cups/180g, plus more as needed) – Gives that classic frosted puppy chow look and taste. Sift if yours is lumpy.
Optional Add-ins & Substitutions:
- If you need this to be gluten-free, double-check your cereal and candy bar labels to be safe.
- For a dairy-free version, use vegan chocolate chips and a dairy-free butter alternative. The Butterfinger bars themselves now use a new formula without milk, but always check the packaging.
- Swap in almond butter or sunflower seed butter if you have peanut allergies in the house (it alters the flavor but still tastes great!).
- If you want extra crunch, toss in a handful of mini pretzels or roasted peanuts at the end.
I usually grab Chex cereal and Butterfinger bars at my local grocery store, but you can order them online too. For the chocolate coating, I stick with Ghirardelli or Nestlé Toll House chips—they melt so smoothly. And don’t be afraid to experiment! That’s half the fun. If you’re making these for a special event, you can even stir in colored sprinkles with the powdered sugar for a festive touch.
Equipment Needed
- Large Mixing Bowl: You’ll need plenty of space to toss everything together. I use my biggest bowl to avoid spills.
- Microwave-Safe Bowl: For melting chocolate, peanut butter, butter, and Butterfinger bars. A sturdy glass bowl works best.
- Rubber Spatula or Wooden Spoon: For gently folding the cereal into the chocolate mixture. Rubber spatulas make it easier to scrape every last bit out.
- Measuring Cups & Spoons: For accuracy! Don’t eyeball the chocolate or peanut butter—those ratios matter.
- Zip-Top Bag or Large Paper Bag: This is my favorite trick for dusting the puppy chow with powdered sugar. You can also use a big Tupperware container with a lid.
- Knife and Cutting Board: For chopping up those Butterfinger bars. A sharp chef’s knife makes quick work of it.
- Baking Sheet (optional): If you want to let the finished puppy chow cool in a single layer, this helps prevent clumping.
If you don’t have a microwave, you can use a double boiler on the stovetop to melt everything together. And if you’re short on bowls, just wash and reuse as you go. I’ve made this with dollar-store measuring cups and thrifted bowls—no need for anything fancy. Just make sure everything is dry before tossing in the cereal, or you’ll end up with soggy puppy chow (not fun!).
How to Make Butterfinger Puppy Chow – Step-by-Step
-
Prep the Ingredients:
- Measure out 6 cups (150g) Chex cereal and place in a large mixing bowl. Set aside.
- Chop 2 Butterfinger bars (about 4.2oz/120g) into small bits for mixing into the coating. Chop the remaining 2 bars for topping.
-
Melt the Coating:
- In a microwave-safe bowl, combine 1 cup (175g) semi-sweet chocolate chips, 1/2 cup (120g) creamy peanut butter, 2 tablespoons (28g) unsalted butter, and half your chopped Butterfinger bits.
- Microwave in 30-second intervals, stirring in between, until smooth and fully melted (about 1.5 to 2 minutes total). Watch closely so it doesn’t scorch—microwaves vary!
- Remove from microwave and stir in 1 teaspoon (5ml) vanilla extract if using.
- Troubleshooting tip: If the mixture looks grainy, add a tiny splash of milk and stir vigorously.
-
Coat the Cereal:
- Pour the melted chocolate-Butterfinger mixture over the Chex cereal.
- Using a rubber spatula, gently fold until every piece is coated. Be patient—this can take a minute or two. Try not to crush the cereal.
- Sensory cue: The cereal should look glossy and smell like pure peanut-butter-chocolate heaven!
-
Add the Powdered Sugar:
- Transfer the coated cereal into a large zip-top bag or paper bag.
- Add 1.5 cups (180g) powdered sugar, seal the bag, and shake until evenly coated. The cereal should look powdery and white, not wet or clumpy.
- If needed, add a bit more powdered sugar and shake again for full coverage.
-
Finish with Extra Butterfinger:
- Spread the puppy chow onto a baking sheet or parchment paper in a single layer (if you’re feeling fancy).
- While still slightly warm, sprinkle the reserved chopped Butterfinger bars over the top. Gently toss if you want even distribution.
- Let cool for about 10 minutes to set the coating.
-
Serve and Store:
- Once cooled, transfer to a serving bowl or airtight container.
- Enjoy immediately or store for later snack attacks!
Pro tip: Don’t rush the mixing step—if you stir too fast, you’ll break the cereal. And trust me, using a bag to shake on the sugar makes cleanup a breeze. If you notice the coating isn’t sticking, your cereal may have been wet—always use dry utensils and bowls for best results!
Cooking Tips & Techniques
- Even Coating: The key to perfect Butterfinger Puppy Chow is getting the chocolate and peanut butter mixture to cover every piece. Pour slowly and fold gently—don’t just dump it all at once.
- Don’t Overheat: Chocolate chips and Butterfinger bits can scorch quickly in the microwave. Go low and slow, stirring after each interval. If you see any burning, start over—it’ll taste bitter.
- Bag Vs. Bowl: Shaking in a zip-top bag or paper bag ensures less mess and better sugar coverage. I once tried tossing in a mixing bowl, and half the sugar ended up on my kitchen floor!
- Keep It Crunchy: Let the finished mix cool in a single layer before sealing in a container. Trapped steam = soggy puppy chow (learned that the hard way, oops).
- Layer the Flavors: Melting Butterfinger bars into the coating, rather than just sprinkling on top, guarantees that signature flavor throughout. Don’t skip this step!
From experience, multitasking helps—while the chocolate mixture melts, I chop the Butterfinger bars and measure out the cereal. And don’t forget to taste along the way (quality control is important!). If your puppy chow looks dull, add a bit more powdered sugar and shake again. It should look snowy and irresistible.
Variations & Adaptations
- Peanut-Free Option: Swap in almond butter or sunflower seed butter instead of peanut butter. You’ll get a different, but still tasty, result.
- Gluten-Free Version: Use gluten-free Chex cereal and double-check your Butterfinger bars (they’re generally gluten-free, but always check!).
- Seasonal Add-Ons: Stir in colorful sprinkles for birthdays, mini marshmallows for a s’mores vibe, or crushed pretzels for extra crunch.
- Dairy-Free Swap: Choose dairy-free chocolate chips and a plant-based butter. The taste stays spot on!
- Different Candy Bars: Out of Butterfingers? Try using chopped Reese’s, Snickers, or Milky Way bars for fun flavor twists.
One time I added a handful of M&Ms for a pop of color, and it was a huge hit at my son’s school bake sale. This Butterfinger Puppy Chow recipe is super flexible—let your taste buds lead the way. If you’re feeling bold, try a spicy version with a pinch of cayenne in the coating. I promise, it’s not as weird as it sounds!
Serving & Storage Suggestions
Serving: Butterfinger Puppy Chow is best served at room temperature in a big bowl with a scoop (for portion control, sort of). For parties, I portion it into cute cupcake liners or mini treat bags—Pinterest-worthy and practical! It’s a great addition to dessert bars or snack tables.
Pairings: This snack goes perfectly with cold milk, hot cocoa, or your favorite coffee. For kids’ parties, serve with fruit kabobs or popcorn for a mix-and-match snack board.
Storage: Store puppy chow in an airtight container at room temperature for up to 5 days. If you want it to last longer, pop it in the fridge (up to 2 weeks) or freezer (up to 2 months). Just let it come to room temp before serving for best texture.
Reheating: No need to reheat! If it clumps together after chilling, just break it apart gently with your hands. The flavors actually deepen after a day or two—if you can resist eating it all right away.
Nutritional Information & Benefits
This Butterfinger Puppy Chow recipe is definitely a sweet treat, but you can make it fit your needs. Each 1/2 cup serving (about 40g) contains roughly 220 calories, 9g fat, 34g carbs, and 3g protein. The peanut butter provides a bit of protein and healthy fats, while the cereal adds some whole-grain crunch. If you’re gluten-free or need nut-free options, those swaps are simple.
Butterfinger bars contain peanuts and may have traces of milk and soy, so always check labels if allergies are a concern. For a lighter version, you can reduce the powdered sugar or use a lower-sugar cereal. I love that this treat can be adjusted for different diets and occasions—plus, the portion size is easy to control (if you have willpower!).
Conclusion
There’s something magical about a homemade snack that’s easy, fun, and totally delicious. This Butterfinger Puppy Chow recipe checks all the boxes: quick to make, packed with nostalgic flavor, and guaranteed to put smiles on faces. I love how simple it is to customize—switch up the candies, make it allergy-friendly, or just enjoy it as-is. Honestly, it never lasts long at my house!
If you’re looking for a snack that everyone will rave about, give this recipe a try. Don’t be afraid to get creative—add your own twist and see what you love best. I’d love to hear how your Butterfinger Puppy Chow turns out! Drop a comment below, share your photos on Pinterest, or let me know your favorite variation. Happy snacking—may your bowl always be full (for at least five minutes)!
FAQs – Butterfinger Puppy Chow Recipe
Can I make Butterfinger Puppy Chow ahead of time?
Absolutely! It actually tastes even better after a day, as the flavors meld together. Store in an airtight container at room temp or in the fridge for longer freshness.
Do I need to use Chex cereal, or can I use another type?
Chex is classic, but Crispex or similar plain crispy cereals work well too. Avoid cereals with strong flavors or coatings, as they can overpower the Butterfinger taste.
Can I melt everything on the stovetop instead of the microwave?
Yes! Use a double boiler or a heatproof bowl over simmering water to gently melt the chocolate, peanut butter, butter, and Butterfinger bits. Stir often to prevent scorching.
How do I keep the puppy chow from getting soggy?
Make sure your cereal, bowls, and utensils are completely dry before you start. Let the finished puppy chow cool in a single layer before sealing it up.
Are there any common allergens in this recipe?
Yes, Butterfinger bars contain peanuts and may have traces of milk and soy. Chex cereal is usually gluten-free, but always read labels if you have allergies or sensitivities.
Pin This Recipe!
Butterfinger Puppy Chow

This quick and easy Butterfinger Puppy Chow is a sweet, crunchy snack packed with chocolate, peanut butter, and real Butterfinger candy bar flavor. Perfect for parties, movie nights, or anytime you need a fun, shareable treat that both kids and adults love.
- Prep Time: 10 minutes
- Cook Time: 2 minutes
- Total Time: 15 minutes
- Yield: 10 servings 1x
- Category: Snack
- Cuisine: American
Ingredients
- 6 cups Chex cereal (rice or corn)
- 4 regular-size Butterfinger candy bars (about 2.1 oz each)
- 1 cup semi-sweet chocolate chips
- 1/2 cup creamy peanut butter
- 2 tablespoons unsalted butter
- 1 teaspoon vanilla extract (optional)
- 1.5 cups powdered sugar (plus more as needed)
Instructions
- Measure out 6 cups Chex cereal and place in a large mixing bowl. Set aside.
- Chop 2 Butterfinger bars into small bits for mixing into the coating. Chop the remaining 2 bars for topping.
- In a microwave-safe bowl, combine chocolate chips, peanut butter, unsalted butter, and half the chopped Butterfinger bits.
- Microwave in 30-second intervals, stirring in between, until smooth and fully melted (about 1.5 to 2 minutes total).
- Remove from microwave and stir in vanilla extract if using.
- Pour the melted chocolate-Butterfinger mixture over the Chex cereal.
- Gently fold with a rubber spatula until every piece is coated.
- Transfer the coated cereal into a large zip-top bag or paper bag.
- Add powdered sugar, seal the bag, and shake until evenly coated. Add more powdered sugar if needed.
- Spread the puppy chow onto a baking sheet or parchment paper in a single layer.
- While still slightly warm, sprinkle the reserved chopped Butterfinger bars over the top. Gently toss if desired.
- Let cool for about 10 minutes to set the coating.
- Once cooled, transfer to a serving bowl or airtight container. Enjoy immediately or store for later.
Notes
For gluten-free, use gluten-free Chex and check Butterfinger labels. For dairy-free, use vegan chocolate chips and plant-based butter. Stir gently to avoid crushing cereal. Let cool in a single layer to keep it crunchy. Store in an airtight container at room temperature for up to 5 days, or refrigerate/freeze for longer storage.
Nutrition
- Serving Size: 1/2 cup (about 40g)
- Calories: 220
- Sugar: 18
- Sodium: 110
- Fat: 9
- Saturated Fat: 4
- Carbohydrates: 34
- Fiber: 1
- Protein: 3
Keywords: Butterfinger puppy chow, muddy buddies, snack mix, chocolate peanut butter, party snack, easy dessert, kid friendly, no bake, gluten free option