“You won’t believe how simple this came together,” my friend Lisa said as she handed me a bowl brimming with layers of sweet berries and fluffy cake. It was a lazy Sunday afternoon, and I was visiting her cozy kitchen cluttered with mismatched mugs and a faint scent of vanilla. Honestly, I wasn’t expecting much from her ‘light berry trifle with angel food cake’—I mean, trifle sounds fancy, right? But what caught me off guard was how effortlessly fresh and satisfying it was.
That day, I learned that you don’t need to spend hours baking or fuss over complicated steps to impress with dessert. Lisa whipped this up using store-bought angel food cake and a handful of fresh berries she picked up at the local farmer’s market that morning. The best part? It’s a no-bake dessert, which means less time in the kitchen and more time enjoying the company (and the sweet treat!).
Maybe you’ve been there—wanting something light, fruity, and just a little indulgent without the heaviness of traditional cakes. This light berry trifle with angel food cake hits that sweet spot. I remember almost forgetting one of the berry layers and had to sneak back to finish it off while Lisa laughed at my absentmindedness. It’s these imperfect moments in the kitchen that make recipes feel like stories, don’t they? Since then, this trifle has become my go-to for summer gatherings and last-minute dinner parties. It’s fresh, colorful, and honestly, the kind of dessert that makes you close your eyes and savor every spoonful.
Why You’ll Love This Recipe
After a few rounds of testing and tweaking, this light berry trifle with angel food cake became a standout in my dessert repertoire. It’s not just about the layers of color and texture; it’s about delivering a refreshing balance that feels like a treat without weighing you down.
- Quick & Easy: Comes together in under 20 minutes, perfect for busy weeknights or impromptu get-togethers.
- Simple Ingredients: No need to hunt down exotic items; angel food cake and fresh berries are easy to find year-round.
- Perfect for Summer: Light and fruity, it’s an ideal dessert for warm-weather meals or picnics.
- Crowd-Pleaser: Kids and adults alike rave about the airy cake paired with juicy berries and creamy layers.
- Unbelievably Delicious: The combination of sweet, tart, and fluffy textures is genuinely comforting.
What sets this recipe apart is the use of angel food cake—it’s naturally low in fat and adds a delicate sweetness without overpowering the berries. Plus, no baking means no worry about overcooking or drying out the cake. The whipped cream layer is lightly sweetened to keep things balanced, making it a guilt-free indulgence that’s just as satisfying as heavier desserts.
Honestly, it’s the kind of dessert that feels like a little celebration in every bite, whether you’re winding down after a hectic day or sharing laughs around a summer table. You might find yourself making it more often than you planned—trust me, I’ve been there!
What Ingredients You Will Need
This recipe uses simple, wholesome ingredients that come together to create a fresh and inviting dessert without any fuss. Most are pantry staples or easily found at your local grocery store, and you can swap some components to fit your preferences or dietary needs.
- Angel food cake: 1 store-bought or homemade, about 10 ounces (280 grams), torn into bite-sized pieces (I prefer brands like Driscoll’s for consistent texture).
- Fresh mixed berries: 3 cups (450 grams) total – a mix of strawberries (hulled and sliced), blueberries, raspberries, and blackberries (seasonal variations work well; in winter, frozen berries can substitute).
- Heavy whipping cream: 1 cup (240 ml), chilled (for fluffy, stable whipped cream).
- Powdered sugar: 2 tablespoons (25 grams), to lightly sweeten the cream.
- Vanilla extract: 1 teaspoon (5 ml), for a warm, aromatic touch.
- Fresh lemon juice: 1 tablespoon (15 ml), to brighten the berry flavor.
- Optional: 2 tablespoons (30 ml) of berry liqueur or fruit juice for soaking the cake pieces (adds a little zing if you’re feeling fancy).
You can easily swap the heavy cream with coconut cream for a dairy-free option. When picking berries, aim for firm, ripe fruits without bruises to keep the trifle visually appealing and tasty. I once tried substituting angel food cake with sponge cake, but the lightness was missing—angel food cake really is the secret to that airy texture.
Equipment Needed
- Mixing bowl: For whipping the cream comfortably.
- Electric mixer or whisk: An electric hand mixer makes whipping cream much faster, but a sturdy whisk works too (prepare for an arm workout!).
- Measuring cups and spoons: For precise ingredient amounts.
- Trifle bowl or clear glass serving dish: To showcase the beautiful layers. A 2-quart (1.9 L) capacity is ideal.
- Spatula or spoon: For folding and layering.
If you don’t have a trifle bowl, a large glass bowl or even individual clear cups work great to show off those colorful layers. I recommend investing in a silicone spatula; it makes folding the whipped cream gentler and easier, preserving that light texture. For cleaning, hand wash your mixer beaters promptly to avoid hardened cream.
Preparation Method
- Prepare the berries: In a medium bowl, gently toss the mixed berries with fresh lemon juice and, if using, the berry liqueur or fruit juice. Let them sit while you prepare the other components, about 10 minutes. This helps the flavors meld and the berries release some natural juices.
- Whip the cream: Pour the chilled heavy cream into a large mixing bowl. Add powdered sugar and vanilla extract. Using an electric mixer or whisk, beat on medium-high speed until soft peaks form, about 3-5 minutes. Be careful not to overwhip—stop as soon as the cream holds shape but still looks smooth and light.
- Break up the angel food cake: Tear or cut the angel food cake into bite-sized pieces, roughly 1 to 1.5 inches (2.5 to 4 cm). If you want, lightly drizzle the cake pieces with some of the berry juice from the berry mixture to keep them moist. Let them soak for 2-3 minutes but not too long or they’ll get soggy.
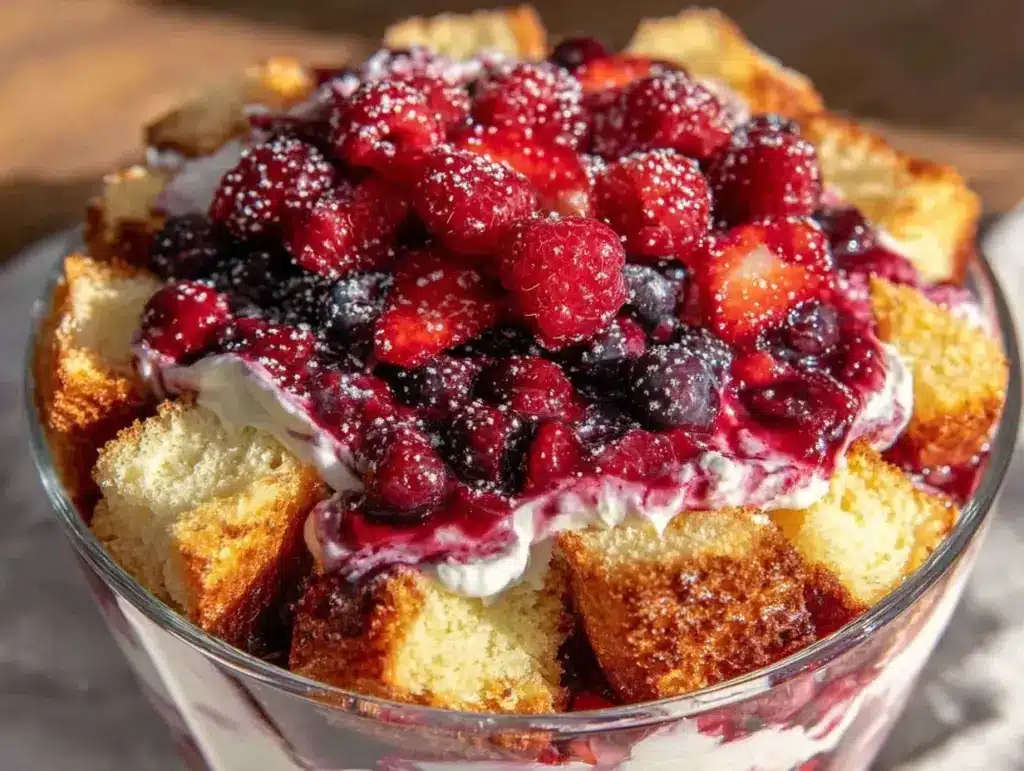
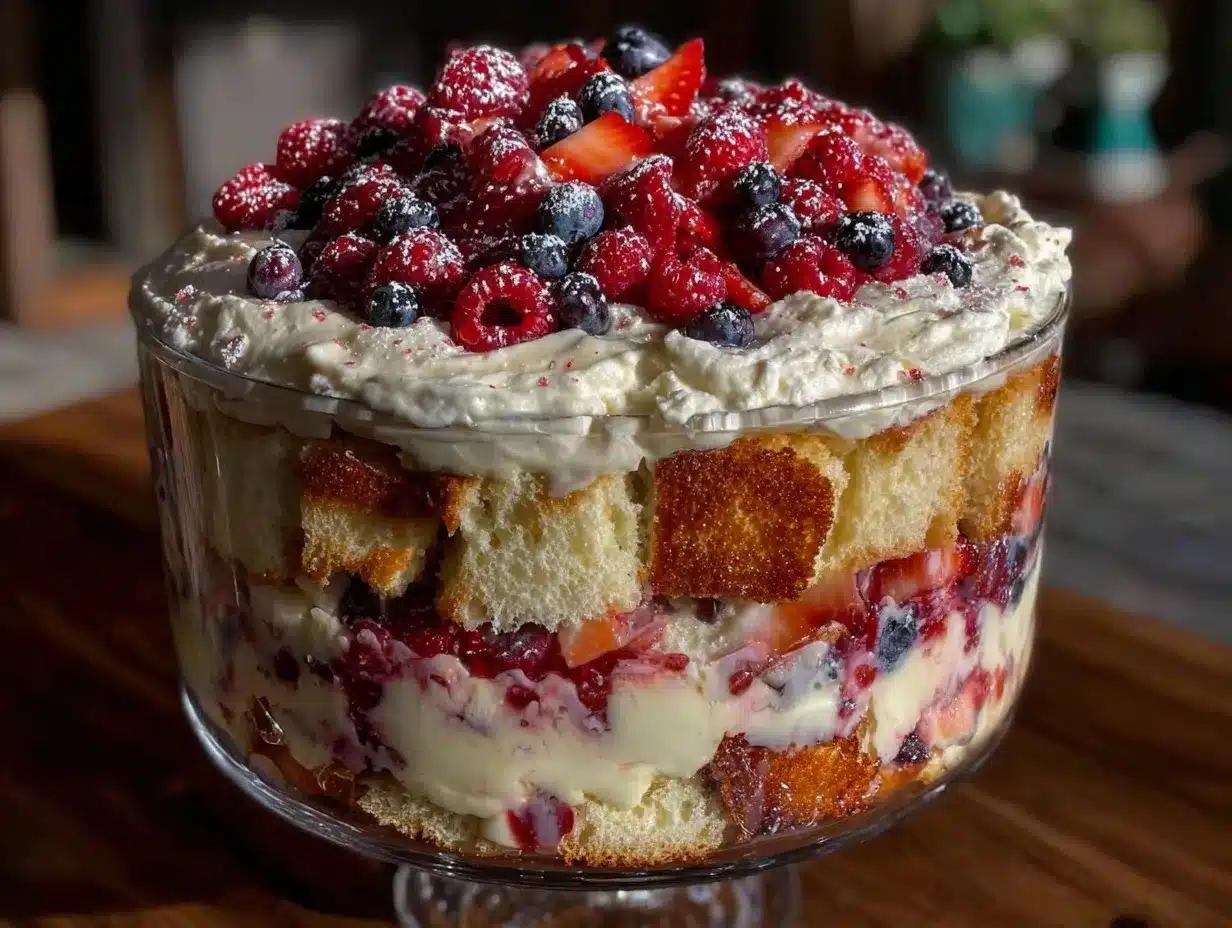
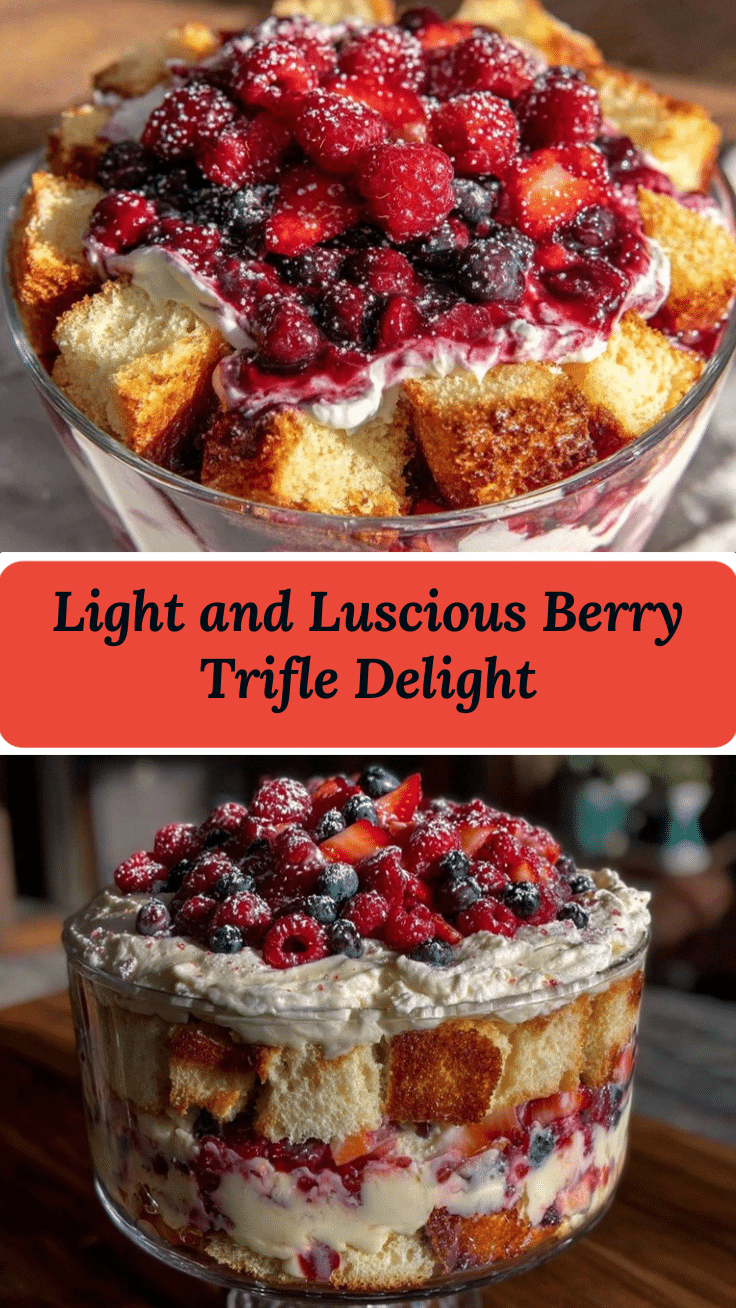
- Assemble the trifle: In your trifle bowl, start with a layer of angel food cake pieces, spreading evenly at the bottom. Next, spoon a layer of the berry mixture, making sure to include some of the juice. Then add a generous layer of whipped cream, spreading gently with a spatula.
- Repeat layering: Continue layering cake, berries, and whipped cream until all ingredients are used, finishing with a whipped cream layer on top. You should have about 3 layers total depending on your bowl size.
- Garnish and chill: Garnish the top with a few whole berries or a sprig of fresh mint for color. Cover and refrigerate the trifle for at least 2 hours before serving to let the flavors meld and the cake soften slightly.
- Serve: Use a large spoon to scoop out portions, making sure each serving has all the layers represented. Enjoy immediately for the best texture—though leftovers keep well in the fridge for 1-2 days.
Pro tip: If you notice the whipped cream starting to separate during assembly, just give it a gentle fold with your spatula to bring it back together. I once had my mixer battery die mid-whip (classic!), so I finished by hand—it took longer but made me appreciate the fluffy texture even more.
Cooking Tips & Techniques
Whipping cream might sound straightforward, but it’s a bit of a balancing act. Here’s what I’ve learned:
- Keep everything cold: Chill your bowl and beaters in the fridge for 10-15 minutes before whipping. This helps the cream thicken faster and hold its shape better.
- Don’t overwhip: If you go too far, the cream turns grainy and then into butter. Stop when you see soft peaks—that’s when it gently holds shape but still looks smooth.
- Layer gently: When assembling, fold the whipped cream carefully to maintain airiness. Rough mixing deflates the cream, making the trifle dense.
- Berry prep matters: Using fresh lemon juice brightens the berries and keeps them vibrant. Avoid stirring too much to prevent mushiness.
- Angel food cake texture: Tear the cake instead of slicing for a rustic look and better absorption of berry juices.
I once tried chopping the cake into perfect cubes and ended up with a very formal but less tasty dessert—torn pieces soak up juices better and feel more homemade. Also, don’t skip the chilling step; it’s key for flavors to blend and the trifle to set properly.
Variations & Adaptations
- Dairy-free option: Swap heavy cream for coconut cream whipped with a little powdered sugar and vanilla. Use dairy-free angel food cake or a light sponge cake alternative.
- Seasonal twists: In fall, use roasted pears and cinnamon-spiced whipped cream instead of berries. For winter, try pomegranate seeds and orange zest for a festive flair.
- Flavor boosts: Add a layer of lemon curd or mascarpone cheese mixed with a touch of honey for a richer trifle. I tried a lavender-infused whipped cream once, and it was surprisingly delightful!
- Gluten-free: Use a gluten-free angel food cake or substitute with gluten-free sponge cake to keep it safe for sensitive diners.
If you want to switch up the texture, try layering crushed graham crackers or toasted almonds for crunch. I like to experiment with these little touches depending on the occasion.
Serving & Storage Suggestions
Serve this light berry trifle chilled, straight from the fridge. The contrast between the cool, creamy layers and the juicy berries is incredibly refreshing. Present it in a clear glass trifle bowl or individual clear cups to show off those pretty layers—it always gets a few “wow”s from guests.
Pair it with a cup of hot herbal tea or a sparkling rosé for a light celebration. For something non-alcoholic, a berry-infused sparkling water works beautifully.
To store, cover the trifle tightly with plastic wrap or a lid and refrigerate for up to 2 days. The cake will soften over time, which some folks love because it feels more pudding-like, but if you prefer a bit of texture, enjoy it within the first day.
Reheat is not recommended since it’s best enjoyed cold, but if you want to serve it slightly less chilled, let it sit at room temperature for 10-15 minutes before serving.
Nutritional Information & Benefits
This light berry trifle with angel food cake is a relatively low-calorie dessert compared to traditional cakes and heavy cream-based sweets. Angel food cake is naturally low in fat and calories, made primarily from egg whites and sugar, making it an airy base. Fresh berries contribute antioxidants, vitamins (especially vitamin C), and dietary fiber.
Estimated nutrition per serving (based on 8 servings): approximately 180 calories, 5g fat, 28g carbohydrates, and 3g protein.
Because it’s light and made with fresh fruit, it’s a great option for those watching their calorie intake or craving a sweet treat that doesn’t feel overwhelming. If using coconut cream, it adds healthy fats and a dairy-free alternative, while still keeping the trifle luscious.
Note: Contains eggs (in angel food cake) and dairy unless substituted.
Conclusion
This light berry trifle with angel food cake is a simple, charming dessert that manages to feel special without demanding hours in the kitchen. It’s a recipe that’s perfect for sharing, whether for a casual family dinner or a sunny weekend gathering. I love how it combines fresh, wholesome ingredients with a fluffy, melt-in-your-mouth cake that everyone seems to enjoy.
Feel free to make it your own—swap berries, add herbs like mint, or sneak in your favorite liqueurs. I can’t wait to hear how you personalize it!
If you try this recipe, drop a comment or share your tweaks. It’s always a joy to see how a simple dessert turns into a family favorite or a new tradition. Happy trifle making!
FAQs
Can I make this light berry trifle ahead of time?
Absolutely! It tastes even better after chilling for a few hours or overnight. Just be aware the cake will soften more over time.
What can I use if I can’t find angel food cake?
Light sponge cake or chiffon cake works as a substitute, but angel food cake’s airy texture is ideal for the lightness of this dessert.
How do I keep the whipped cream from deflating when layering?
Fold the whipped cream gently using a spatula instead of stirring vigorously. Also, keep the cream cold until assembly.
Can I use frozen berries instead of fresh?
Yes, just thaw and drain excess liquid to avoid making the trifle too watery.
Is this recipe suitable for gluten-free diets?
Only if you use a gluten-free angel food or sponge cake. Otherwise, it contains gluten from the cake.
Pin This Recipe!
Light Berry Trifle with Angel Food Cake

A quick and easy no-bake dessert featuring layers of airy angel food cake, fresh mixed berries, and lightly sweetened whipped cream. Perfect for summer gatherings and light indulgence.
- Prep Time: 15 minutes
- Cook Time: 0 minutes
- Total Time: 2 hours 15 minutes
- Yield: 8 servings 1x
- Category: Dessert
- Cuisine: American
Ingredients
- 1 store-bought or homemade angel food cake (about 10 ounces / 280 grams), torn into bite-sized pieces
- 3 cups (450 grams) fresh mixed berries (strawberries hulled and sliced, blueberries, raspberries, blackberries)
- 1 cup (240 ml) heavy whipping cream, chilled
- 2 tablespoons (25 grams) powdered sugar
- 1 teaspoon (5 ml) vanilla extract
- 1 tablespoon (15 ml) fresh lemon juice
- Optional: 2 tablespoons (30 ml) berry liqueur or fruit juice for soaking the cake pieces
Instructions
- Prepare the berries: In a medium bowl, gently toss the mixed berries with fresh lemon juice and, if using, the berry liqueur or fruit juice. Let them sit for about 10 minutes to meld flavors and release juices.
- Whip the cream: Pour the chilled heavy cream into a large mixing bowl. Add powdered sugar and vanilla extract. Beat on medium-high speed with an electric mixer or whisk until soft peaks form, about 3-5 minutes. Stop before overwhipping.
- Break up the angel food cake: Tear or cut the cake into bite-sized pieces (1 to 1.5 inches). Lightly drizzle with some berry juice if desired and let soak for 2-3 minutes.
- Assemble the trifle: In a trifle bowl, layer angel food cake pieces evenly at the bottom, followed by a layer of berry mixture including some juice, then a generous layer of whipped cream. Spread gently with a spatula.
- Repeat layering cake, berries, and whipped cream until all ingredients are used, finishing with a whipped cream layer on top (about 3 layers total).
- Garnish the top with whole berries or a sprig of fresh mint. Cover and refrigerate for at least 2 hours before serving.
- Serve: Scoop portions ensuring all layers are included. Enjoy immediately for best texture. Store leftovers covered in the fridge for 1-2 days.
Notes
Keep all ingredients cold for best whipped cream texture. Do not overwhip cream to avoid graininess. Tear cake pieces instead of slicing for better juice absorption. Chill trifle at least 2 hours before serving. Leftovers keep well for 1-2 days refrigerated. For dairy-free option, substitute heavy cream with coconut cream and use dairy-free cake. Frozen berries can be used if thawed and drained.
Nutrition
- Serving Size: 1/8 of the trifle bo
- Calories: 180
- Fat: 5
- Carbohydrates: 28
- Protein: 3
Keywords: berry trifle, angel food cake, no-bake dessert, summer dessert, light dessert, easy dessert, fresh berries, whipped cream